
📘 ABP Transport Booking — Documentation v1.0.4
Free + PRO user guide — setup, configuration, booking workflow, orders, global data, shortcodes and templates.
🚀 Getting Started
Thank you for choosing ABP Transport Booking. This documentation is designed to help you get started with the plugin and understand its features, configuration options, and booking workflow. Please review it carefully to learn how to configure and use the plugin effectively.
📄 Document information
- Version — 1.0.4
- Author — ABPTEAM
- Created — 14 August 2026
- Last Updated — 05 September 2026
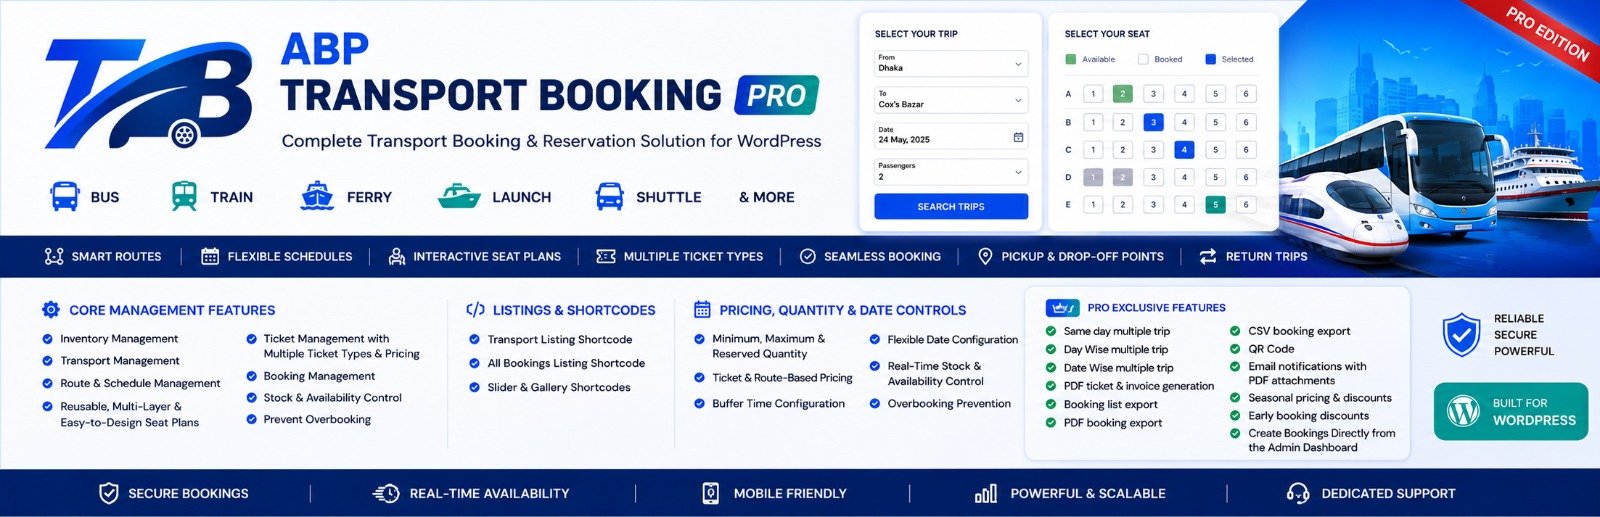
⬇️ Installation & Setup
Install the free plugin from the WordPress repository (or upload the ZIP), then — if you own a license — upload ABP Transport Booking PRO on top of it. Follow the steps below in order: each step builds on the one before it.
- Install and activate WooCommerce first — both plugins depend on it.
- Check your server: WordPress 6.0+, PHP 7.4+, MySQL 5.7+, WooCommerce 8.0+.
- Take a backup of your site before installing anything new.
🆓 Step 1 — Install the Free Plugin (from WordPress.org)
Pick one method. The easiest way is to install directly from the WordPress repository:
- Go to Plugins → Add New Plugin in the admin dashboard.
- Type "ABP Transport Booking" in the search box and press Enter.
- Click Install Now on the ABP Transport Booking plugin card.
- Click Activate when the installation finishes.
📦 Step 2 — Install by Uploading a ZIP (for free or PRO)
If you have the ZIP file locally (downloaded from your account on abp-team.com), use the upload method instead:
- Go to Plugins → Add New Plugin.
- Click the Upload Plugin button at the top.
- Choose the
.zipfile and click Install Now. - Click Activate Plugin to make it live.
⭐ Step 3 — Install & Activate PRO (only if you own a license)
The PRO plugin does not work alone — it needs the free plugin and WooCommerce to be active first. Follow this exact order:
- Make sure WooCommerce and ABP Transport Booking (free) are installed and active.
- Upload and activate the abp-transport-booking-pro.zip file using the upload method in the previous step.
- Open the new ABP Transport Booking menu in the admin sidebar → go to the License tab.
- Paste your license key (sent to your e-mail / visible in your account) and click Activate License. Wait for the status to show Active.
- If the plugin asks to install the ABP PDF Tools (needed for PDF tickets), click Install and wait for it to finish.
🔧 Step 4 — First-time Setup (same for free & PRO)
After the plugins are active, configure them in this order so everything has the data it needs:
- Go to ABP Transport Booking → Configuration and set the transport label, store name and general settings.
- Go to Global Data → Dates and set the global date format, buffer and advance-booking window.
- Create reusable Stops / Locations (Global Data) — boarding and drop-off points.
- Create Ticket types and/or Seat plans under Ticket/Seat Plan that the transports will reuse.
- Open Lists → Add New to create your first transport.
- Inside the transport editor fill in General → Route → Price → Date → Time → Ticket in order (the tabs run left to right).
- Publish the transport and place a test booking through the WooCommerce checkout to confirm tickets and seats work.
- (PRO) Return to Configuration → PDF to set the ticket logo, colors and download permissions.
✨ Features
ABP Transport Booking provides a powerful and flexible passenger transport booking system designed for managing transports, routes, schedules, tickets, seats, bookings, and passengers from a single platform. It includes the essential tools required to manage modern bus, ferry, launch, shuttle, coach, van, minibus, and other passenger transport services.
The cards below group every feature of the plugin. Overarching capabilities such as the all-in-one transport booking dashboard and the transport management system apply across the whole plugin, while additional capabilities — marked PRO — are available in the paid version.
Core System
Top-level capabilities shared by the entire platform:
- All-in-one transport booking dashboard
- Transport management system
Transport Management
- Create, edit, clone, view, and delete transports
- Manage transport information and configurations
- Transport list with pagination
- Related transport display
Route & Schedule Management
- Route management
- Boarding and drop-off stop management
- Multiple pickup points
- Multiple drop-off points
- Boarding and drop-off stop types
- Route direction configuration
- Date-wise schedules
- Travel time configuration
- Dynamic intermediate route allocation
One-Way & Return Trip Booking
- One-way trip booking
- Return trip booking
- Return booking using the same transport
- Return route configuration
- Return trip pricing and schedule configuration
Global Ticket Type Management
- Create reusable ticket types
- Assign ticket types to seat plans
- Ticket name, color, icon/image, and prefix configuration
- Reuse ticket types across multiple transports
Reusable Seat Plan System
- Create reusable global seat plans
- Assign seat plans to multiple transports
- Reuse the same seat plan multiple times within one transport
- Multi-layer seat plan support
- Clone, edit, view, and delete seat plans
Advanced Seat Plan Designer
- Drag-and-drop seat positioning
- Automatic seat numbering
- Custom seat labels and prefixes
- Dynamic ticket type assignment
- Custom seat cells and text
- Flexible rows and columns
- Adjustable cell dimensions
- Adjustable spacing and gaps
- Multiple layout configurations
- Background and visual customization
- Decor item support
Real-Time Seat Reservation
- Display available seats
- Display booked and sold seat status
- Interactive seat selection
- Ticket-type based seating
- Multi-layer seat availability
Flexible Pricing & Quantity Control
- Dynamic price calculation
- Ticket and seat-based pricing
- Minimum quantity configuration
- Maximum quantity configuration
- Reserved quantity support
- Return trip pricing configuration
Availability Management
- Date-wise availability
- Schedule-based availability
- Weekend availability controls
- Special date configuration
- Off-date configuration
- Availability override options
Passenger Information Forms
- Global passenger forms
- Transport-specific passenger forms
- Custom passenger fields
- Passenger information collection during booking
Additional Services
- Global additional services
- Transport-specific services
- Optional service selection
- Service pricing
Global Reusable Configuration
Reusable data types defined once and shared across transports:
- Global ticket types
- Global seat plans
- Global stops
- Global categories
- Global organizers
- Global brands
- Global features
- Global additional services
- Global passenger forms
- Global FAQs
- Global Terms & Conditions
Global & Transport-Specific Configuration
- Import global configuration
- Customize imported configuration for individual transports
- Global feature enable/disable controls
Booking & Order Management
- Filter bookings and orders
- Paginated booking/order list
- Detailed booking information
- Passenger information
- Ticket and seat information
- Order cancellation
- WooCommerce order integration
Frontend Booking Experience
- Transport listing pages
- Search and filtering
- Transport details
- Route and stop information
- Schedule information
- Travel date selection
- Return date selection
- Ticket type selection
- Seat selection
- Passenger information
- Additional service selection
- Dynamic pricing
- WooCommerce checkout
- Responsive booking interface
Frontend Taxonomy Filter Bar
- Category filter dropdown with an on/off toggle
- Brand filter dropdown with an on/off toggle
- Organizer filter dropdown with an on/off toggle
- Location (stop) filter dropdown with an on/off toggle
- Filters appear as a toolbar above the transport listing
- Each filter can be independently enabled or disabled
- Works with the [abptb-booking] and [abptb-post] shortcodes
Customer My Account Page
- "Transport Bookings" section inside the WooCommerce My Account page
- Lists the logged-in customer's own bookings only
- Paginated bookings list
- Shows booking status and details
- Login required to view bookings
FAQ & Terms and Conditions
- Global FAQ configuration
- Transport-specific FAQ configuration
- Global Terms & Conditions
- Transport-specific Terms & Conditions
- Import and customize global configuration
WooCommerce Integration
- WooCommerce checkout integration
- WooCommerce payment gateway support
- WooCommerce order management
- WooCommerce tax and coupon support
Transport Listings & Shortcodes
- Transport listing shortcode
- Booking shortcode
- Passenger PDF download shortcode (PRO)
- Transport gallery shortcode
- Search and filtering
- Multiple layout styles
Responsive & Translation Ready
- Fully responsive frontend interface
- Translation-ready
PRO Features
The following capabilities are available in the PRO version:
Multiple Trip Management
PRO- Same-day multiple trips
- Day-wise multiple trips
- Date-wise multiple trips
PDF Ticket & Invoice
PROBooking List Export
PRO- PDF booking export
- CSV booking export
QR Code Support
PROEmail Notifications with PDF Attachments
PRO- Email booking notifications
- PDF ticket/invoice attachment
- Resend email with PDF
Advanced Pricing & Discounts
PRO- Seasonal pricing and discounts
- Early booking discounts
Partial Payment
PROLet customers pay a deposit now and settle the balance later:
- Site-wide On/Off switch for the whole feature
- Deposit as a fixed amount or a percentage of the total
- Global default plus an independent per-transport override
- Customer chooses Full Amount or Deposit at checkout
- Balance Due Later fee keeps the remaining amount visible on the order
- Deposit paid and remaining balance stored on the order
Advanced Booking Management
PROEdit Existing Bookings
PRO- Edit a booking directly from the Order List via the ✏️ button
- Change transport, route, journey date and departure time
- Adjust ticket quantities or rearrange the seat plan
- Edit passenger details and additional services
- Update billing information and order status
- Live stock availability with own-booking stock excluded
My Account PDF Download & Cancellation
PROCustomer-facing tools on the My Account bookings list:
- Download the PDF ticket/invoice button for each booked booking
- "Request Cancellation" button on a customer's booking
- Request allowed only within the time limit set under Global Data → Cancel Request
- "Cancel Request Pending" status badge while waiting
- Admin approves or rejects requests from the Order List Cancel Requests tab
- Approval cancels the booking and makes its seats/tickets available again
Additional Administrative Tools
PROPremium Support
PROPriority Updates & New Features
PRO🏢 Applications
ABP Transport Booking is a flexible passenger transportation and ticket booking solution designed for a wide range of transportation businesses. It supports route-based booking, scheduled trips, ticket types, seat reservations, passenger information, pickup and drop-off points, and one-way or return journeys.
Its flexible configuration system makes it suitable for both simple and advanced passenger transport services. Common use cases include:
- 🚌 Bus ticket booking
- ⛴️ Ferry ticket booking
- 🚢 Launch ticket booking
- 🚐 Shuttle service booking
- 🚍 Coach & minibus booking
- 🚕 Van & passenger transport booking
- ✈️ Airport transfer booking
- 🏙️ Local passenger transport
- 🌍 Intercity transport booking
- 🏖️ Tourist transportation
- 🎪 Event transportation
- 🏢 Corporate transportation
- 🎓 School & college transportation
- 👥 Group travel transportation
- 🔄 Scheduled return trip services
- 🚏 Multi-stop passenger transportation
- 🎫 Multi-ticket type transport services
- 🪑 Seat-based passenger reservation services
🗂️ Admin Menu
After installing ABP Transport Booking, you get a dedicated admin dashboard menu that centralizes the plugin's transport booking and management features in one place. All major modules are organized into structured menu items, letting you manage transports, bookings, ticket types, seat plans, global data, configurations, and system information from a clean, user-friendly interface.
📊 Menu overview
The menu bar shown at the top of the ABP Transport Booking admin page contains the following tabs:
| Menu item | Description |
|---|---|
| Dashboard | Overview page with key statistics, quick actions, earnings, recent orders and popular transports. |
| Lists | Create, edit, clone, restore, delete and manage all transport services. |
| Orders | View, filter and manage transport bookings and their WooCommerce orders. |
| Ticket/Seat Plan | Create and manage reusable global ticket types, seat plans, seat labels and decor items. |
| Add Order PRO | Create transport bookings directly from the admin dashboard. |
| Cancel Requests PRO | Shows the number of pending cancellation requests from customers. Approve or reject each request here. |
| Global Data | Manage reusable transport data and shared configurations (dates, stops, categories, organizers, brands and more). |
| Configuration | Manage plugin-wide settings, feature switches, PDF/e-mail options, slider, contact information and CSS properties. |
🌐 Global Data sub-menu
Under Global Data the following sub-tabs are available (some appear only when the related feature switch is ON):
- Dates — global date format, buffer and advance-booking window
- 💰 Additional Services — reusable additional services
- 📋 Client Form — reusable passenger information form fields
- ✂️ Global Discount PRO — seasonal and early-bird discounts site-wide
- 💰 Partial Payment PRO — site-wide deposit / balance-due settings
- Stops / Locations — reusable boarding and drop-off stops
- Transport Type / Category — reusable transport categories
- 🏢 Organizer — reusable transport organizers / operators
- 🏷️ Brands — reusable transport brands
- 🔗 Features Library — reusable transport features
- 📚 Resources — global FAQs and Terms & Conditions
⚙️ Configuration sub-menu
Under Configuration the following sub-tabs are available:
- Configuration — general transport labels and store settings
- ON/OFF — enable or disable individual plugin features
- Slider — featured transport slider settings
- Contact Information — company details shown on bookings
- CSS Property — custom CSS colors and fonts
- PDF PRO — PDF ticket and invoice settings
- Order Lists PDF PRO — PDF export of the order list
- Order Lists CSV PRO — CSV export of the order list
- E-Mail PRO — booking e-mail notifications with PDF attachments
⚡ Quick Actions
The Quick Actions card on the Dashboard–page gives fast access to commonly used screens in one click:
- Manage Transport — open the transport lists
- Orders — view and filter bookings
- Ticket/Seat Plan — design seat layouts
- Global Data — routes, dates and more
- Configuration — plugin settings
- ON/OFF Configuration — enable and disable features
- Global Date — manage global dates
- Additional Services, Client Form, Stops Configuration — feature-dependent shortcuts
- Partial Payment, Global Discount, Cancel Request — PRO shortcuts
📊 Dashboard
The Dashboard is the first screen you see when opening ABP Transport Booking. It gives a live overview of your transport booking business — key metrics, today's trips, recent orders and quick shortcuts — all in one place.
👋 Welcome Banner
The top hero section greets the logged-in admin by name, shows today's date and summarizes what is happening with the transport booking business today. Two quick buttons are always available:
- + Add New — opens the WordPress post editor to create a new transport.
- Orders — jumps straight to the admin Order List.
🔢 Key Performance Cards
Five clickable stat cards summarize the whole business. Each card opens the matching admin screen when clicked:
| Card | Shows |
|---|---|
| 🚌 Total Transport | Number of transports created. Clicking opens the Lists (transport list). |
| 🧾 Total Orders | Total number of bookings/orders. Clicking opens the Order List. |
| 🎫 Tickets Sold | Total tickets sold across all bookings. |
| 💰 Total Revenue | Total sales value in the store currency. |
| 📅 Booked Today | How many bookings have been placed today. |
🛣️ Today Trips
The main column lists today's journeys. Each journey row shows the transport, route, journey date and time, an Up/Return badge, and a Journey Started badge once the trip begins. Availability is shown with Sold, Available, Total and Reserved counts.
Clicking a journey opens a popup with the journey details: a live Seat Map (for seat–plan transports) or a Ticket Type Breakdown (for ticket–only transports), plus the list of bookings for that journey.
🧾 Recent Orders
The Recent Orders card shows the latest bookings with two view tabs — Last 10 Orders and Today's Orders — and an All Orders link that opens the full Order List.
⚡ Quick Actions (side panel)
The sidebar gives one-click shortcuts to the most commonly used screens:
- ON/OFF Configuration — enable or disable plugin features.
- Global Date — manage global dates.
- Additional Services and Client Form — shown only when the related feature switch is enabled.
- Stops Configuration — manage stops / locations.
- PRO — Partial Payment, Global Discount and Cancel Request shortcuts appear when the related PRO features are active.
🖥️ System Status & Content Breakdown
The sidebar also shows a System Status card with the current plugin, WordPress, PHP and WooCommerce versions, and a Content Breakdown card with quick counts of your content by type. With PRO installed, a license status card is added to the sidebar as well.
🚌 Transport Lists
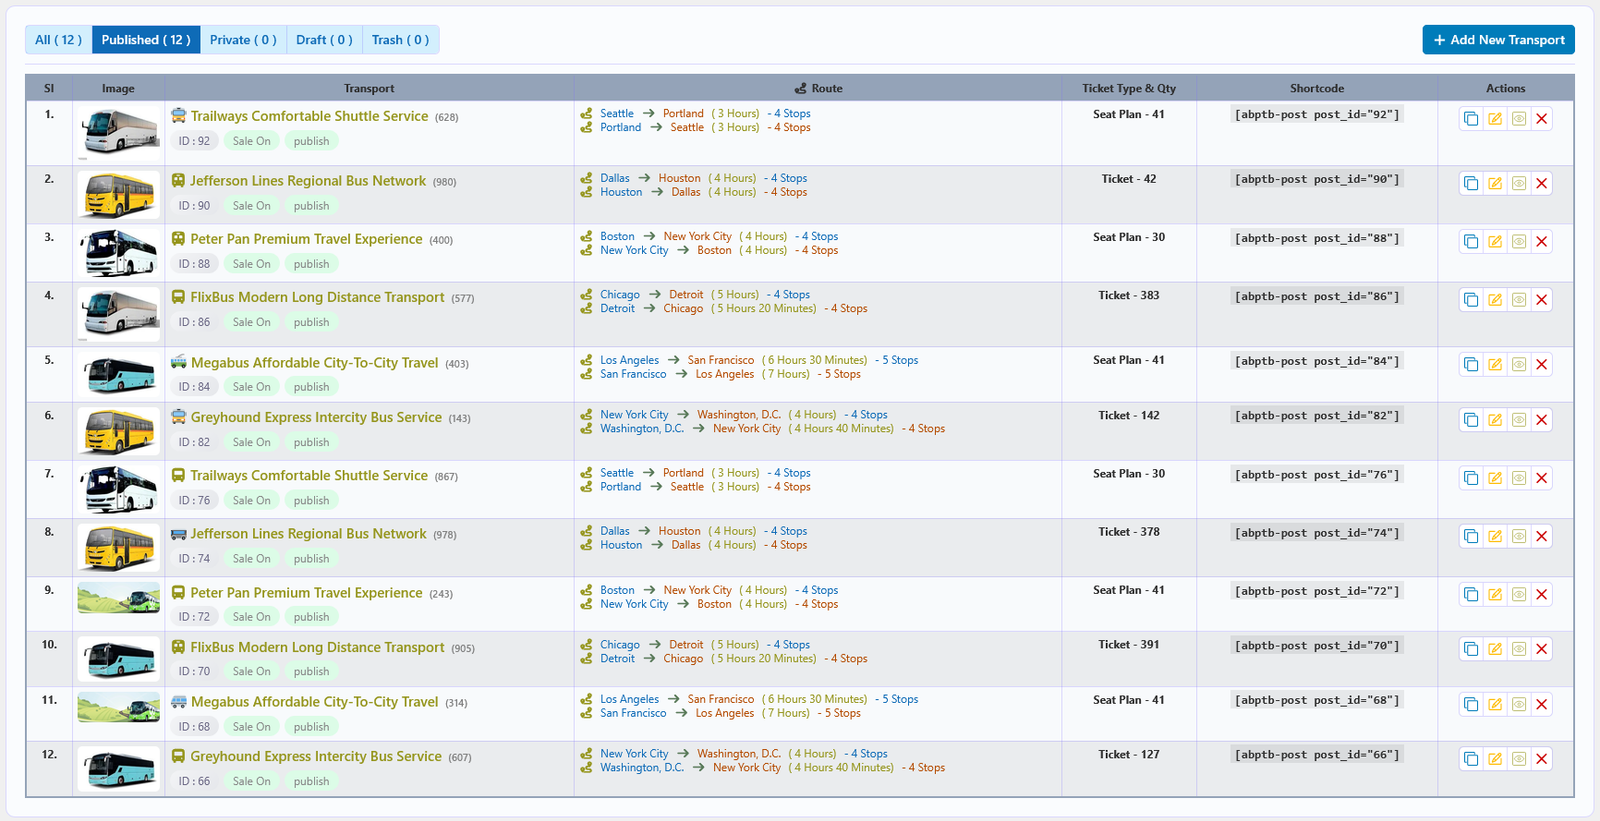
The Transport Lists page provides a central hub for viewing and managing all ABP Transport Booking services. Create, clone, edit, restore, view, or delete transports from a single screen. Access it via ABP Transport Booking → Transport Lists in the WordPress admin.
📋 Overview
Every transport is displayed with its key details — route, schedule, capacity, booking status, and other essential information — so you can manage your fleet quickly and efficiently. From this page you can also navigate to the Transport Details Page, where all transport-related settings are configured in a structured interface.
⚙️ Available Actions
Each transport entry offers the following actions:
| Action | Description |
|---|---|
| 🔀 Clone Transport | Creates an exact duplicate of the selected transport. The cloned transport can then be freely edited or customized. |
| ♻️ Restore Transport | Recovers a previously deleted or archived transport and adds it back to the transport list. |
| 🗑️ Permanent Delete | Permanently removes the selected transport from the system. This action cannot be undone. |
| ✏️ Edit Transport | Opens the Transport Details Page where you can modify settings, schedules, routes, and configurations. |
| 👁️ View Transport | Previews how the transport will appear on the frontend website. |
| 🚮 Move to Trash | Moves the transport to trash instead of permanently deleting it. The transport can be restored later if needed. |
📝 The Transport Details Page
After clicking Clone, Edit, or Add New Transport, you are redirected to the Transport Details Page. This is where you fully configure transport information, routes, schedules, ticket types, seat plans, pricing, availability, passenger forms, and other settings before publishing or updating.
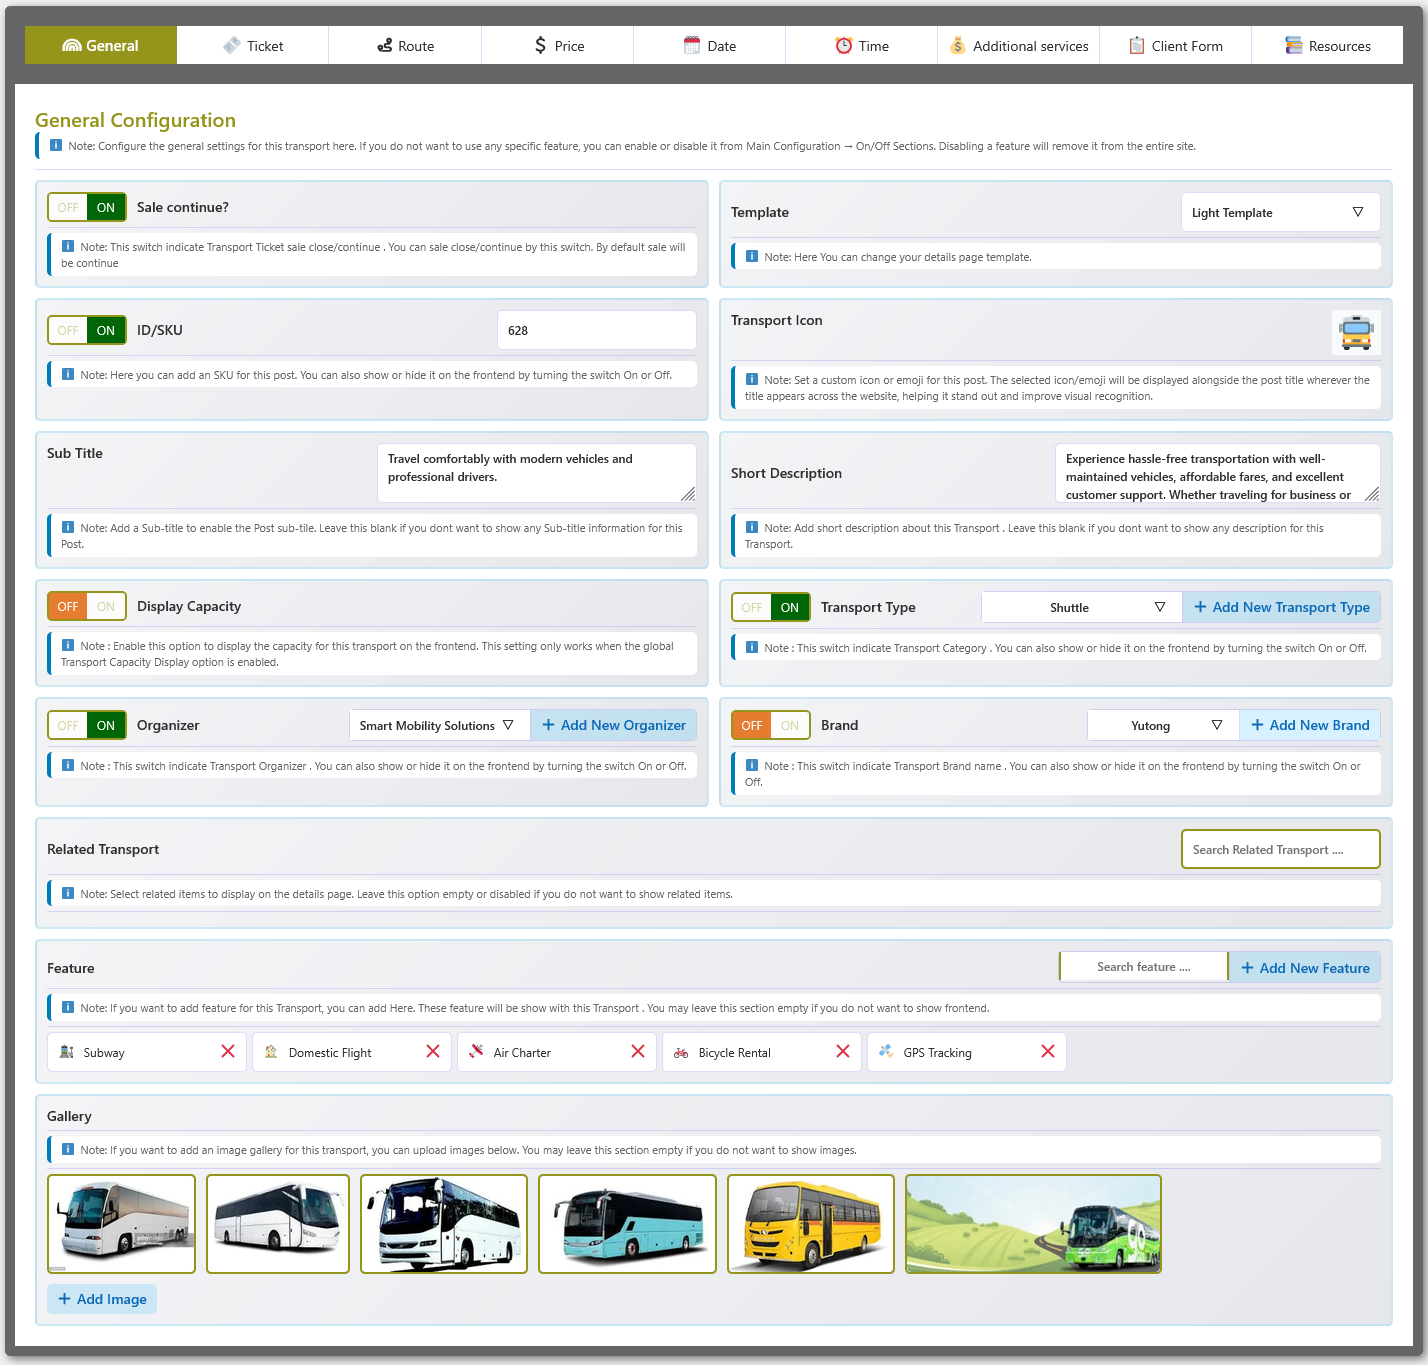
⚙️ General Configuration
The General tab in the Transport Details Page provides centralized controls for the basic information and general behavior of a transport. Configure template, SKU, icon, description, capacity display, transport type, organizer, brand, and more from a single section.
🎯 Overview
This section covers all the foundational settings that define a transport's identity and display behavior. You can manage everything from the sales toggle and page template to gallery images and related transports without leaving the Transport Details Page.
📋 Fields and Options
The following fields and controls are available in the General Configuration section:
| Option | Description |
|---|---|
| Sale Continue ON/OFF | Enables or disables ticket sales for this transport. When enabled, customers can purchase tickets according to the configured availability. |
| Template | Selects the details page template for this transport. Choose the preferred template to control the frontend layout and presentation. |
| ID/SKU | A unique SKU or identifier for the transport. You can also choose whether to display the SKU on the frontend. |
| Transport Icon | A custom icon or emoji for the transport. The selected icon can be displayed alongside the transport title across the website. |
| Sub Title | A short subtitle for the transport. Leave empty if you do not want to display a subtitle. |
| Short Description | A brief description of the transport to provide customers with an overview of the service. |
| Display Capacity ON/OFF | Enables or disables the transport capacity display on the frontend. This option works when the global Transport Capacity Display feature is enabled. |
| Transport Type | Selects a transport type or category. You can also enable or disable its frontend display. |
| Organizer | Selects an organizer for the transport. A new organizer can be added directly from this section. |
| Brand | Selects a transport brand and controls whether the brand information is displayed on the frontend. A new brand can be added directly from this section. |
| Related Transport | Selects related transports to display on the transport details page. Leave empty to hide related transports. |
| Feature | Adds features to the transport by selecting existing features or creating new ones. Selected features can be displayed on the frontend. |
| Gallery | Adds multiple images to create a gallery for the transport. These images can be displayed on the transport details page. |
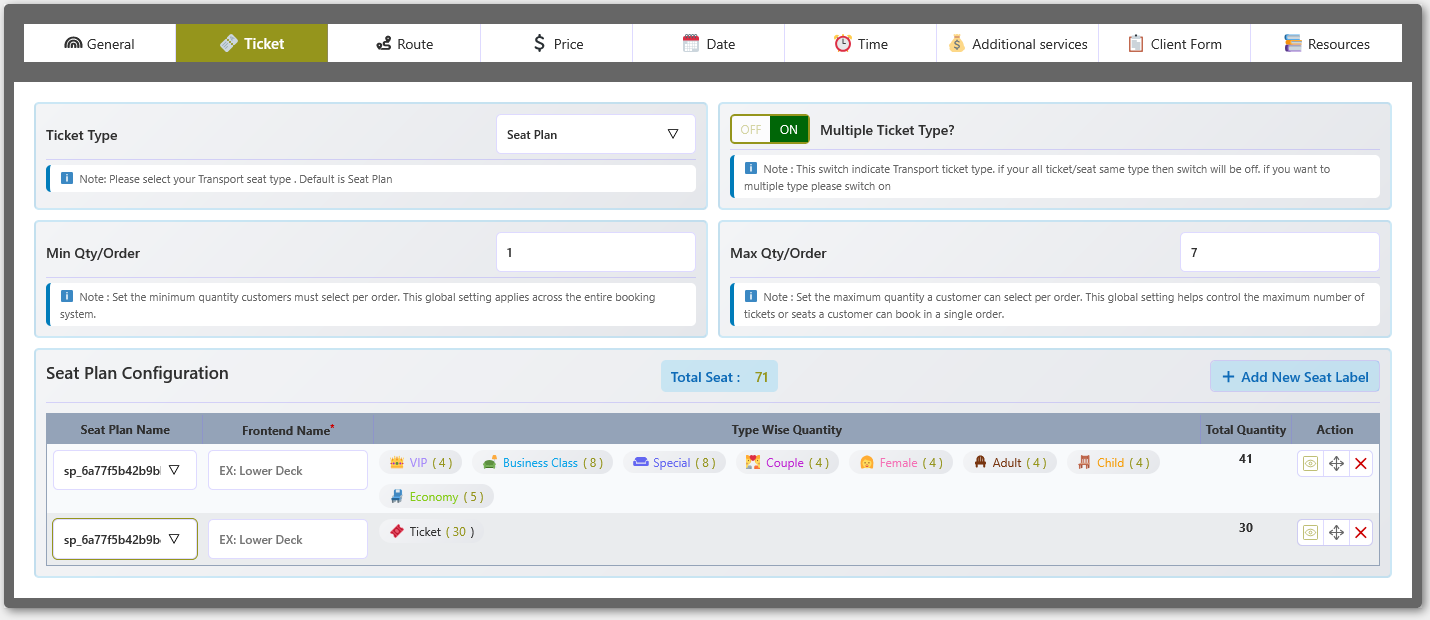
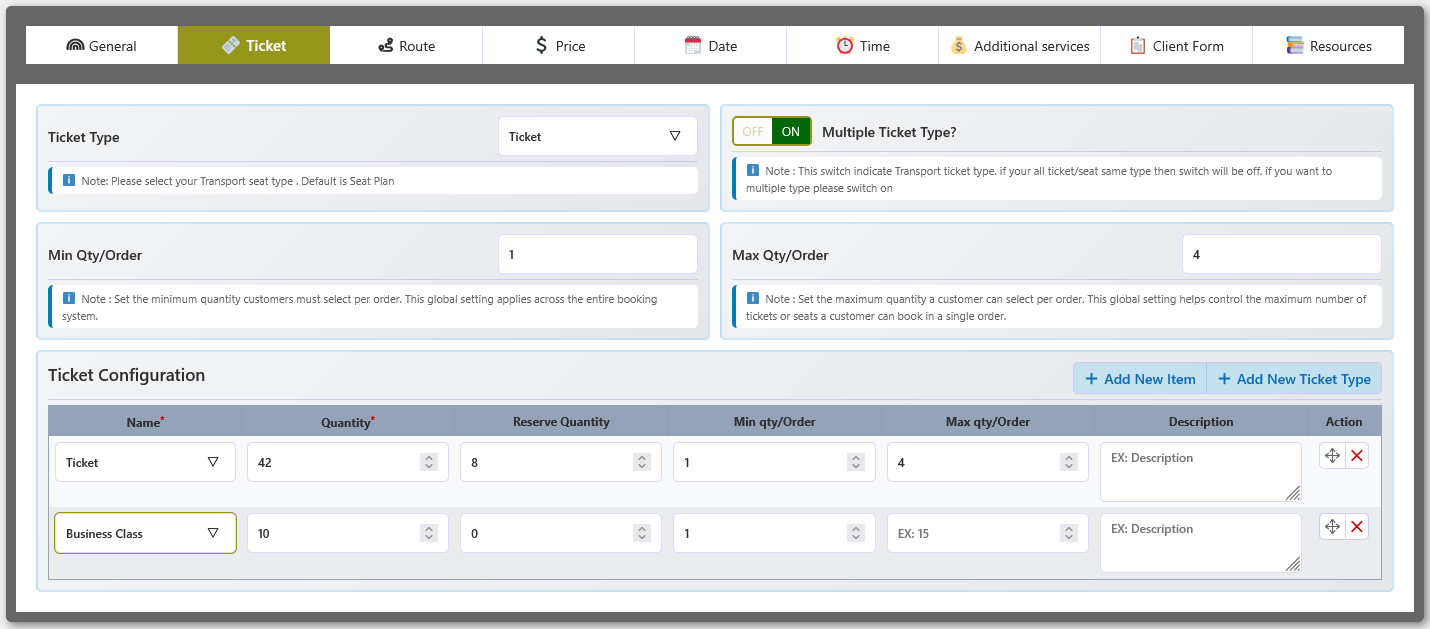
🎫 Ticket Configuration
The Ticket tab in the Transport Details Page defines how tickets and seats are managed for the transport. Choose between a seat plan or ticket-based configuration, enable multiple ticket types, and control minimum and maximum order quantities.
🎯 Overview
This section lets you control the entire ticketing model for a transport — from the fundamental booking type (seat plan vs. standard ticket) to per-order quantity limits and individual ticket type settings. The options available depend on the ticket configuration type you select.
📋 Fields and Options
The following fields and controls are available in the Ticket Configuration section:
| Option | Description |
|---|---|
| Ticket Type | Selects the configuration type — Seat Plan or Ticket — based on how passengers will be booked. |
| Multiple Ticket Type ON/OFF | Enables multiple ticket or seat types for the transport. Disable when all tickets or seats use the same type. |
| Min Qty/Order | Sets the minimum number of tickets or seats a customer must select in a single order. |
| Max Qty/Order | Sets the maximum number of tickets or seats a customer can select in a single order. |
🪑 Seat Plan Configuration
When Seat Plan is selected as the ticket type, additional options become available:
| Option | Description |
|---|---|
| Seat Plan Configuration | Assigns reusable seat plans to the transport and configures their frontend names and ticket/seat type quantities. |
| Add New Seat Label | Adds a new seat label configuration for the selected seat plan. |
| Type-wise Quantity | Configures the quantity available for each ticket or seat type within the selected seat plan. |
🎟️ Ticket Configuration
When Ticket is selected as the ticket type, the following options become available:
| Option | Description |
|---|---|
| Ticket Configuration | Configures individual ticket types, quantities, reserve quantities, min/max quantity per order, and ticket descriptions. |
| Add New Item | Adds a new ticket configuration item to the ticket list. |
| Add New Ticket Type | Adds a new ticket type when multiple ticket types are enabled. |
| Reserve Quantity | Defines a quantity reserved from the available ticket quantity for the selected ticket type. |
| Ticket Description | Adds a description for the selected ticket type to provide additional information to customers. |
Route Configuration
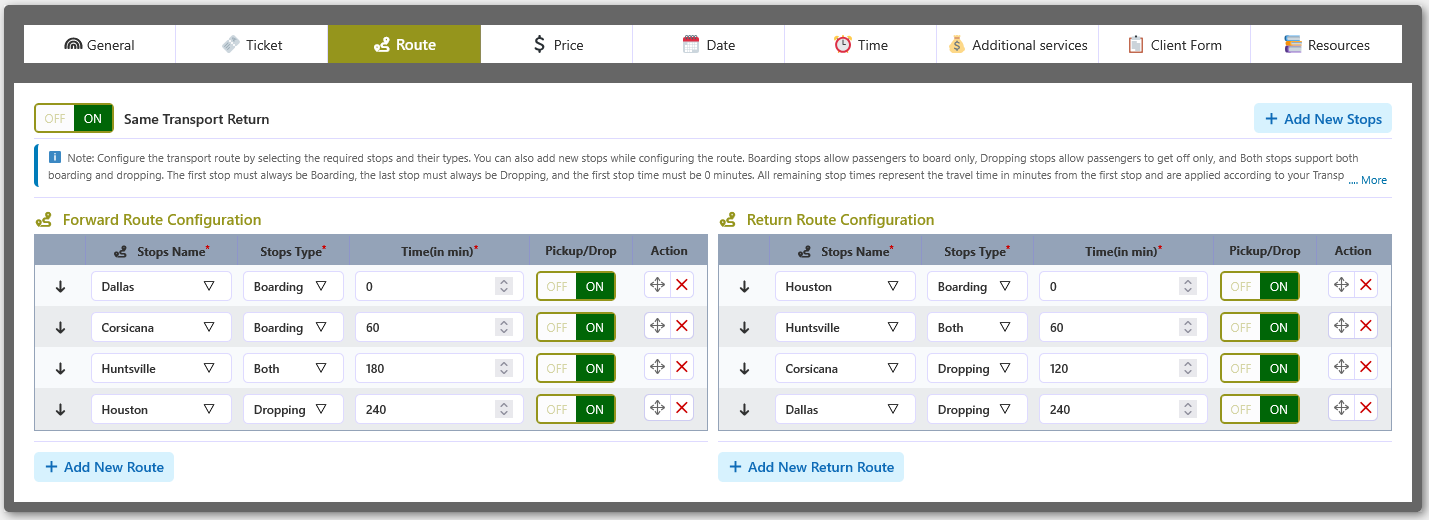
The Route tab in the Transport Details Page defines the complete journey of a transport — stops, stop types, travel times, and pickup/drop-off availability. Create separate forward and return routes when the transport supports return journeys.
🎯 Overview
Route configuration determines which stops the transport calls at, in what order, and what role each stop plays (boarding, dropping, or both). Travel times are measured in minutes from the first stop, and pickup/drop-off availability is controlled per stop. When return journeys are enabled, a second route can be configured independently.
📋 Fields and Options
The following fields and controls are available in the Route Configuration section:
| Option | Description |
|---|---|
| Same Transport Return ON/OFF | Enables the same transport to be used for both forward and return journeys. When enabled, a return route can be configured. |
| Stops Name | Selects the transport stop for each route point. |
| Stops Type | Defines the purpose of each stop — Boarding, Dropping, or Both. |
| Time (in min) | Sets the travel time in minutes from the first stop to each selected stop. The first stop must always be 0 minutes. |
| Pickup / Drop | Enables or disables pickup and drop-off availability for the selected stop. |
| Stop Order | Arranges the stops in the correct journey sequence. The first stop must be a Boarding stop and the last stop must be a Dropping stop. |
🔀 Route Actions
The following actions are available for managing routes:
| Action | Description |
|---|---|
| Forward Route Configuration | Configures the main journey route by selecting stops and arranging them in the correct travel order. |
| Return Route Configuration | Configures the return journey route when Same Transport Return is enabled. Stops are selected and arranged for the return journey. |
| Add New Stops | Adds new stops directly from the route configuration section without leaving the Transport Details Page. |
| Add New Route | Adds and configures a new forward route when multiple route configurations are required. |
| Add New Return Route | Adds and configures a new return route for the selected transport. |
💲 Price Configuration
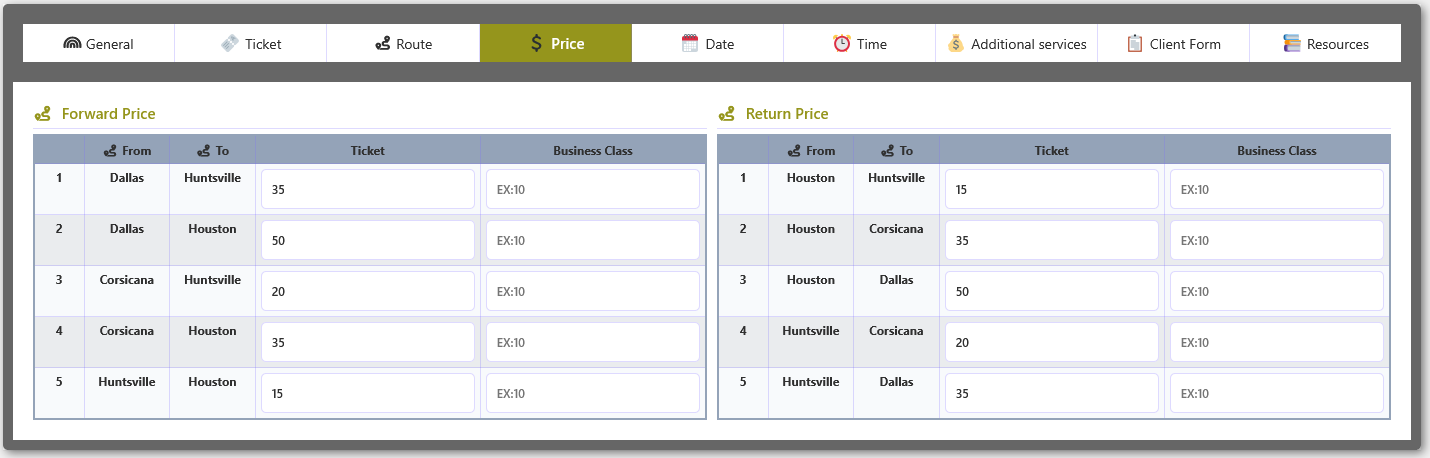
The Price tab in the Transport Details Page lets you set ticket prices for each From and To stop combination on the selected route. Configure separate prices for forward and return routes when the transport supports return journeys.
🎯 Overview
Pricing is organized by route direction — forward and return — with individual price rows for every possible boarding-to-dropping stop combination. Additional ticket types (such as Business Class) can be priced independently for the same route combination.
📋 Fields and Options
The following fields are available in the Price Configuration section:
| Field | Description |
|---|---|
| Forward Price | Configures ticket prices for each available From and To combination on the forward route. |
| Return Price | Configures ticket prices for each available From and To combination on the return route when a return route is configured. |
| From | Displays the starting stop for the selected price combination. |
| To | Displays the destination stop for the selected price combination. |
| Ticket | Sets the ticket price for the selected From and To stop combination. |
| Business Class | Sets the price for the selected ticket type or class for the corresponding route combination. |
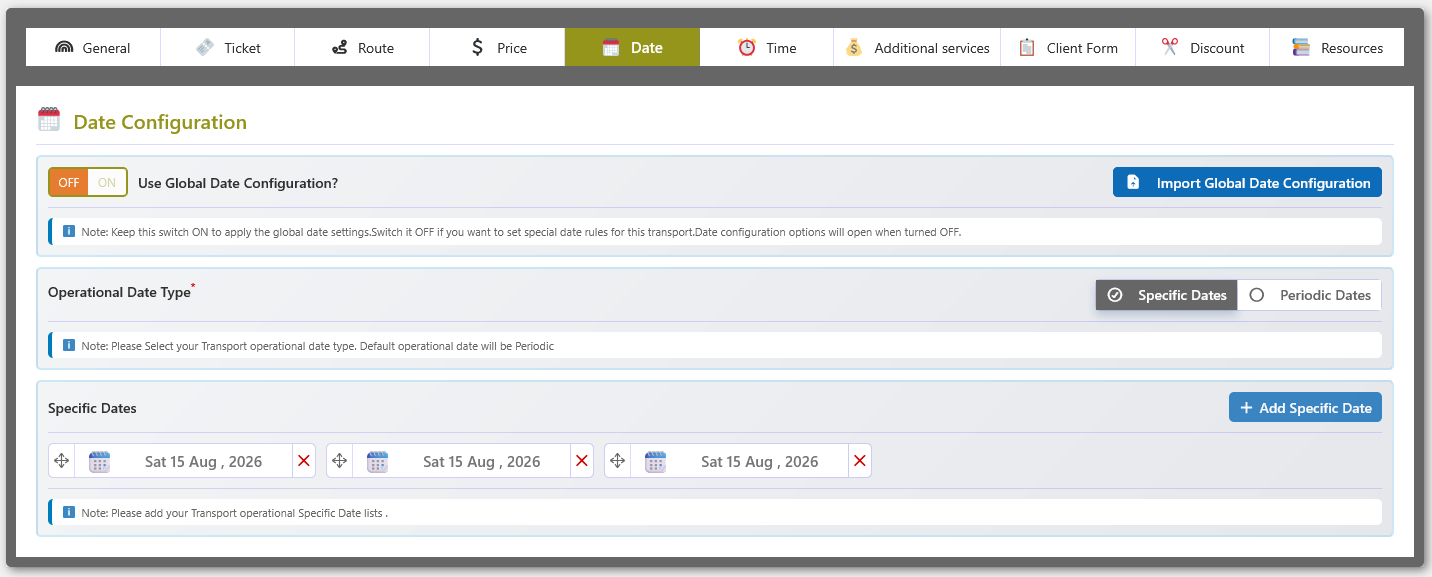
📅 Date Configuration
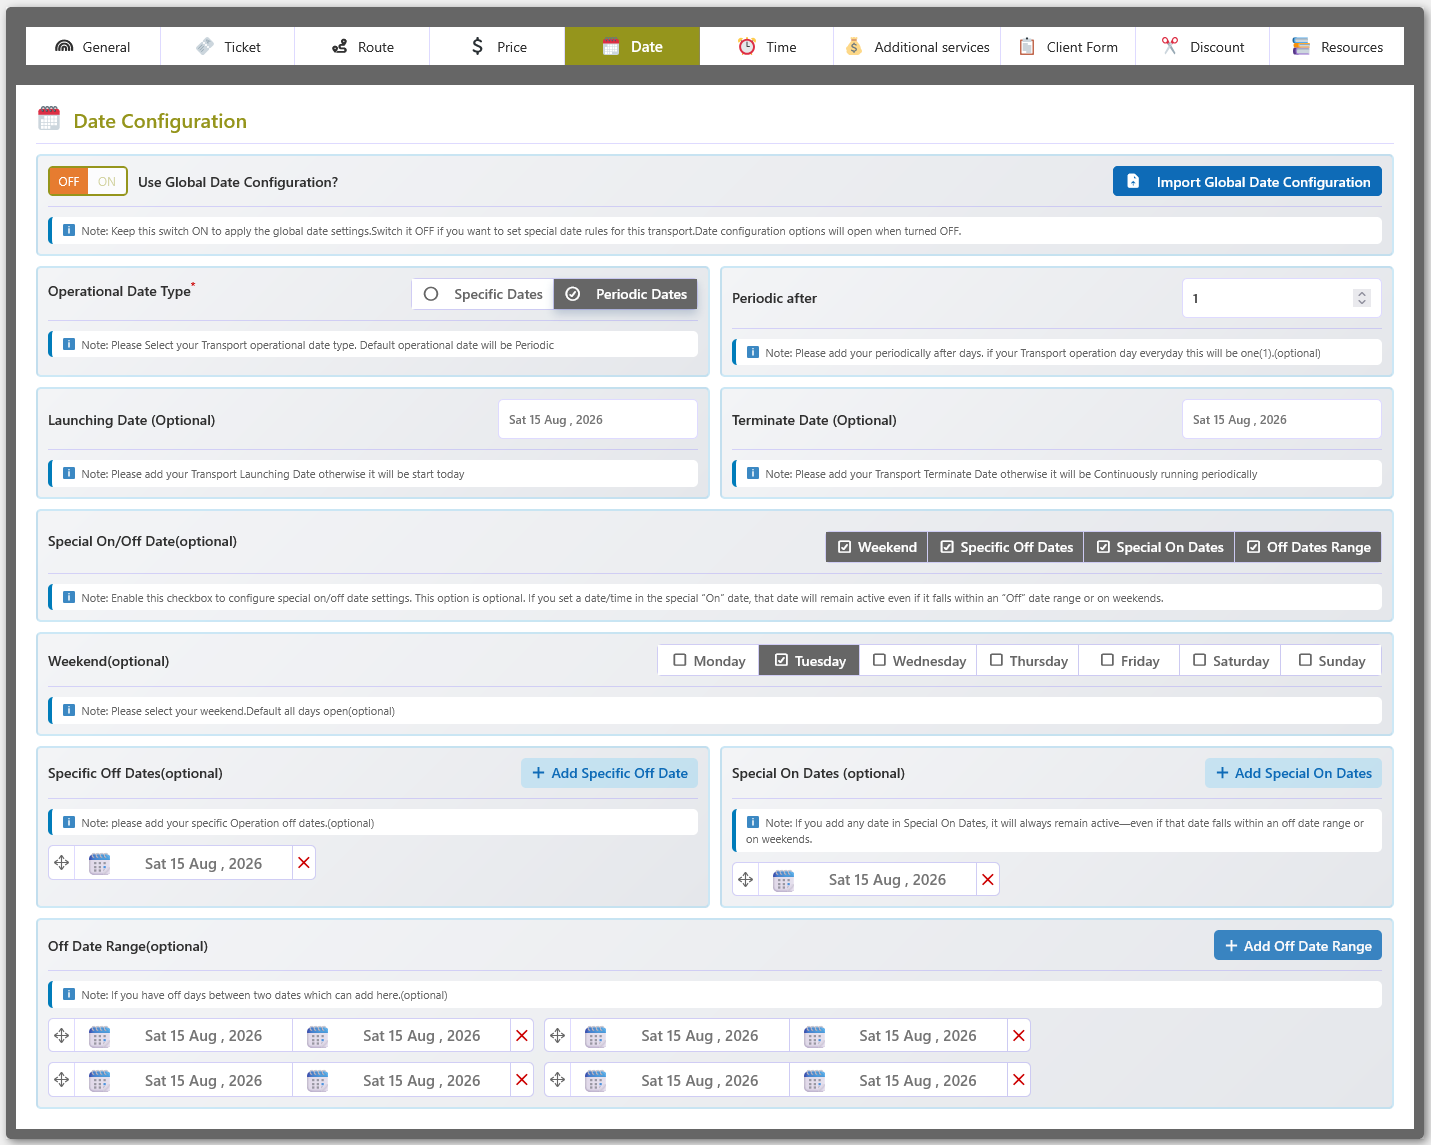
The Date tab in the Transport Details Page controls the operational dates for each transport. Use global date settings for shared rules or configure transport-specific dates including periodic schedules, specific dates, weekends, and off-date ranges.
🎯 Overview
The date configuration system offers flexible scheduling for transport operations. You can apply a single set of date rules across all transports through the global configuration, or override those rules on a per-transport basis. Special dates, weekends, and off-date ranges give you fine-grained control over when a transport is available for booking.
🌍 Global Date Configuration
The global date configuration lets you define shared date rules once and apply them to multiple transports. Individual transports can opt in or out.
| Setting | Description |
|---|---|
| Global Date Configuration ON | The transport follows the global date settings configured in the plugin's global options. |
| Global Date Configuration OFF | The transport uses its own custom date configuration instead of the global rules. |
| Import Global Date Configuration | Loads the configured global date settings into the transport's local date configuration. |
⚙️ Operational Date Type
When custom date configuration is enabled, you choose how the transport's operating dates are determined:
| Type | Description |
|---|---|
| Specific Dates | Define a list of individual dates on which the transport will operate. |
| Periodic Dates | Configure the transport to operate periodically after a defined number of days. |
🚀 Transport Operation Period
Set the date range and recurrence for the transport's operation:
| Field | Description |
|---|---|
| Launching Date | The date when the transport operation starts. |
| Terminate Date | The date when the transport operation ends. |
| Periodic After | The number of days after which the transport will operate again when using Periodic Dates. |
📅 Special Date Configuration
Fine-tune availability with weekends, exception dates, and off-date ranges:
| Option | Description |
|---|---|
| Weekend | Selects the days of the week that should be treated as weekends (non-operating days). |
| Specific Off Dates | Individual dates when the transport will not operate. |
| Special On Dates | Individual dates that remain active even if they fall within an off-date range or weekend. |
| Off Date Range | A date range during which the transport will not operate. |
⏰ Time Configuration (Multiple Times in PRO)
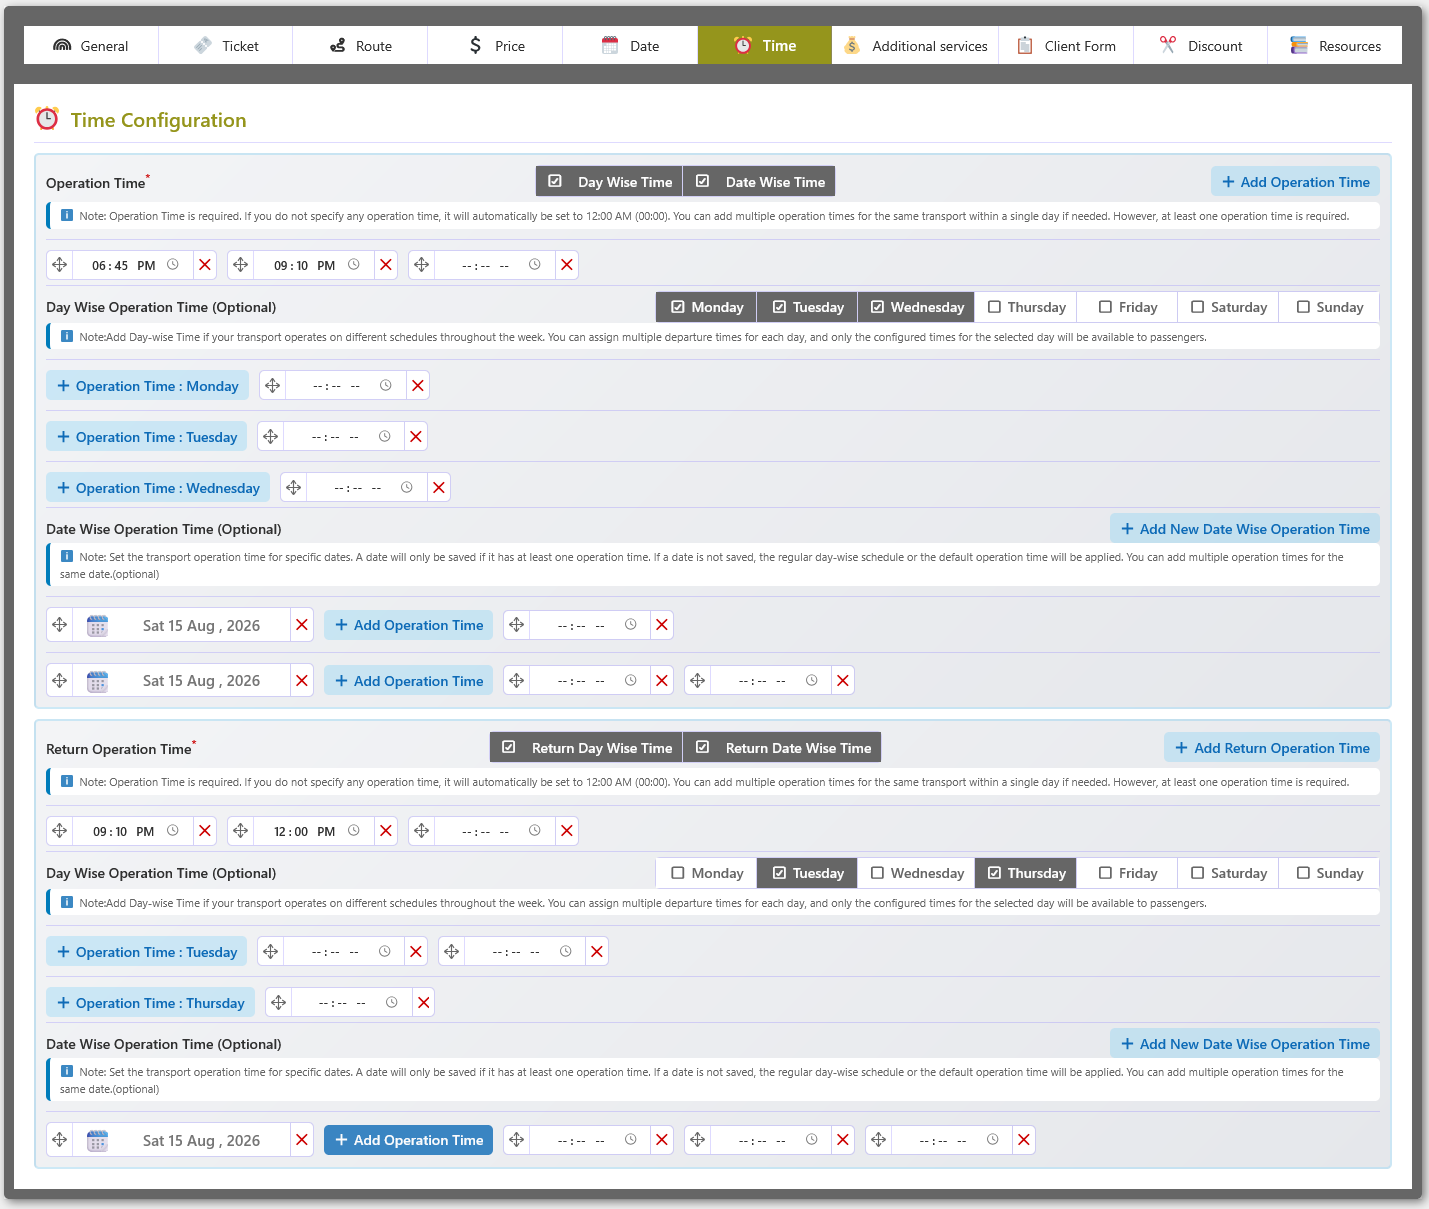
The Time tab in the Transport Details Page defines the departure and operation times for each transport. Configure one or multiple departure times per day, set day-wise and date-specific schedules, and manage separate return operation times for round-trip services.
🎯 Overview
Time configuration determines when a transport departs and operates. You can set a single daily schedule or create multiple departure times within a single day. Day-wise schedules let you assign different times to different weekdays, while date-specific overrides handle special occasions. When return journeys are enabled, independent return schedules can be configured.
📅 Day-Wise Operation Time
Day-wise operation time lets you configure different departure schedules for different days of the week.
- Select the days on which the transport operates.
- Add multiple operation times for each selected day.
- Use different departure schedules for different weekdays.
- Only the configured times for the selected day will be available to passengers.
📆 Date-Wise Operation Time
Date-wise operation time lets you define custom departure times for specific dates, overriding the regular day-wise or default schedule.
- Select a specific operating date.
- Add one or multiple operation times for the selected date.
- Override the regular day-wise or default operation time for that date.
- Ideal for special schedules, holidays, events, or temporary schedule changes.
🔄 Return Operation Time
When return journey support is enabled, separate operation times can be configured for the return route.
- Add one or multiple return departure times.
- Configure Return Day-Wise Time for different weekdays.
- Configure Return Date-Wise Time for specific dates.
- Use different schedules for forward and return journeys.
⚙️ Operation Time Rules
The following rules apply to all time configurations:
- At least one operation time is required for the transport.
- Multiple operation times can be added for the same transport and day.
- Day-wise schedules are applied according to the selected weekday.
- Date-wise schedules override the regular day-wise or default operation time for specific dates.
- If no date-wise schedule is configured for a given date, the regular day-wise or default operation time is used.
Additional Services Configuration
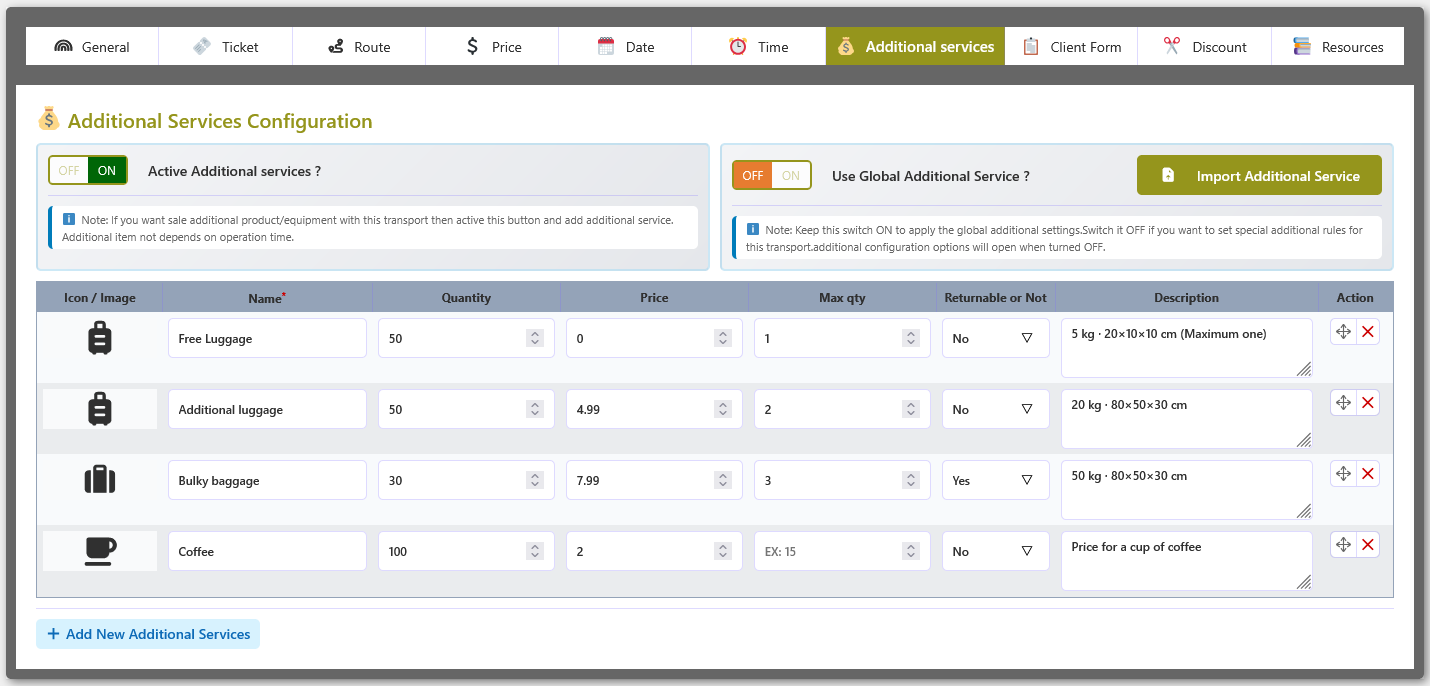
The Additional Services system lets you define extra optional items — such as luggage, meals, or Wi-Fi — that passengers can add to their transport booking. Services are managed globally and then imported into individual transports for flexible, transport-level control.
🌍 Global Additional Services
From the Global Configuration panel you create a reusable library of additional services that can be imported into any transport. Each service is defined once here and shared across multiple transports.
- Create reusable additional services for transport bookings.
- Define a service name, icon/image, quantity, price, maximum quantity, and description.
- Set whether an additional service is returnable or non-returnable.
- Maintain a centralized service list that any transport can pull from.
🚌 Transport-Level Configuration
Each transport can have its own set of additional services based on what is available for that particular route or vehicle. You can import from the global list or add services from scratch.
- Enable or disable additional services for the transport.
- Import services directly from the global configuration.
- Add new custom services specific to the transport.
- Modify imported or custom services according to transport requirements.
- Remove services that are not available for the selected transport.
⚙️ Service Configuration Options
Each additional service supports the following fields:
| Option | Description |
|---|---|
| Icon / Image | A visual representation displayed alongside the service name. |
| Service Name | The label shown to passengers when selecting the service. |
| Quantity | The total available quantity of the service. |
| Price | The additional charge applied when a passenger selects this service. |
| Maximum Quantity | Limits how many units a single passenger can select. |
| Returnable or Not | Specifies whether the service is applicable for return or refundable use. |
| Description | Additional information or instructions displayed alongside the service. |
🔄 Import & Flexibility System
The import system keeps your service definitions in sync while allowing transport-level customization.
- Import reusable services from the global configuration.
- Edit imported services to match transport-specific requirements.
- Combine global and transport-specific services in a single list.
- Add custom services without modifying the global service library.
🚀 Common Transport Services
Typical additional services offered by transport operators include:
- Extra Luggage
- Additional Baggage
- Priority Boarding
- Meal or Food Service
- Wi-Fi Access
- Bicycle or Sports Equipment
- Special Passenger Assistance
- Other Optional Transport Services
Client / Attendee Form Fields
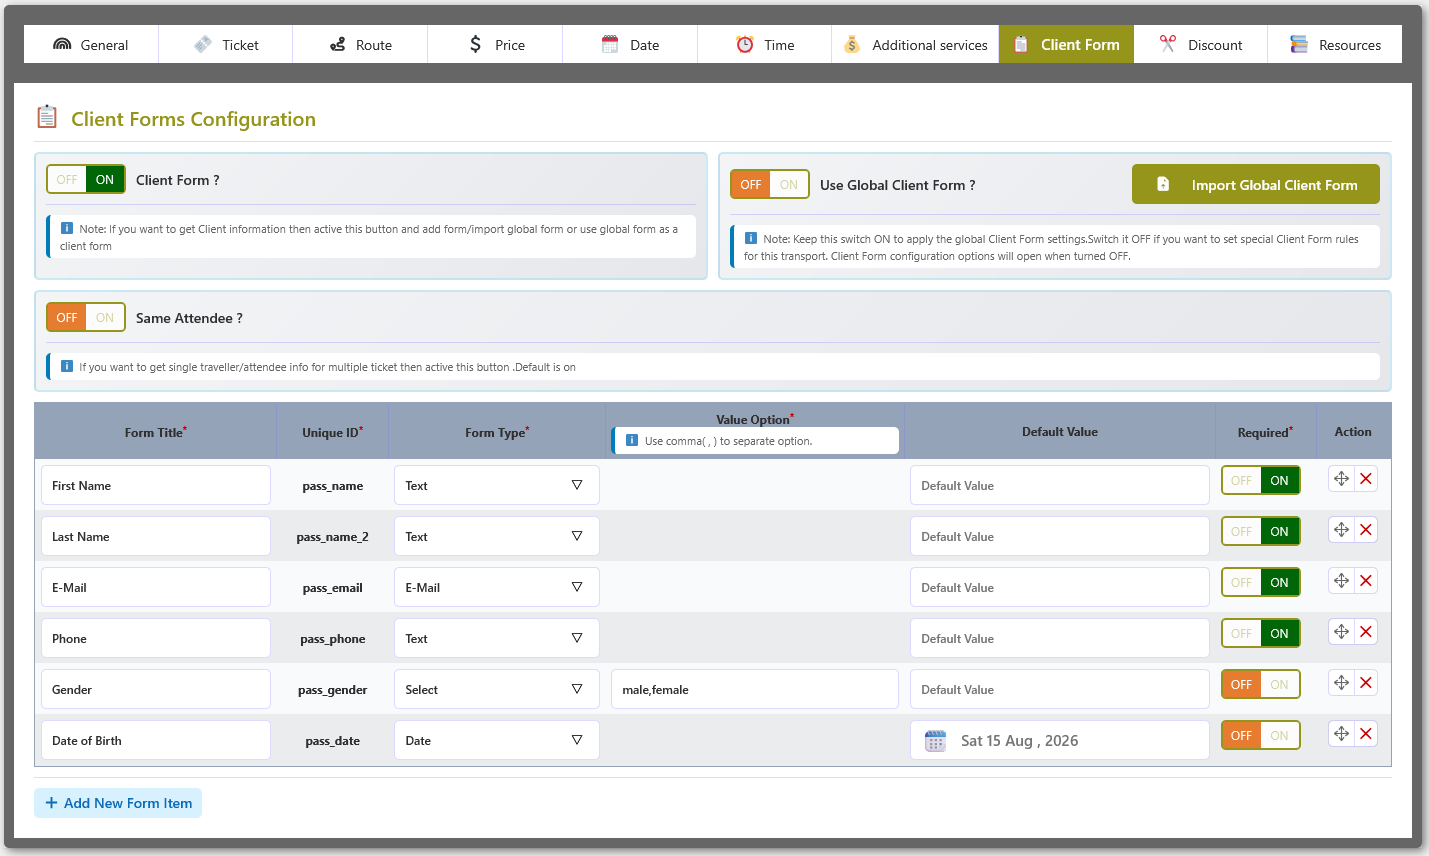
The Client Form system controls what passenger information is collected during the booking process. You can define fields globally and import them into individual transports, or build transport-specific forms from scratch.
🌍 Global Client Forms
From the Global Configuration panel you create a reusable set of client form fields that can be applied across multiple transports, ensuring consistent passenger data collection.
- Create reusable passenger information fields.
- Define standard fields such as First Name, Last Name, Email, Phone, Gender, Date of Birth, and other required information.
- Enable or disable individual fields.
- Maintain a consistent passenger information structure across transports.
🚌 Transport-Level Client Forms
Each transport can use the global client form or have its own customized form configuration tailored to that transport's requirements.
- Enable or disable the Client Form for the transport.
- Import fields from the Global Client Form configuration.
- Add custom fields specific to the transport.
- Modify imported fields according to transport requirements.
- Remove fields that are not required for the selected transport.
👤 Same Attendee Configuration
When a single passenger is purchasing multiple tickets, the Same Attendee option streamlines data entry.
- Enable Same Attendee when the same passenger information should be used for multiple tickets.
- Disable it when separate passenger information is required for each ticket.
- This option simplifies passenger information collection when multiple tickets belong to the same attendee.
⚙️ Form Field Configuration
Each form field supports the following settings:
| Option | Description |
|---|---|
| Form Title | The label displayed to the user for this passenger information field. |
| Unique ID | A unique identifier used internally for each form field. |
| Form Type | The field input type — Text, Email, Select, Date, or other supported types. |
| Value Option | Available options for fields that use a Select or similar input type. |
| Default Value | A pre-filled value applied when the field is first rendered. |
| Required | Specifies whether the passenger must provide this information before completing the booking. |
| Field Order | Determines the display position of the field within the form. |
🔄 Import & Customization System
Import the global form with one click, then customize it per transport without affecting the shared configuration.
- Import the Global Client Form with one click.
- Edit imported fields according to the transport requirements.
- Combine global and custom passenger information fields.
- Add new fields without changing the global configuration.
- Remove unnecessary fields from the transport-level form.
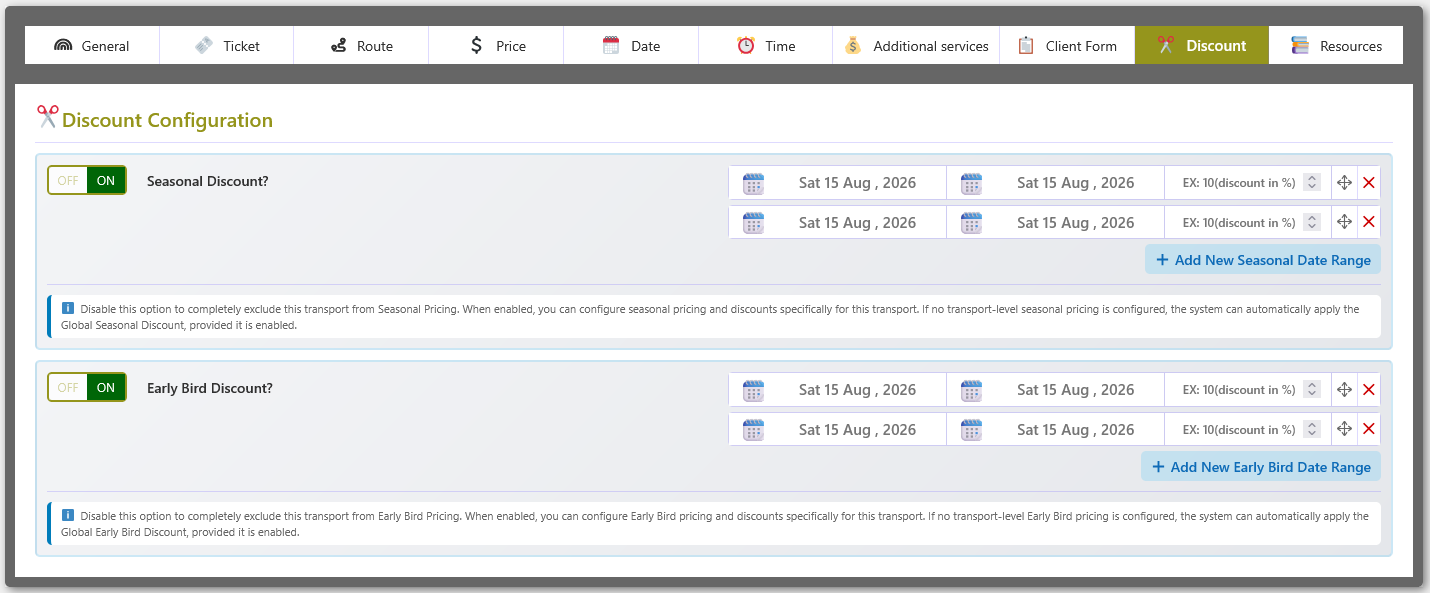
✂️ Discount Configuration (PRO)
The Discount system lets you configure transport-specific Seasonal Discounts and Early Bird Discounts. Define multiple date ranges and discount percentages for each type to control promotional and advance-booking pricing on a per-transport basis.
🌤️ Seasonal Discount
Seasonal discounts apply reduced pricing during specific date ranges — for example, holiday periods or off-peak seasons. You can define one or more seasonal periods per transport.
- Enable or disable Seasonal Discount for the transport.
- Define a start and end date for each seasonal discount period.
- Set the discount percentage for each seasonal date range.
- Add multiple seasonal date ranges when different periods require different discounts.
- Apply seasonal discounts specifically to the selected transport.
🐦 Early Bird Discount
Early Bird discounts reward passengers who book in advance. You define the qualifying booking window and the corresponding discount percentage.
- Enable or disable Early Bird Discount for the transport.
- Define a start and end date for each Early Bird discount period.
- Set the discount percentage for each Early Bird date range.
- Add multiple Early Bird date ranges when needed.
- Provide advance-booking discounts for eligible booking periods.
📅 Flexible Discount Periods
Both discount types support independent, overlapping, or sequential date ranges.
- Configure different discount percentages for different date ranges.
- Add multiple Seasonal Discount periods.
- Add multiple Early Bird Discount periods.
- Manage each discount period independently.
⚙️ Smart Discount Control
Transport-level settings give you granular control, with global settings available as a fallback.
- Disable Seasonal Discount to exclude the transport from seasonal pricing.
- Disable Early Bird Discount to exclude the transport from early bird pricing.
- Transport-level discount settings override global defaults when configured.
- Global discount settings apply when no transport-level discount is configured, if enabled.
💰 Partial Payment Configuration (PRO)
The Partial Payment tab under each transport lets you allow customers to pay only a partial amount of the booking price at checkout. You can define the deposit as a percentage of the total or as a fixed amount, independently for every transport.
Partial Payment is a site-wide PRO feature. The individual transport settings below either define a custom deposit for that transport or fall back to the global Partial Payment configuration when no transport-specific values are set.
🔀 Enable Partial Payment for the Transport
| Option | Description |
|---|---|
| Pay Partial Amount at Checkout? | Turn this switch to ON to allow customers to pay a partial amount for this transport at checkout. Turn it OFF to charge the full amount for this transport. |
🧮 Partial Payment Type & Value
When the switch is ON, the deposit calculation is defined by a type and a value:
- Partial Payment Type — choose Percentage (%) of Total or Fixed Amount.
- Partial Payment Value — enter the deposit value:
50means 50% of the total for a percentage, or500means a fixed 500 currency-unit deposit. - The deposit is never larger than the line total, and the remaining balance is shown to the customer.
🌐 Global Fallback
If the transport switch is ON but no valid type/value is saved for the transport, the global Partial Payment configuration set under Global Data → Partial Payment is used automatically. If neither a transport-level nor a global value is available, the full amount is charged.
🛒 At Checkout
For eligible transports, customers see a Payment Option block at checkout where they can choose to pay the full amount now or the partial amount (deposit) now. When the partial option is selected, the balance is subtracted from the cart and shown as a Partial Payment : Balance Due Later fee.
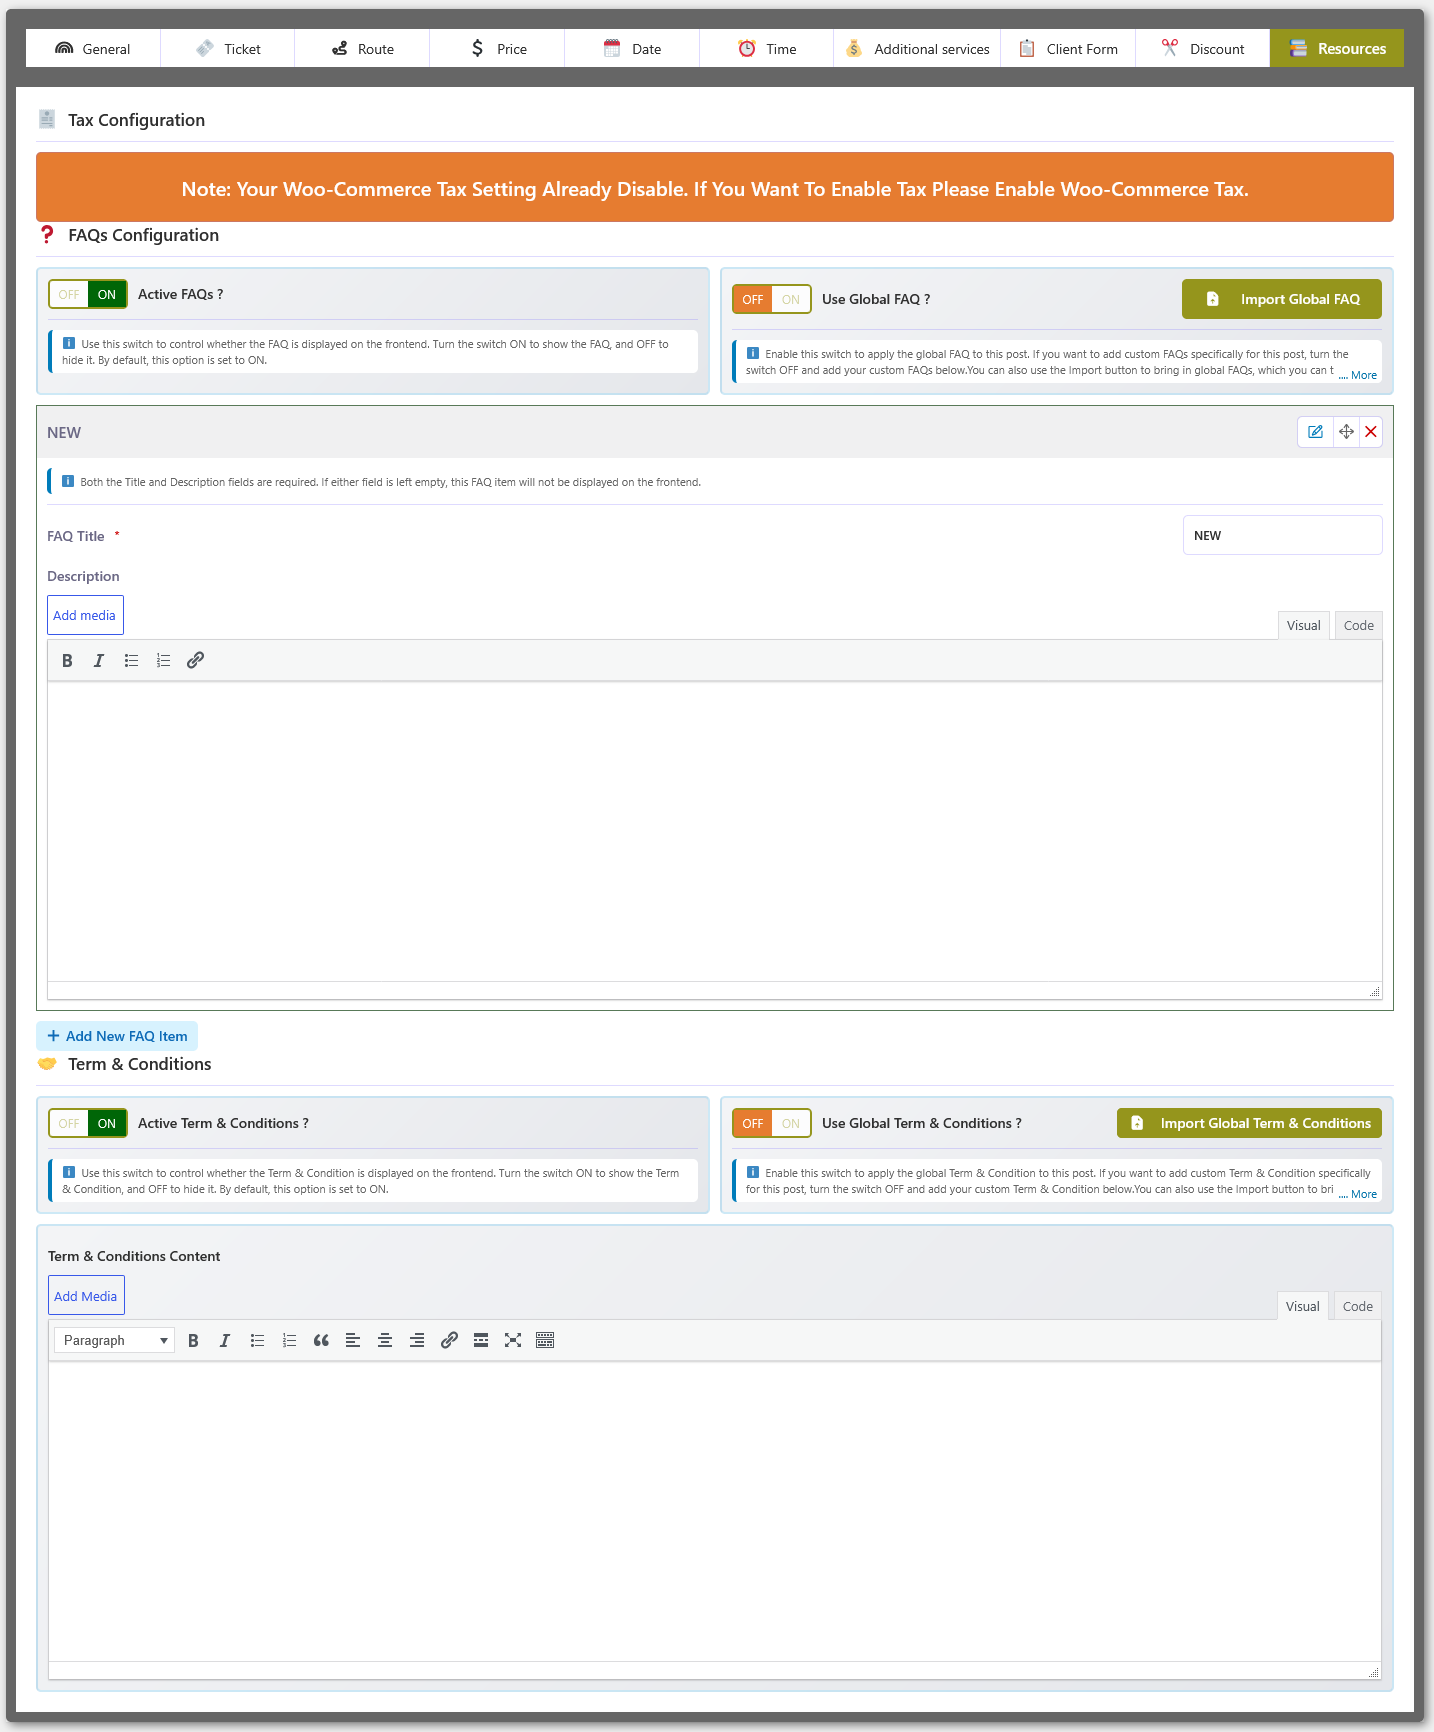
📚 Resources — Tax, FAQ & Terms & Conditions
The Resources section covers three per-transport settings: Tax calculation (via WooCommerce), Frequently Asked Questions, and Terms & Conditions that passengers must accept before completing a booking.
💰 Tax Configuration
Tax calculation for transport bookings is handled entirely through WooCommerce. You control whether tax applies by enabling or disabling WooCommerce Tax in your store settings.
- When WooCommerce Tax is enabled, taxes are automatically calculated and applied according to your configured WooCommerce tax rules and product settings.
- When WooCommerce Tax is disabled, no tax is calculated or displayed for transport bookings.
❓ FAQ Configuration
The FAQ system lets you display frequently asked questions and answers for each transport. You can define FAQs globally and import them into individual transports, or build transport-specific FAQ lists.
🌍 Global FAQ
From the Global Configuration panel you create and manage a standard set of FAQs that can be reused across transports.
- Define global questions and answers.
- Enable or disable the FAQ section globally.
- Maintain a consistent FAQ structure across transports.
🚍 Custom Transport-Level FAQ
Each individual transport can also have its own custom FAQ configuration, independent of the global set.
- Import FAQs from the global configuration.
- Add new FAQs specific to a transport.
- Modify imported questions and answers.
- Remove or reorder FAQs according to transport requirements.
🔄 FAQ Import & Customization
- One-click import from global FAQs.
- Fully editable after import.
- Combine global and custom FAQs when needed.
- Control FAQ order and visibility per transport.
📄 Terms & Conditions Configuration
The Terms & Conditions system lets you define the policies that passengers must review and accept before completing a transport booking. Like FAQs, terms can be managed globally or per transport.
🌍 Global Terms & Conditions
From the Global Configuration panel you create and manage standard Terms & Conditions that can be reused across transports.
- Define global Terms & Conditions content.
- Enable or disable terms acceptance globally.
- Maintain consistent booking policies across transports.
🚍 Custom Transport-Level Terms
Each individual transport can have its own custom Terms & Conditions configuration when the global terms are not sufficient.
- Import Terms & Conditions from the global configuration.
- Add custom terms specific to a transport.
- Modify imported terms when required.
- Replace or customize terms according to transport requirements.
🔄 Terms Import & Customization
- One-click import from global Terms & Conditions.
- Fully editable after import.
- Combine global and custom terms when required.
- Control visibility and acceptance requirements per transport.
📋 Orders List
The Orders List screen provides a centralized overview of all transport bookings and ticket orders. Search, filter, track, and manage passenger bookings from a single dashboard with advanced journey-based filtering, status tabs, pricing, and payment details.
🔎 Advanced Order Filtering
A powerful filtering system lets you narrow down bookings by transport, journey, route, and order date.
| Filter | Description |
|---|---|
| Transport | Filter bookings by a specific transport. |
| Journey Date | Search bookings for a specific journey date. |
| Journey Date Between | Search bookings within a selected journey date range. |
| From | Filter bookings by the selected boarding or pickup point. |
| To | Filter bookings by the selected dropping or destination point. |
| Order Date | Filter bookings based on the order creation date. |
📊 Booking Status Tabs
Separate status tabs let you view bookings according to their current booking and payment status.
| Tab | Description |
|---|---|
| All Booking | View all transport bookings regardless of status. |
| Booking Completed | Bookings that have been successfully completed. |
| Pending Payment | Bookings waiting for payment confirmation. |
| Processing | Bookings currently being processed. |
| On Hold | Bookings placed on hold. |
| Completed | Orders marked as fully completed. |
| Cancelled | Cancelled bookings. |
| Refunded | Bookings that have been refunded. |
| Failed | Bookings where payment or order processing failed. |
| Draft | Draft bookings not yet finalized. |
🎫 Booking & Ticket Information
Each order row displays key booking details at a glance.
- Transport — the transport associated with the booking.
- Journey Route — boarding and dropping points with journey date and time.
- Ticket Info — selected ticket types, quantities, and ticket prices.
- Additional Info — additional services or other booking-related information.
💰 Order & Payment Information
Financial details for each booking are displayed alongside the order.
- Price — the base ticket or order price.
- Additional — additional service charges.
- Total — the final booking amount.
- Payment Method — the payment method used for the booking.
- Status — the current order status.
👤 Customer & Billing Information
Customer details are linked directly to each order for quick reference.
- View customer billing name and email information.
- Access billing details associated with each booking.
- Review passenger and booking information from the order list.
📋 Order Management
From the centralized order table you can review, track, and manage every booking.
- View complete transport booking information from the centralized order table.
- Track booking and payment status quickly.
- Review journey route, ticket, passenger, and pricing information.
- Access detailed order information when required.
- Delete an order when it is no longer required.
📊 Order Summary
The order list provides a running total of the displayed booking amounts.
- Ticket prices, additional service charges, and final totals are summarized.
- Helps administrators quickly understand the total value of the filtered bookings.
✏️ Order Actions (PRO)
Every booking row has a set of quick-action buttons so common tasks — viewing the ticket, resending the notification, or editing the booking — can be done without leaving the list.
| Action | Description |
|---|---|
| Download the ticket / invoice PDF for the booking directly from the list. | |
| Resend E-Mail | Re-send the booking confirmation e-mail (with PDF attachment when configured) to the customer. |
| ✏️ Edit | Open the Edit Booking popup and modify the transport, route, journey date & time, stock, passengers, additional services and billing / status of an existing booking. |
| Request badge | Cancel Requested badge with approve / reject actions for customer cancellation requests. |
✏️ Edit Booking Popup (PRO)
Clicking the ✏️ edit button opens the Edit Booking popup with the booking prefilled. All prices, seat availability and limits are computed with the exact same logic the customer checkout uses, so what you see in the popup is always accurate.
- Transport — switch the booking to any other transport (with its ticket / seat-plan type clearly labelled).
- Route — pick any boarding → dropping pair for the selected transport, forward or return direction.
- Journey Date — choose another schedule date for the journey.
- Departure Time — keeps the resolved start / journey times and total travel duration in sync.
- Pick Up / Drop Off — change the boarding and destination stops.
- Stock — for ticket-type transports, set the quantity per ticket type; for seat-plan transports, click the interactive seat grid (Available / Selected / Sold legend with per-type prices).
- Passengers — edit the passenger details captured by the configured client form (when enabled).
- Additional Services — add or remove extra services with their live remaining counts.
- Billing & Order Status — name, e-mail, phone and address, plus the WooCommerce order status.
- Price Summary — line-by-line totals recalculated instantly; a note clarifies that the WooCommerce order total itself is not recomputed.
✅ Live availability & validation
Before a change can be saved, the popup re-checks everything the checkout would:
- Seats / tickets already sold or held are excluded — with the booking's own stock subtracted first, so an unchanged booking never blocks itself.
- Additional service quantities are validated against their remaining counts.
- Routes, journey dates and departure times are validated against the transport schedule.
- The transport seat type (seat-plan vs. ticket) cannot be changed on an existing booking — the popup warns and the save is blocked.


🔑 Licence-based updates (PRO)
With an active licence the PRO plugin receives automatic update checks from the abp-team.com update server. New versions appear on the standard Plugins → Installed Plugins and Dashboard → Updates screens just like any other plugin — no manual download is required.
1.0.4 (or later) does not show, trigger a fresh check with
Plugins → Check Again or Dashboard → Updates → Check Again, then confirm the licence is
Active on the Dashboard → License card.🎫 Ticket / Seat Plan Configuration
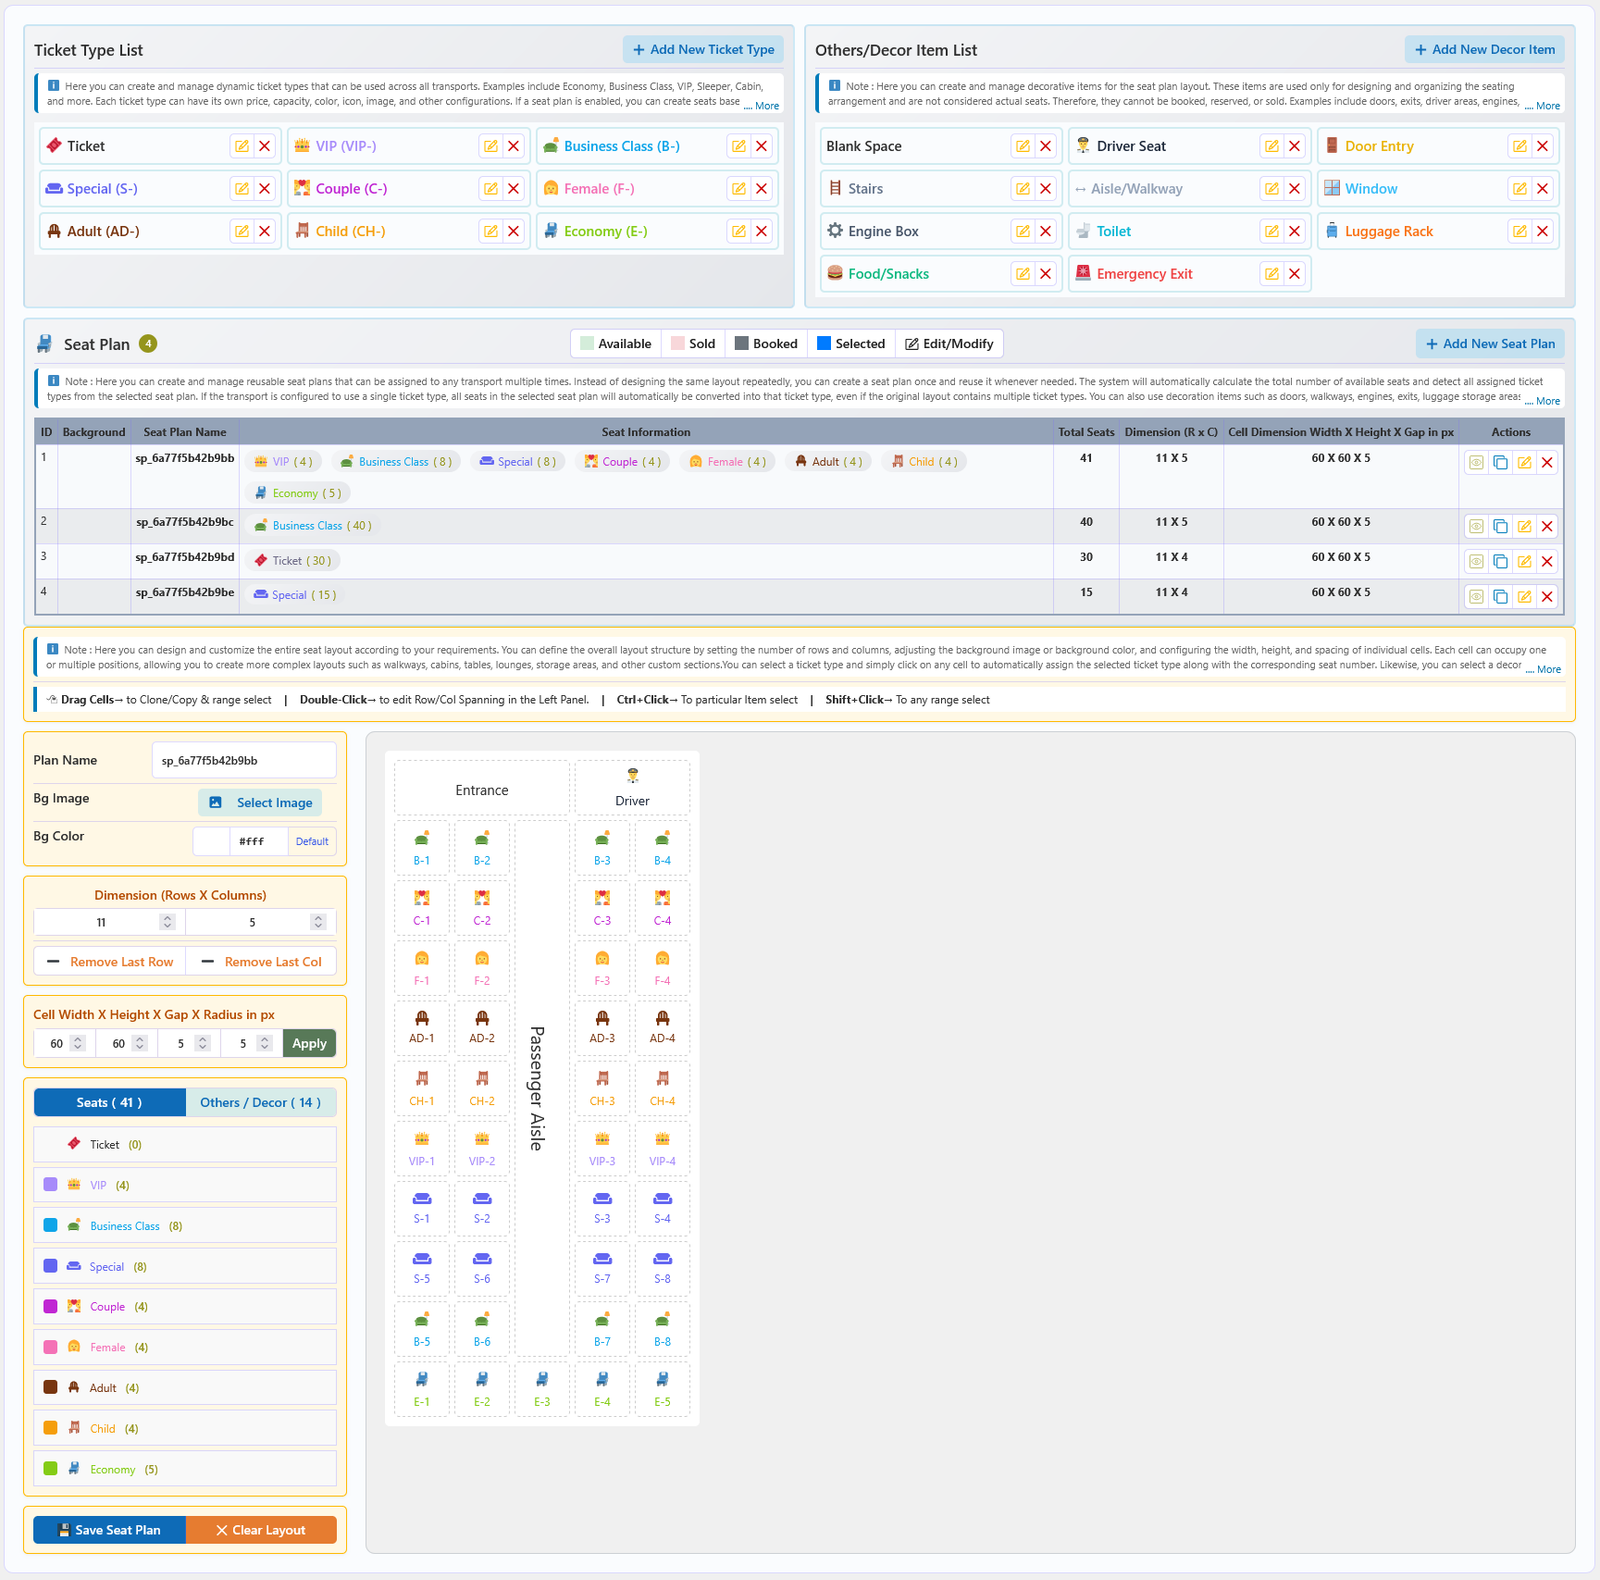
The Ticket / Seat Plan system lets you create and manage reusable ticket types, decorative layout items, and interactive seat plans. Build a seat plan once and assign it to multiple transports while maintaining full control over seat types, layout dimensions, and numbering.
🎫 Ticket Type Management
Define reusable ticket types that can be shared across multiple transports and seat plans.
- Create and manage dynamic ticket types for use across transports.
- Define ticket names, icons, colors, and ticket prefixes.
- Use different ticket types such as Ticket, VIP, Business Class, Special, Couple, Female, Adult, Child, and Economy.
- Reuse the same ticket types across multiple seat plans and transports.
- Configure ticket types according to your transport booking requirements.
🎨 Decor Item Management
Decor items represent non-seat elements of the transport layout — doors, aisles, windows, and so on.
- Create and manage decorative items for seat plan layouts.
- Use items such as Driver Seat, Door Entry, Stairs, Aisle/Walkway, Window, Engine Box, Toilet, Luggage Rack, Food/Snacks, and Emergency Exit.
- Arrange decorative elements to represent the actual transport layout.
- Use decor items for visual organization without treating them as passenger seats.
💺 Reusable Seat Plans
Create a seat layout once and assign it to multiple transports. This reduces repetitive work when the same seating arrangement is shared by different vehicles.
- Create and manage multiple reusable seat plans.
- Assign a seat plan to multiple transports.
- Automatically calculate the total number of available seats.
- Automatically identify and count assigned ticket types.
- View seat type quantities directly from the seat plan list.
- Duplicate or manage existing seat plans when needed.
⚙️ Seat Plan Layout Configuration
Fine-tune the visual layout of each seat plan to match the physical transport structure.
- Define the number of rows and columns for the seat layout.
- Configure the seat plan background image or background color.
- Set individual cell width, height, gap, and radius.
- Add or remove rows and columns according to the required layout.
- Create complex layouts using multiple cells for selected elements.
- Arrange seats and decorative items according to the actual transport structure.
🪑 Seat Type Assignment
Assign ticket types to individual cells in the layout and let the system handle seat numbering.
- Select a ticket type and assign it to available seat cells.
- Automatically assign seat numbers according to the selected ticket type.
- Manage different passenger seat categories within the same seat plan.
- View ticket-type-wise seat quantities while designing the layout.
- Select and modify individual seats or multiple cells when required.
🖱️ Interactive Seat Plan Editor
The visual editor provides drag-and-drop and multi-select controls for building layouts efficiently.
- Drag cells to change their position.
- Drag-select multiple cells for easier layout management.
- Double-click to edit row/column span settings.
- Ctrl + Click to select a particular item or range.
- Shift + Click to select any range of cells.
- Use the editor to build customized seating and transport layouts.
🔢 Automatic Seat Numbering
Seat numbers are generated automatically when you assign ticket types, keeping numbering organized across the plan.
- Automatically generate seat numbers when assigning ticket types.
- Maintain ticket-type-specific seat numbering.
- Keep seat numbering organized across the complete seat plan.
📊 Seat Plan Information
The seat plan list provides a summary of each plan's configuration.
- View total seats for each reusable seat plan.
- View ticket-type-wise seat quantities.
- View seat plan dimensions and cell configuration.
- Manage multiple seat plans from a centralized list.
➕ Add Order From Dashboard (PRO)
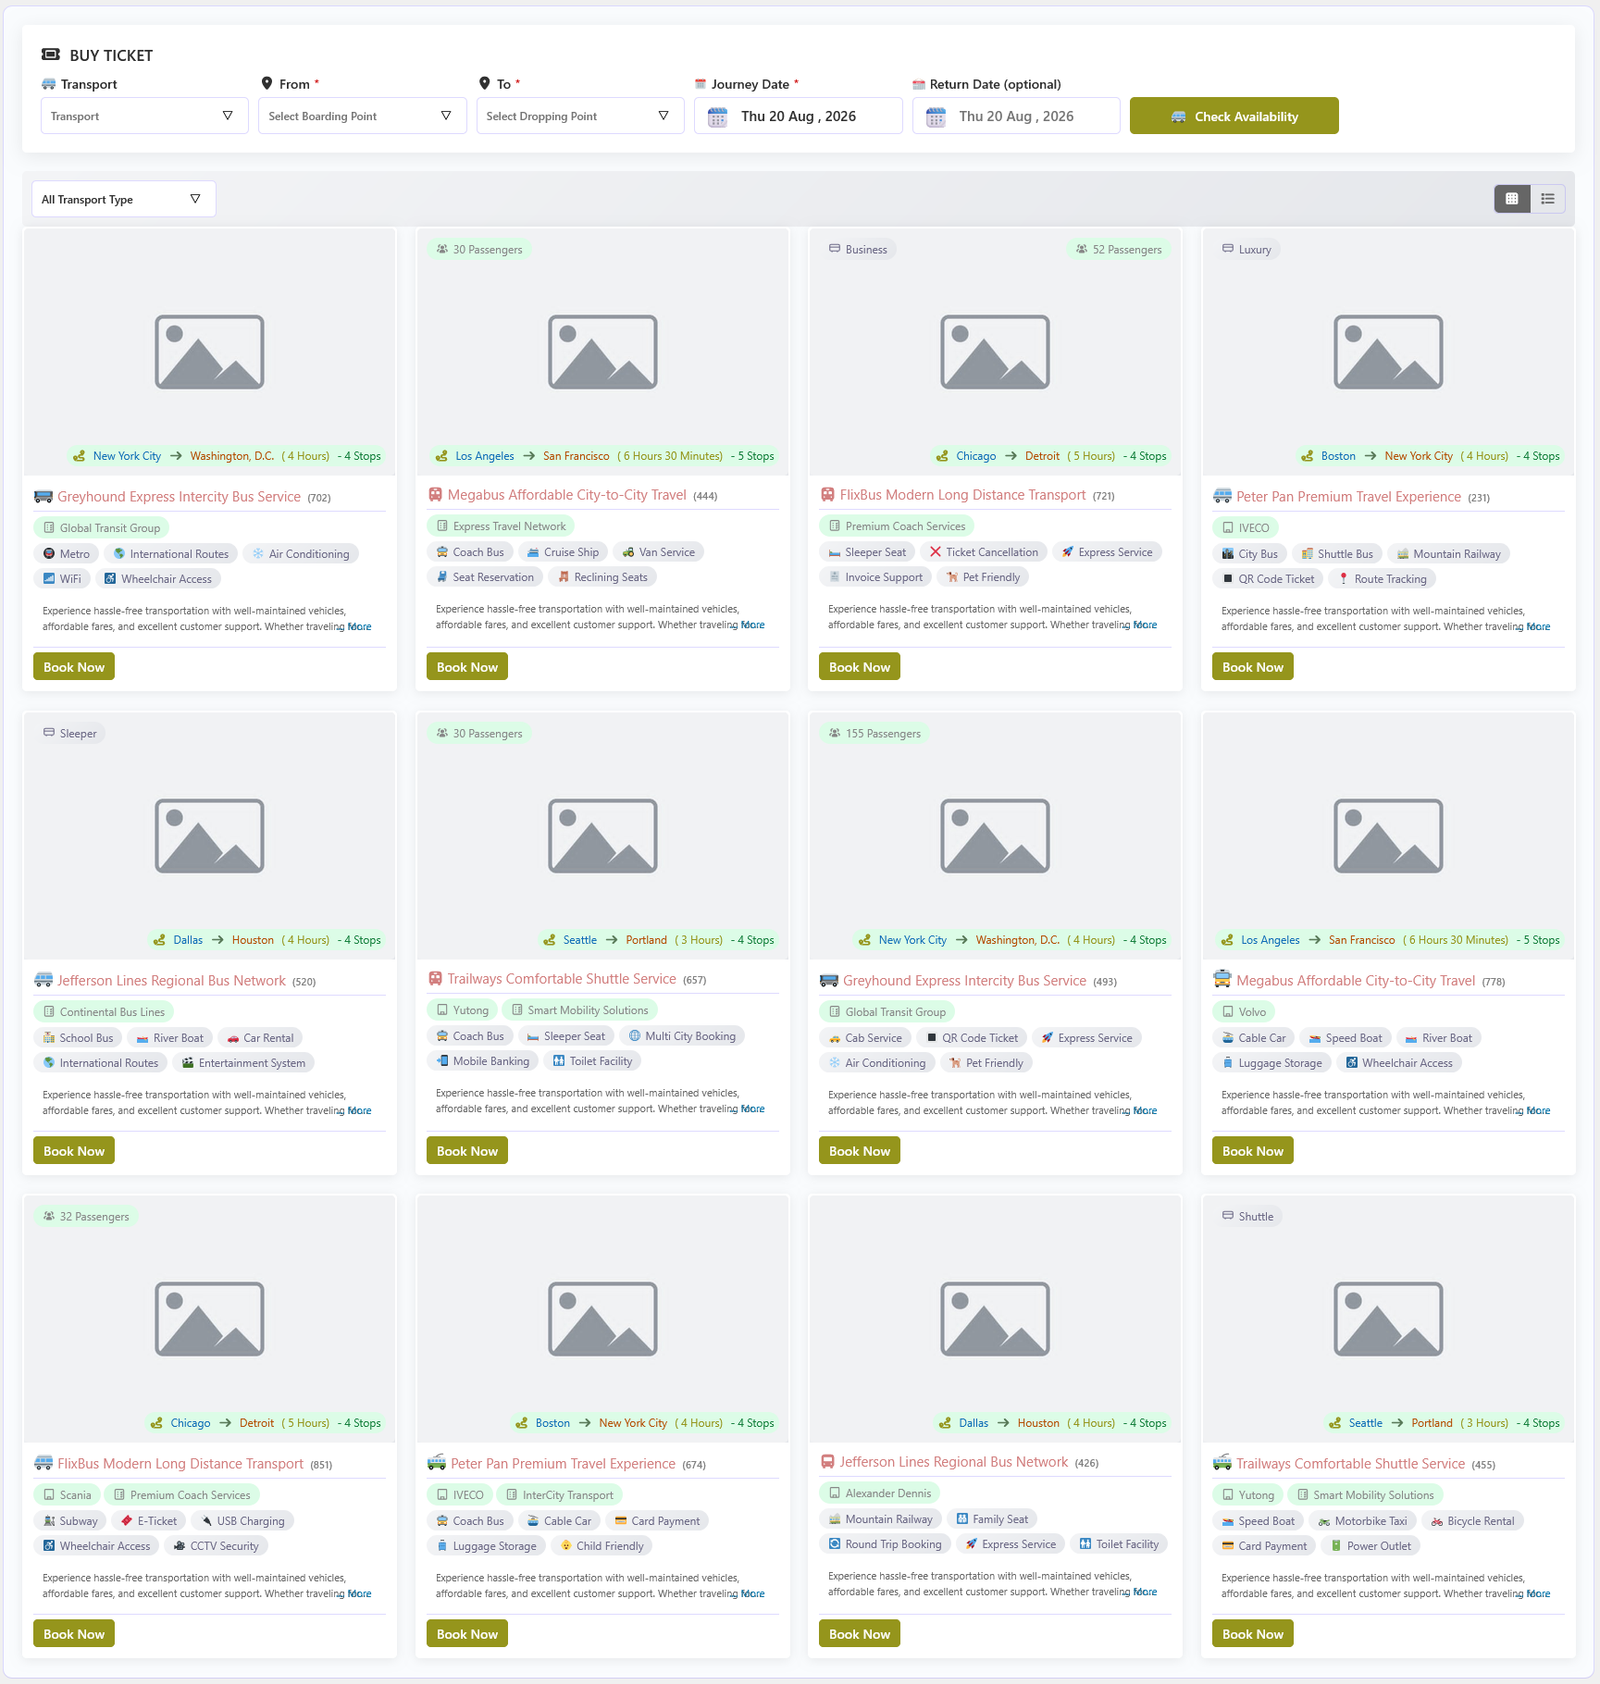
The Add Order feature lets administrators create transport bookings directly from the WordPress admin dashboard without requiring customers to complete the frontend checkout process. It is ideal for phone bookings, walk-in customers, offline reservations, and custom ticket arrangements.
🎯 Overview
Using the same booking experience available on the frontend, administrators can select a transport, choose pickup and return dates and times, configure booking details, and generate an order within a few clicks — no online payment required.
⚙️ Key Capabilities
- Create transport orders directly from the admin dashboard.
- No online payment is required to create an order.
- Select any available transport item or listing with ease.
- Use the same date, time, and availability selection system available on the frontend.
- Add custom customer information, including name, email, phone number, and billing details.
- Send booking notifications to any custom email address during order creation.
- Perfect for manual bookings, corporate reservations, and offline transport management.
- Quickly create and manage orders without leaving the dashboard.
🚫 Cancel Requests
The Cancel Requests admin screen (PRO) lists every booking for which a customer has requested cancellation. From here the admin approves or rejects each request, and configures how long before departure a request can still be sent.
The Cancel Requests menu tab appears in the main admin menu (between Add Order and Global Data) only when Transport Booking Pro is active. The menu label shows the number of pending requests in a badge.
📋 What the Page Shows
The list contains bookings that have a pending cancellation request from a customer. Each row shows:
- Action — Approve (✔) and Reject (✖) buttons.
- Order / Date — order number and creation date.
- Transport — transport name and journey start time.
- From – To — route direction of the booking.
- Ticket Info, Total and booking Status.
- Requested By / At — which customer sent the request and when.
✔️ Approve / ✖️ Reject
| Action | Result |
|---|---|
| Approve (✔) | The booking is cancelled (status changes to Cancelled) and its seats/tickets immediately become available again for other customers to book. |
| Reject (✖) | The cancellation request is cleared and the booking keeps its current status. |
Only administrators can approve or reject requests. When there are no pending requests, the page shows a "no orders found" notice.
⚙️ Cancel Request Setting
The Cancel Request Setting button (top-right) opens a popup to configure how long before the journey starts a customer can still send a request — in Hours or Days (e.g. 24 hours). The customer sees the Request Cancellation button on their My Account booking only while the journey begins more than this limit away.
🔗 How Requests Arrive Here
Customers send cancellation requests from their My Account → Transport Bookings page (PRO). The whole flow is admin-approved:
- The booking is flagged Cancel Request Pending for the customer until the admin decides.
- The booking row in the admin Order List and here in Cancel Requests shows a Cancel Requested badge while pending.
- Until the admin acts, the request stays in this list — the customer cannot send another request in the meantime.
🌐 Global Data Configuration
The Global Data Configuration system provides a centralized place to manage reusable data and common settings for the Transport Booking system. Instead of configuring the same information repeatedly for individual transports, you can define commonly used data globally and reuse it throughout your transport booking operations.
Global configuration helps maintain consistent data across transports while reducing repetitive setup and simplifying the management of routes, schedules, tickets, passengers, services, and other booking-related information.
🌍 Centralized Global Configuration
- Manage commonly used transport booking data from one centralized location
- Create reusable configurations for multiple transports
- Reduce repetitive data entry and configuration work
- Maintain consistent information throughout the booking system
⚙️ Available Global Data
| Global data | Description |
|---|---|
| Global Date Configuration | Define reusable operational date rules for transports. |
| Additional Services | Manage reusable passenger services and extra booking options. |
| Passenger Forms | Configure common passenger information fields. |
| Discount | Manage reusable Seasonal and Early Bird discount settings. |
| Stops | Maintain reusable boarding and dropping points. |
| Transport Type / Category | Organize transports using reusable types and categories. |
| Organizer | Manage organizer information for transports. |
| Brands | Maintain reusable transport brand information. |
| Features | Define commonly available transport features. |
| FAQ | Create reusable frequently asked questions and answers. |
| Terms & Conditions | Manage reusable booking terms and conditions. |
🔄 Reusable Configuration
Global data can be reused when configuring individual transports, allowing you to quickly apply previously configured information instead of creating the same data repeatedly.
- Configure data once and reuse it across multiple transports
- Import or apply global settings where supported
- Customize transport-level settings when specific requirements are needed
- Keep commonly used booking data organized and easy to manage
🚀 Benefits
- Saves time during transport configuration
- Reduces duplicate data entry
- Keeps common booking information consistent
- Makes large transport booking systems easier to manage
- Provides a structured foundation for transport-specific configuration
📅 Global Date Configuration
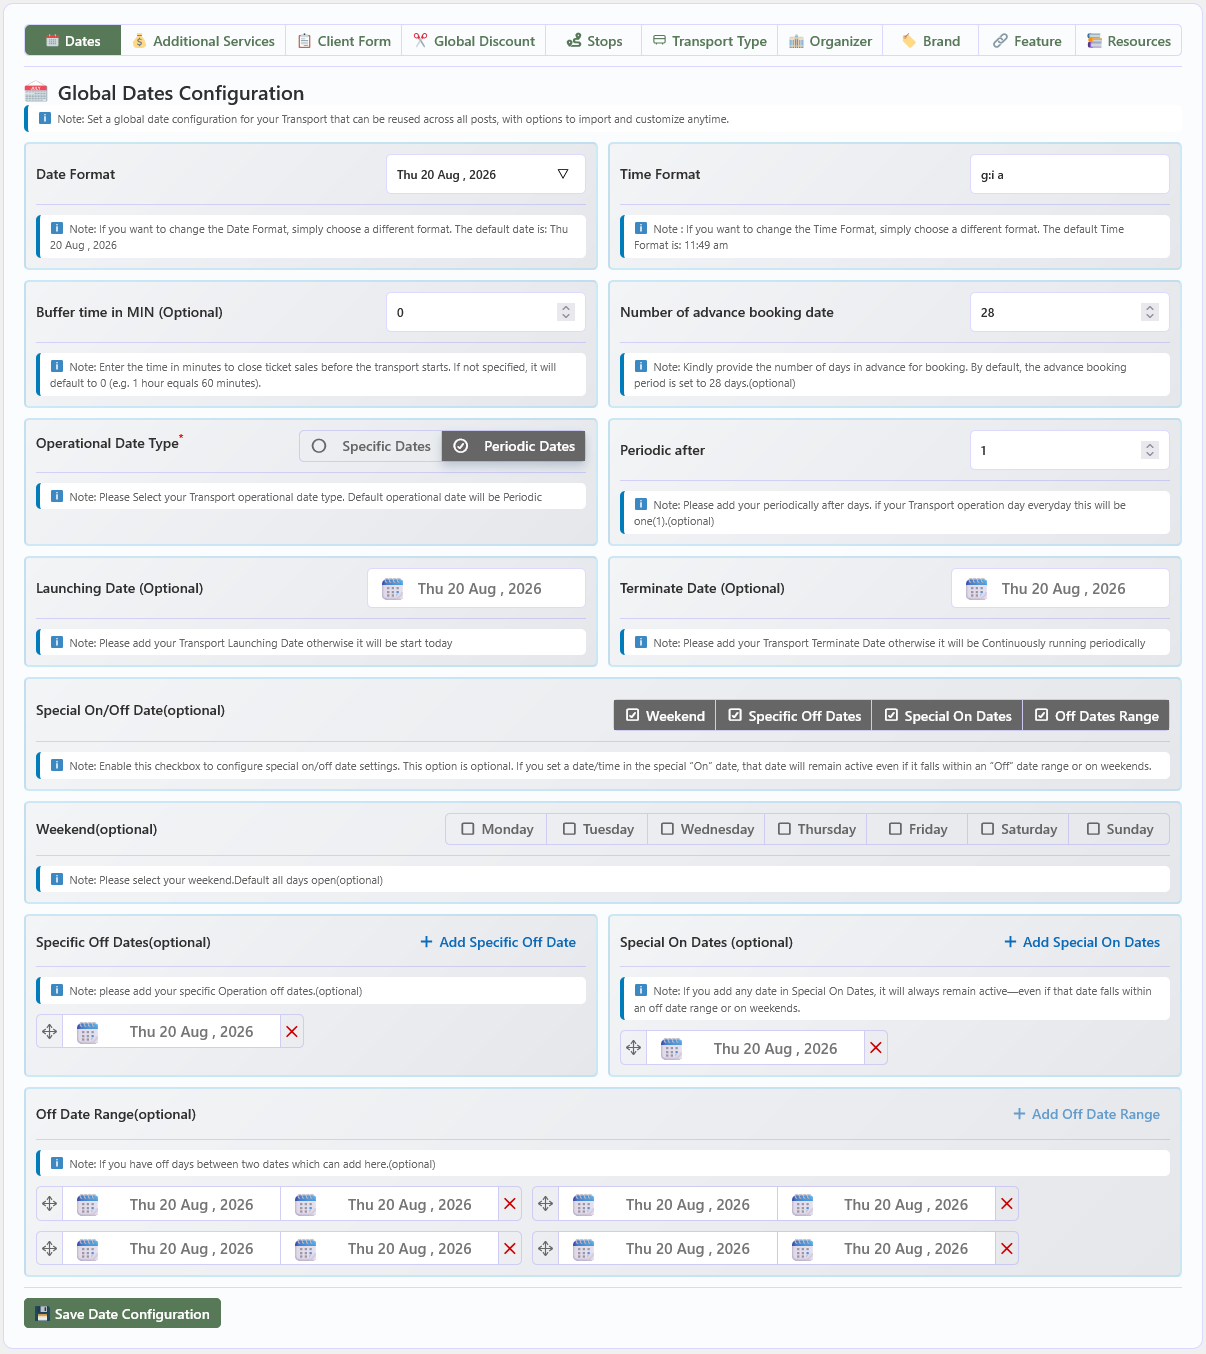
The Global Date Configuration screen under the Global Data tab lets you define the date format, time format, buffer time, advance-booking window, and full operational schedule for every transport post. These settings can be imported into individual transports and overridden per post when needed.
⚙️ Date & Time Settings
| Option | Description |
|---|---|
| Date Format | Choose the date format used throughout the Transport Booking system. Select a format that matches your website's requirements. |
| Time Format | Choose the time format used throughout the Transport Booking system. Select a format that matches your website's requirements. |
| Buffer time in MIN (Optional) | Enter the number of minutes before departure when ticket sales should close. For example, 1 hour equals 60 minutes. If left empty, this defaults to 0. |
| Number of advance booking date | Enter the number of days in advance that customers can book transport. The default is 28 days. This option is optional. |
🗓️ Operational Date Configuration
| Option | Description |
|---|---|
| Operational Date Type | Select how operational dates are configured. Choose Specific Dates for individual operating dates, or Periodic Dates for a recurring schedule. The default is Periodic Dates. |
| Periodic after | Enter the number of days after which the operational schedule repeats. For example, set this to 1 for daily operations. |
| Launching Date (Optional) | Set the transport's launch date. If left empty, operations begin from the current date. |
| Terminate Date (Optional) | Set the transport's termination date. If left empty, the transport continues running according to the configured operational schedule. |
🚫 Special On/Off Dates
Configure exceptions to the regular operational schedule. A date configured as a Special On Date remains active even if it falls within an off-date range or on a weekend.
| Option | Description |
|---|---|
| Special On/Off Date (Optional) | Enable the required options to configure special date settings. Available options include Weekend, Specific Off Dates, Special On Dates, and Off Dates Range. |
| Weekend (Optional) | Select the days that should be treated as weekends. Selected days can be used as non-operational days when the Weekend option is enabled. By default, all days are open. |
| Specific Off Dates (Optional) | Add individual dates when the transport should not operate. |
| Special On Dates (Optional) | Add individual dates that should remain active even if the date falls within an off-date range or on a configured weekend. |
| Off Date Range (Optional) | Add date ranges during which the transport should not operate. Multiple off-date ranges can be configured to match the transport schedule. |
💾 Saving the Configuration
Click Save Date Configuration to persist all global date settings and apply the configured operational schedule.
💰 Global Additional Services
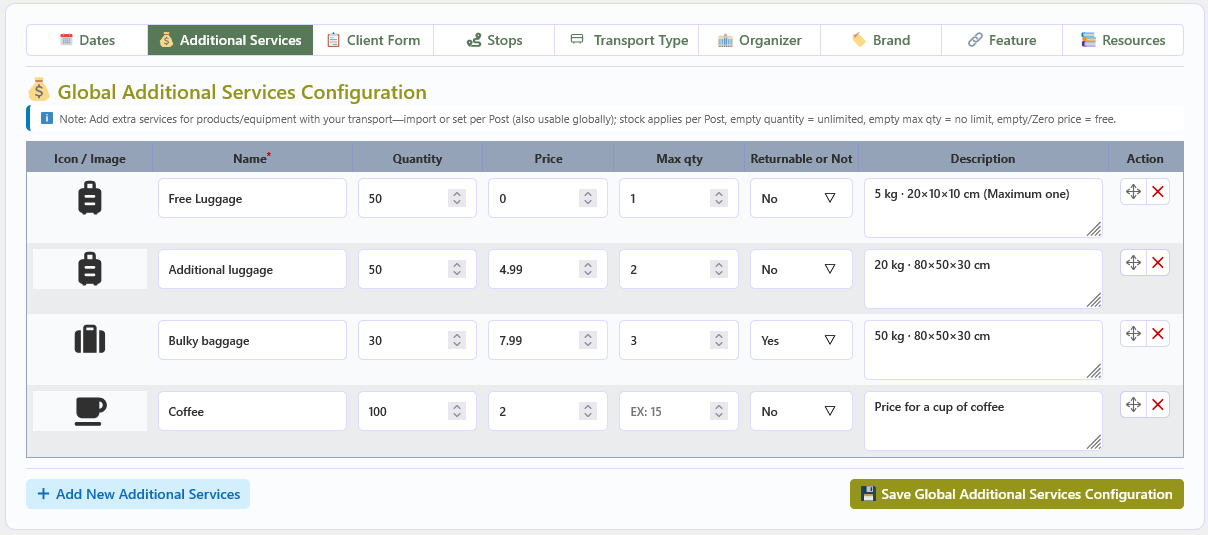
The Global Additional Services screen under the Global Data tab lets you create a reusable library of extra services, products, or equipment. These services can be imported into any transport post and also serve as the site-wide global default.
Additional services let customers add optional extras — such as equipment rental or supplementary products — to their booking. Stock levels are applied per transport post: an empty quantity means unlimited stock, an empty maximum quantity means no limit, and an empty or zero price means the service is free of charge.
📋 Field Reference
| Field | Description |
|---|---|
| Icon / Image | Set an icon or image to visually represent the additional service. This helps customers identify the service when it is displayed alongside the transport booking options. |
| Name | Enter the name of the additional service. This field is required and should clearly describe the service or equipment available to customers. |
| Quantity | Enter the available stock quantity for the additional service. The quantity is applied per transport post. Leave this field empty to allow unlimited availability. |
| Price | Enter the price of the additional service. An empty or zero price means the service is free. |
| Max qty | Set the maximum quantity a customer can select for this service in a single booking. Leave this field empty for no maximum limit. |
| Returnable or Not | Select whether the additional service or equipment is returnable. Choose Yes if the item must be returned, or No if it does not require returning. |
| Description | Enter a description of the additional service. Use this field to provide customers with useful information such as size, weight, usage details, or service conditions. |
| Action | Use the available action controls to reorder an additional service or remove it from the configuration. |
➕ Adding & Saving
- Add a service — Click Add New Additional Services to create and configure another additional service entry.
- Save — Click Save Global Additional Services Configuration to persist all configured services and their settings.
📋 Global Client Form
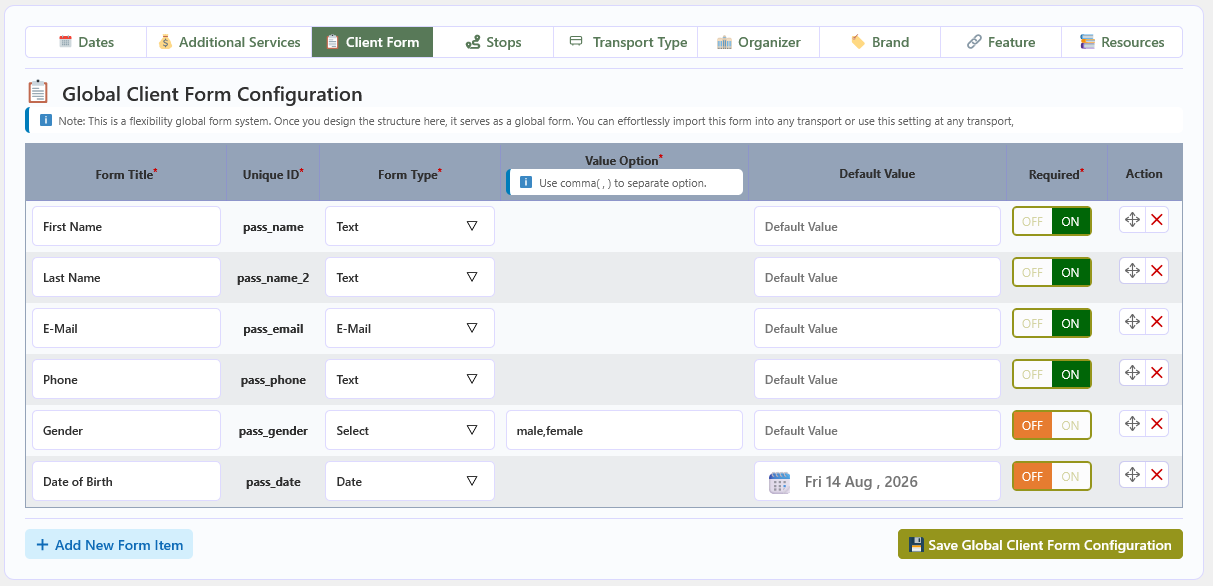
The Global Client Form screen under the Global Data tab lets you build a reusable client information form. Once the form structure is defined here, it can be imported into any transport post or used as the site-wide default.
The client form collects the information you need from each customer at booking time. Define your fields once in the global form, then import or reference them in individual transport posts to avoid duplicate configuration.
📋 Field Reference
| Field | Description |
|---|---|
| Form Title | Enter the label displayed to customers for this form field. This field is required. |
| Unique ID | Define the unique identifier used internally to process the submitted client information. This field is required. |
| Form Type | Select the input field type used to collect the client information. Choose the type that best matches the required data. |
| Value Option | Enter the available options for fields such as Select. Use a comma (,) to separate multiple options, for example: male,female. |
| Default Value | Enter a default value for the form field. The configured value is displayed automatically when the client form loads. |
| Required | Controls whether the customer must provide a value for this field. Turn ON to make the field required, or turn OFF to make it optional. |
| Action | Use the available action controls to reorder form items or remove an existing field from the global client form. |
➕ Adding & Saving
- Add a field — Click Add New Form Item to add another client form field and configure its title, unique ID, field type, options, default value, and required status.
- Save — Click Save Global Client Form Configuration to persist the configured form and make it available for reuse across transport posts.
✂️ Global Discount Configuration (PRO)
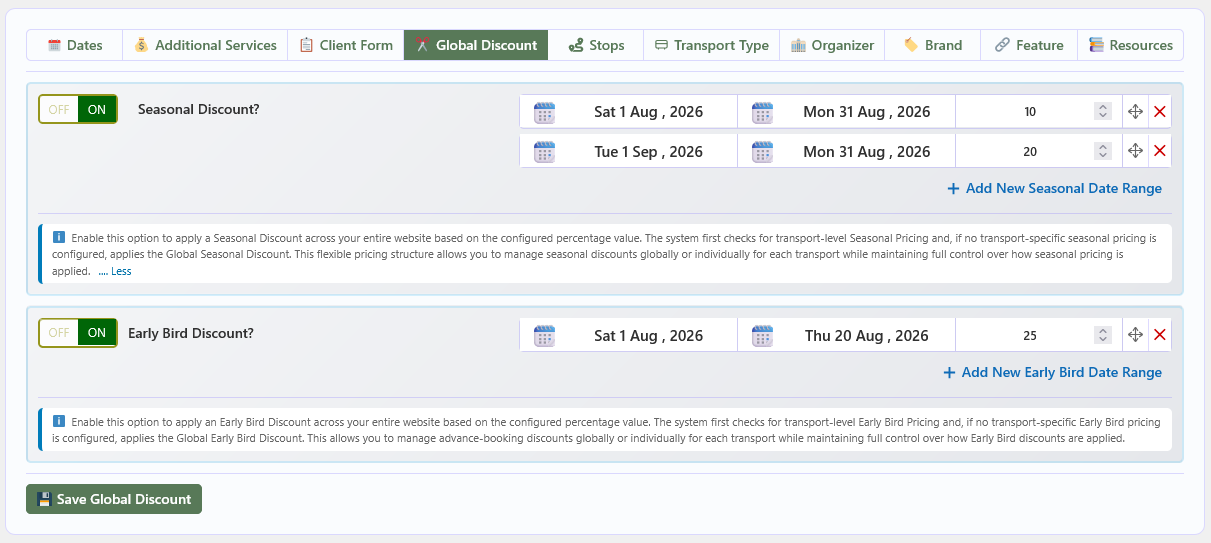
The Global Discount Configuration screen under the Global Data tab lets you enable and manage Seasonal Discount and Early Bird Discount rules across the entire website. When no transport-level discount pricing is configured, the applicable global discount is used automatically.
You can define multiple date ranges and discount percentages for each discount type. The system first checks transport-level discount pricing; if no transport-specific discount is found, it falls back to the global rules configured here.
🌦️ Seasonal Discount
| Option | Description |
|---|---|
| Seasonal Discount? | Enable or disable the Global Seasonal Discount feature. Turn ON to apply seasonal discounts across the website according to the configured date ranges, or turn OFF to disable it. |
| Seasonal Date Range | Define the start date and end date for each seasonal discount period. You can configure different discount percentages for different date ranges. |
| Seasonal Discount Percentage | Enter the discount percentage applied during the configured seasonal date range. |
| Add New Seasonal Date Range | Click Add New Seasonal Date Range to create an additional seasonal period with its own start date, end date, and discount percentage. |
🐦 Early Bird Discount
| Option | Description |
|---|---|
| Early Bird Discount? | Enable or disable the Global Early Bird Discount feature. Turn ON to apply early bird discounts across the website, or turn OFF to disable it. |
| Early Bird Date Range | Define the start date and end date for each early bird discount period. Use these to configure advance-booking promotional periods. |
| Early Bird Discount Percentage | Enter the discount percentage applied during the configured early bird date range. |
| Add New Early Bird Date Range | Click Add New Early Bird Date Range to create an additional early bird period with its own start date, end date, and discount percentage. |
⬇️ Discount Priority
The system checks transport-level Seasonal Pricing and Early Bird Pricing first. If no transport-specific discount is configured, the applicable global discount rules are applied.
💾 Saving the Configuration
Click Save Global Discount to persist the configured Seasonal and Early Bird discount settings along with their date ranges.
💰 Global Partial Payment Configuration (PRO)
The Partial Payment screen under the Global Data tab defines the website-wide default deposit for transport bookings. It is used automatically for every transport that enables Pay Partial Amount at Checkout? without its own transport-level type and value.
Partial Payment lets customers pay a deposit at checkout and settle the remaining balance later. The calculation method (percentage or fixed amount) is configured here globally and can be overridden individually for each transport.
🧮 Global Partial Payment Settings
| Option | Description |
|---|---|
| Partial Payment Type | Choose how the deposit is calculated: Percentage (%) of Total or Fixed Amount. |
| Partial Payment Value | Enter the deposit value. 50 means 50% of the total booking price, while 500 means a fixed 500 currency-unit deposit per eligible line. |
| Save Global Partial Payment | Click to save the global type and value, making them the site-wide default deposit. |
⬇️ Priority & Fallback
The system checks the transport-level Partial Payment settings first. If a transport enables partial payment but has no valid type/value of its own, the applicable global configuration is applied. When no valid value is available at either level, the full amount is charged.
🛒 Checkout Behaviour
- For eligible transports, customers see a Payment Option block at checkout and can choose to pay the full amount now or the partial amount (deposit) now.
- Selecting the partial option subtracts the balance from the cart and adds a Partial Payment : Balance Due Later fee.
- The order stores the full amount, deposit paid, and remaining balance, plus the payment option chosen by the customer.
📍 Global Location & Stop Management
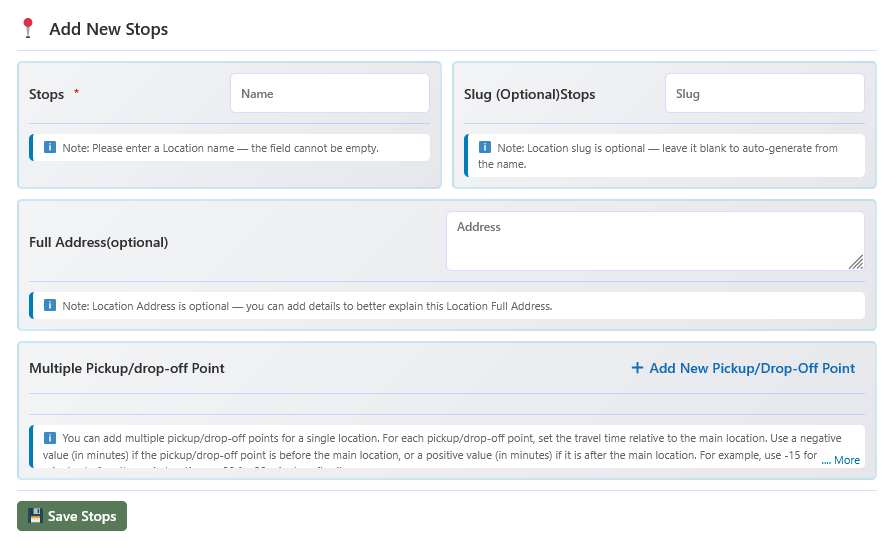
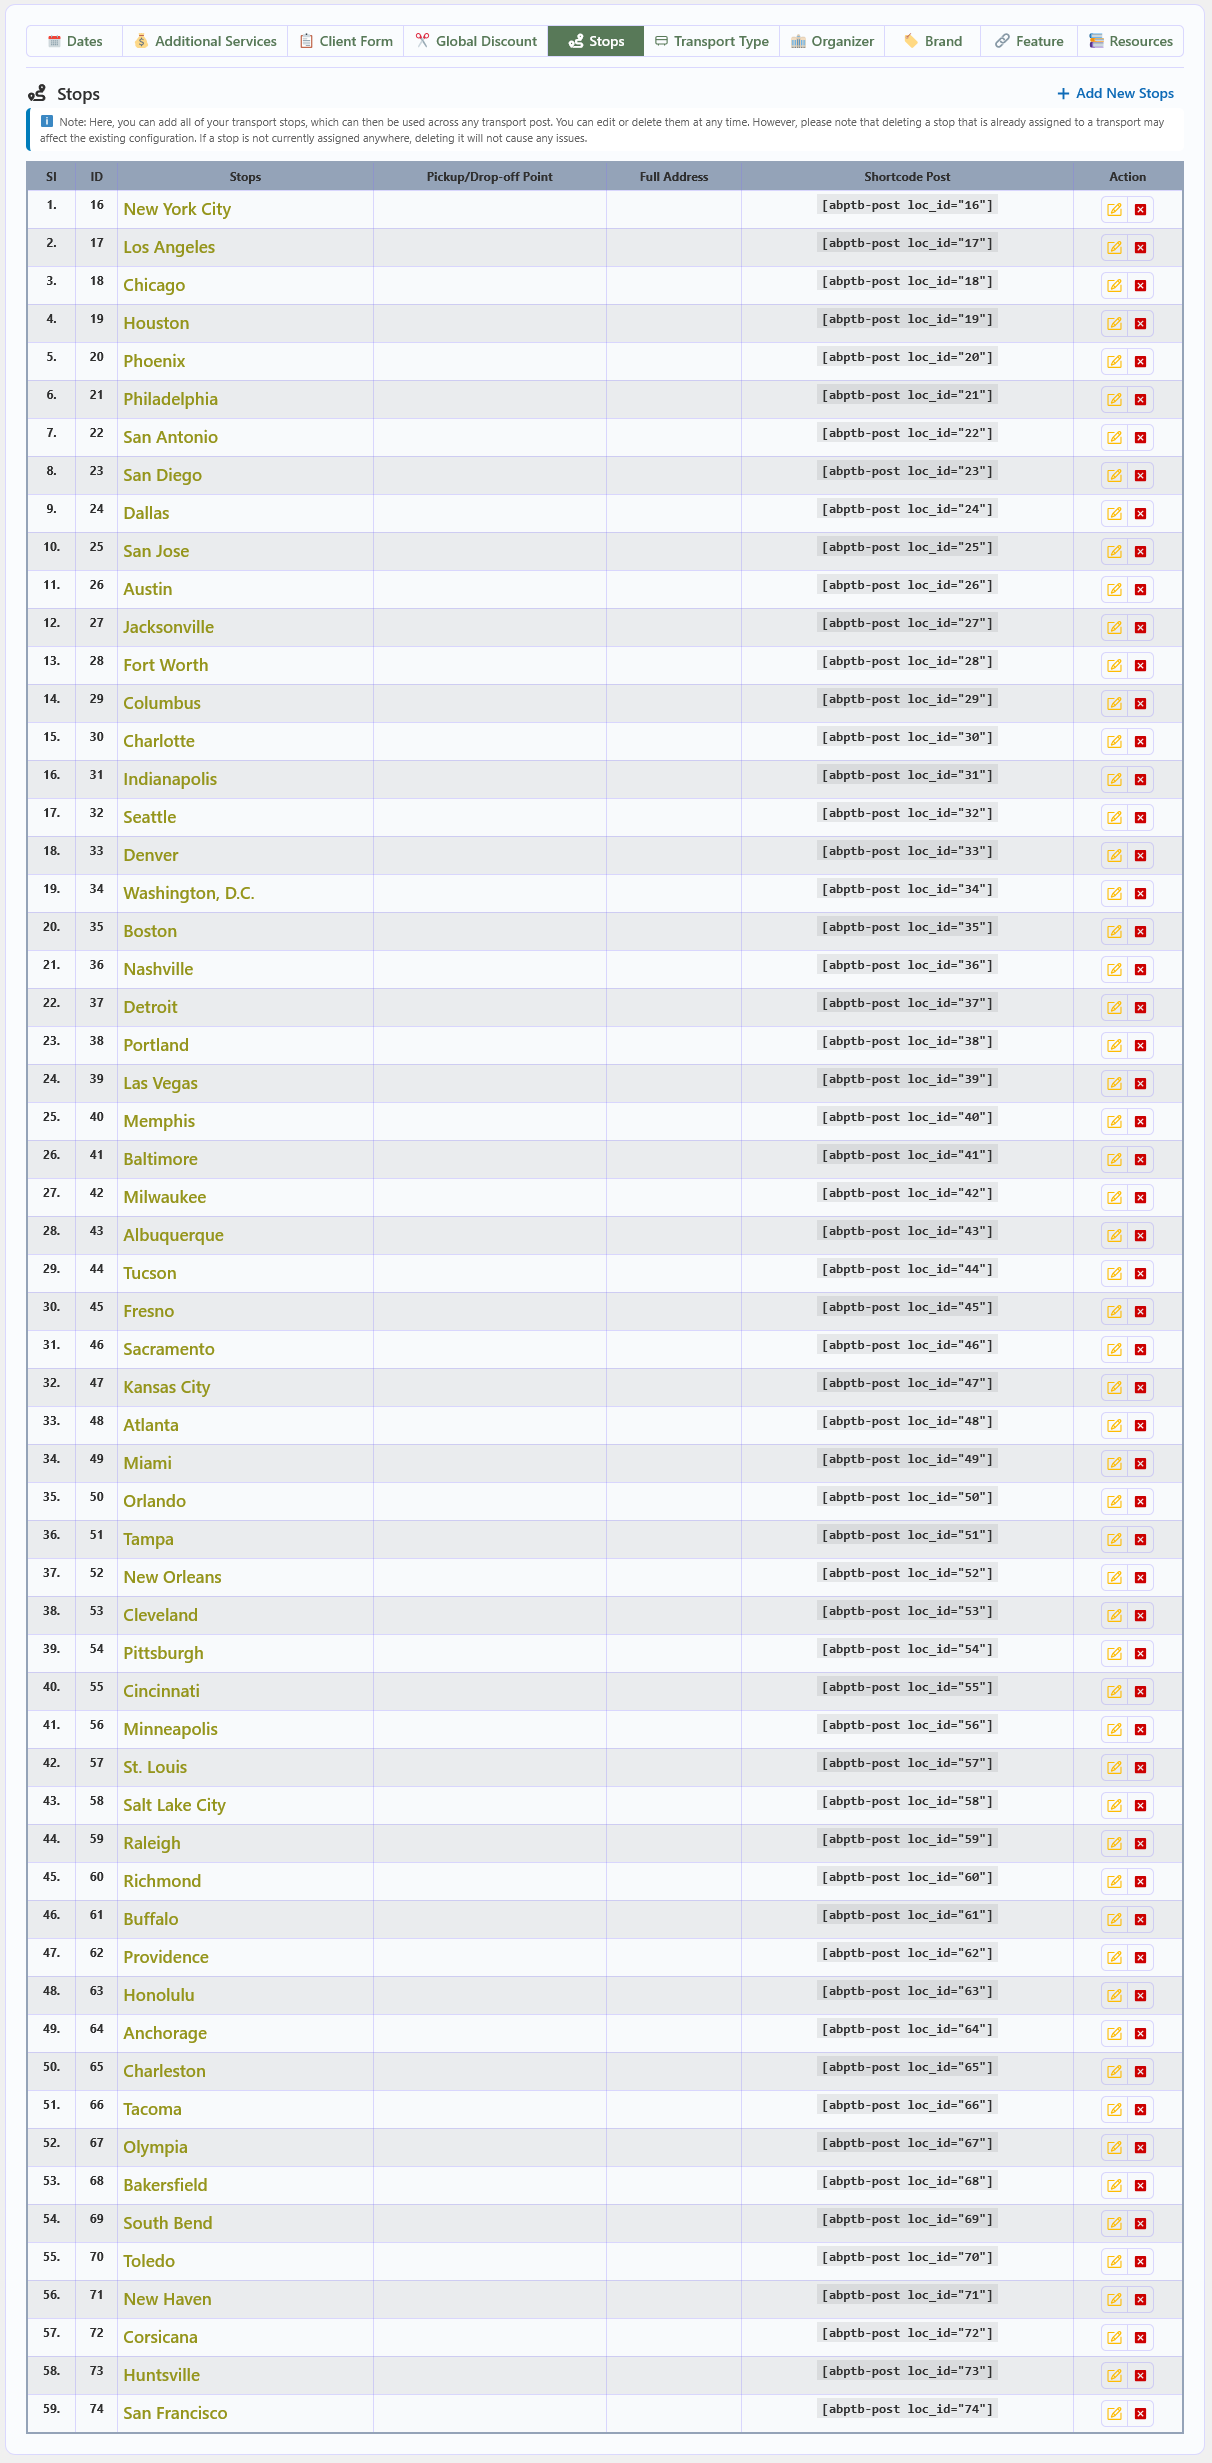
The Global Location & Stop Management screen under the Global Data tab lets you create reusable transport locations and stops. Create a location once, then assign it to any transport route as a pickup, drop-off, boarding, or intermediate stop. Changes to a global location are automatically reflected across all routes and transports where it is used.
🏗️ Managing Locations
The location list displays all existing global locations. From this list you can view, edit, or delete locations, and add new ones.
🔍 Location-Based Transport Listing
The [abptb_list] shortcode supports location-based transport filtering. Pass a location ID to
display only the transports available at that location.
| Parameter | Description |
|---|---|
loc_id | Shows all transports available at the selected location. |
bp | Shows transports departing from the selected boarding location (use the location ID as the value). |
dp | Shows transports arriving at the selected drop-off location (use the location ID as the value). |
🏘️ Global Transport Type / Category
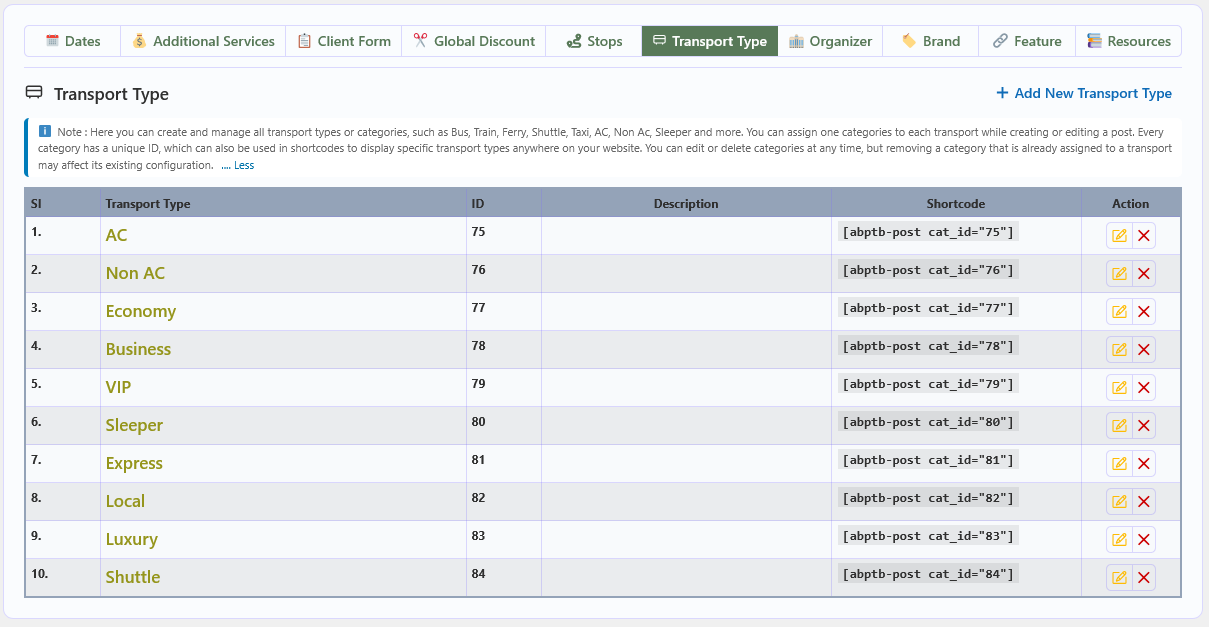
The Global Transport Type / Category screen under the Global Data tab lets you create, edit, and delete transport types or categories. Each type includes a name, optional slug, and optional description, and a shortcode that can be used to display transports of that type.
📋 Managing Transport Types
The category list displays all existing transport types. From this list you can view, edit, or delete categories and create new ones.
- Use the Edit option to update an existing transport type or category.
- Use the Delete option to remove an existing transport type or category.
- Click Add New Transport Type to create a new category.
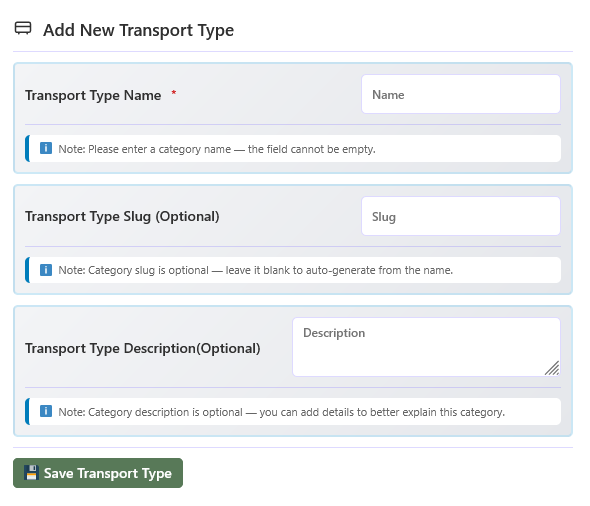
➕ Adding a New Transport Type
- Enter the name — Provide a Transport Type Name for the new category.
- Set a slug (optional) — Add a Transport Type Slug, or leave it blank to generate one automatically from the name.
- Add a description (optional) — Enter a Transport Type Description to provide additional information about the category.
- Save — Click Save Transport Type to persist the new category.
🏢 Global Organizer Configuration
The Global Organizer screen under the Global Data tab lets you create, edit, and delete organizers, operators, or companies. Each organizer includes a name, optional slug, and optional description, and a shortcode that can be used to display transports from a specific organizer.
📋 Managing Organizers
The organizer list displays all existing organizers. From this list you can view, edit, or delete organizers and create new ones.
- Use the Edit option to update an existing organizer.
- Use the Delete option to remove an existing organizer.
- Click Add New Organizer to create a new organizer.
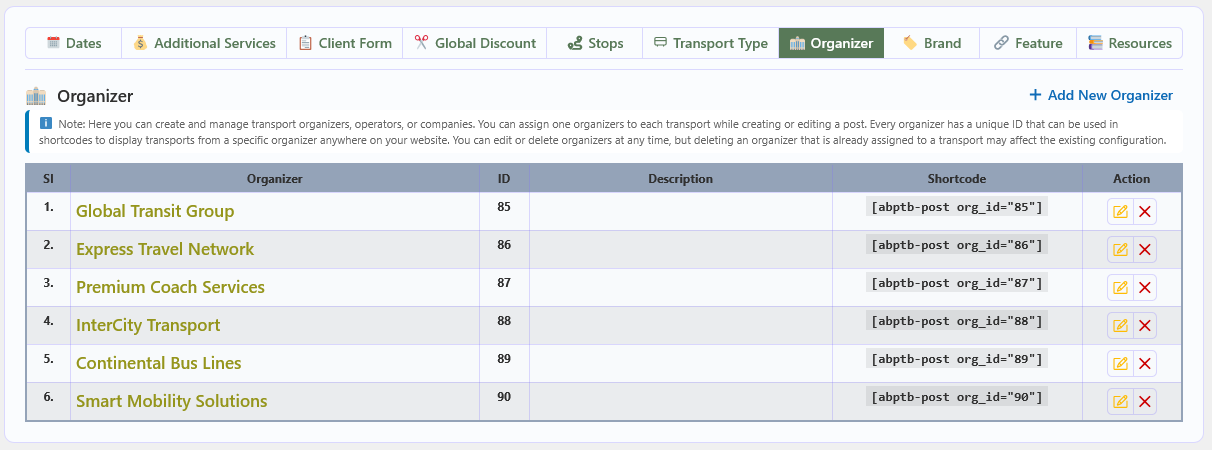
➕ Adding a New Organizer
- Enter the name — Provide an Organizer Name for the new organizer.
- Set a slug (optional) — Add an Organizer Slug, or leave it blank to generate one automatically from the name.
- Add a description (optional) — Enter an Organizer Description to provide additional information about the organizer.
- Save — Click Save Organizer to persist the new organizer.
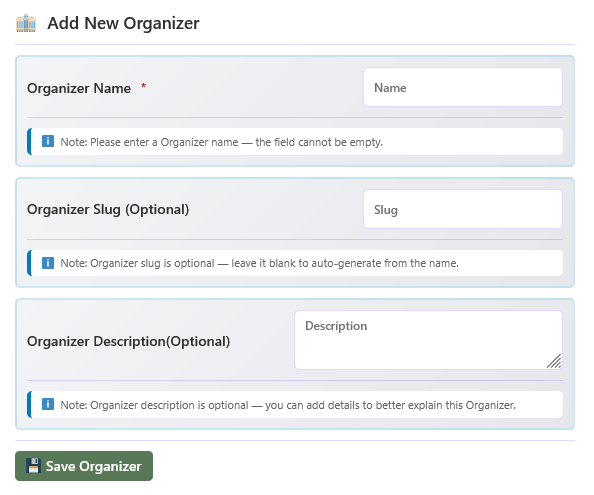
🏷️ Brands Library
The Brands section of the Global Configuration panel lets you create, update, and delete the brands, manufacturers, or service providers used by your transports. Assign a brand to a transport while creating or editing a post, or use the provided shortcode to display transports from a specific brand.
🎯 Overview
Brands give you a single, reusable library of manufacturers, operators, or service providers that can be linked to any transport. Because brands are managed in one central place, you maintain consistent naming and avoid re-entering the same information for every transport.
🏷️ Managing brands
- View all brands — The list displays all currently available brands together with their details.
- Edit a brand — Use the Edit option to update an existing brand.
- Delete a brand — Use the Delete option to remove an existing brand.
- Add a new brand — Use the Add New Brand option to create a new brand.
- Use the shortcode — Use the displayed Shortcode to show transports assigned to a specific brand.
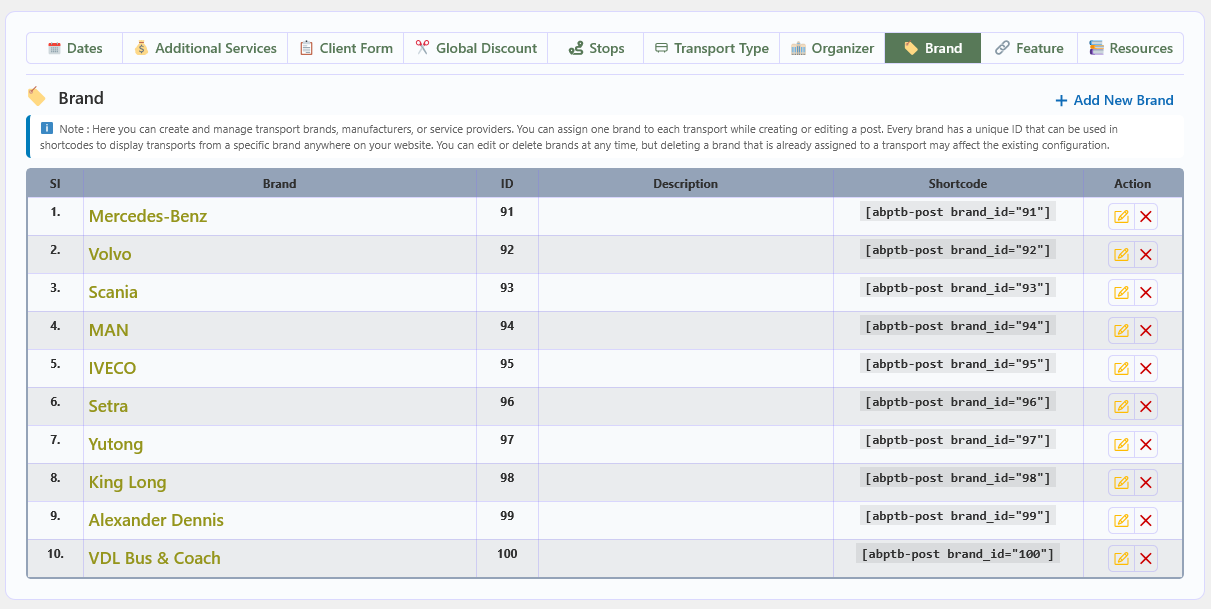
🆕 Adding a new brand
- Enter the Brand Name — This is the only required field and is used to create the new brand.
- Add a Brand Slug — An optional slug for the brand; leave it blank to generate one automatically from the name.
- Add a Brand Description — Optional text providing additional information about the brand.
- Save the brand — Click Save Brand to store the new brand.
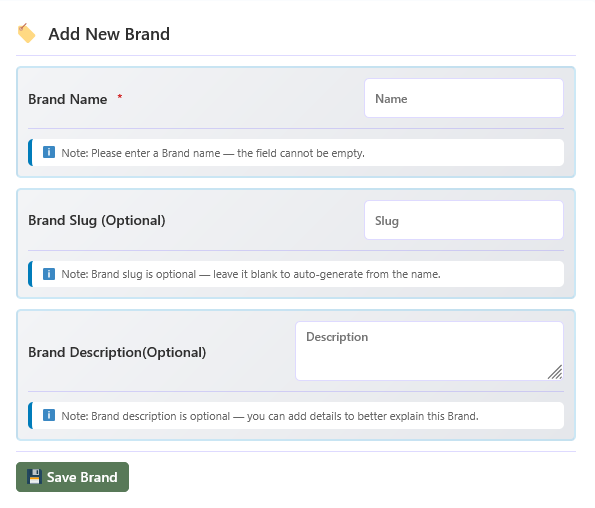
🔗 Features Library
The Features section of the Global Configuration panel lets you create, update, and delete the features your transports offer. Manage feature details in one place and reuse them whenever you create or edit a transport.
🎯 Overview
Features describe the individual services or attributes a transport provides, such as Wi-Fi, air conditioning, or refreshments. By keeping them in a central library, you can apply the same set of features consistently across your transports instead of re-entering them each time.
🔗 Managing features
- View all features — The list displays all currently available features together with their details.
- Edit a feature — Use the Edit option to update an existing feature.
- Delete a feature — Use the Delete option to remove an existing feature.
- Add a new feature — Use the Add New Feature option to create a new feature.
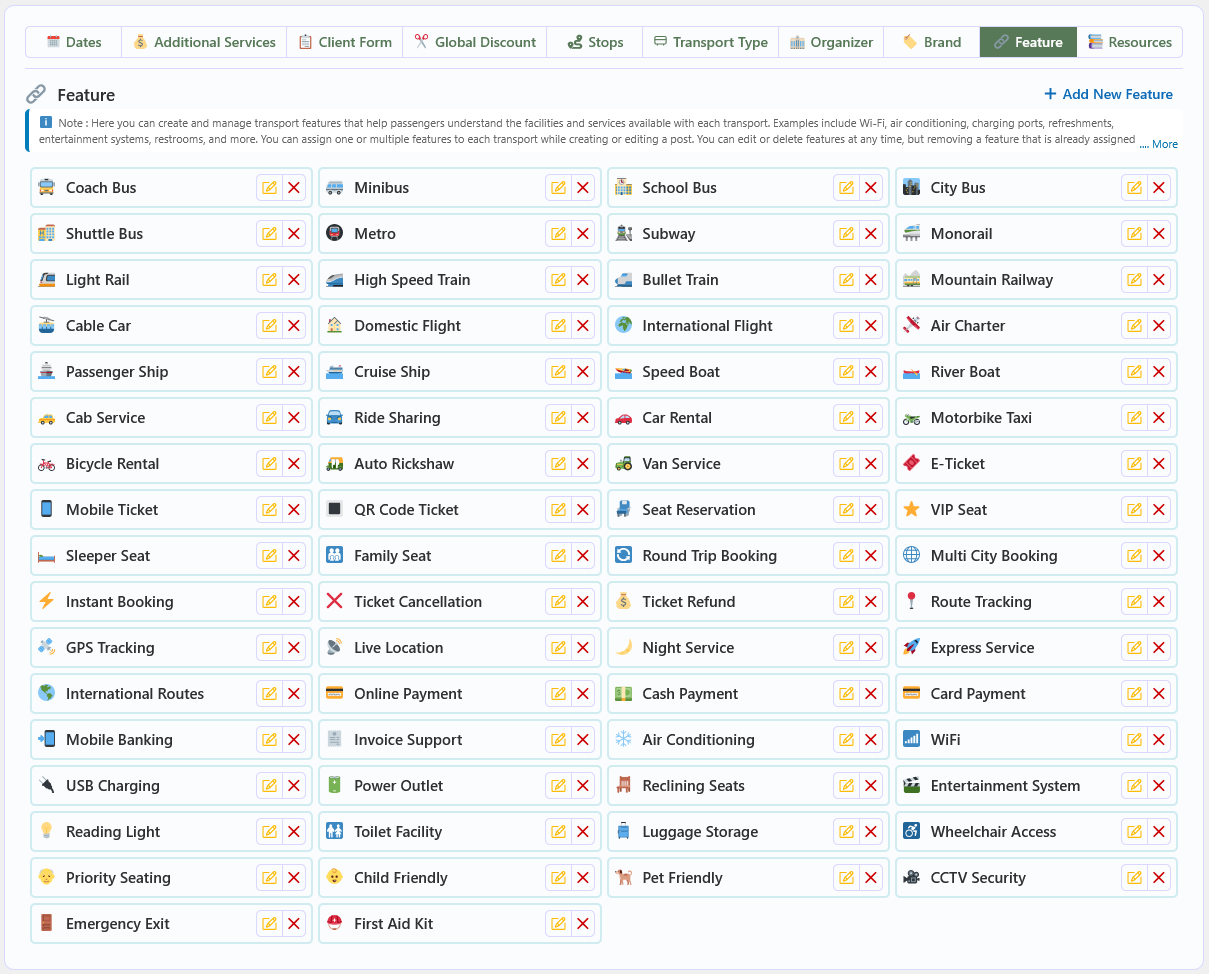
🆕 Adding a new feature
- Enter the Feature Name — The name of the feature you want to create.
- Add a Feature Value — An optional value for the feature; leave it blank if not required.
- Save the feature — Click Save Feature to store the new feature.
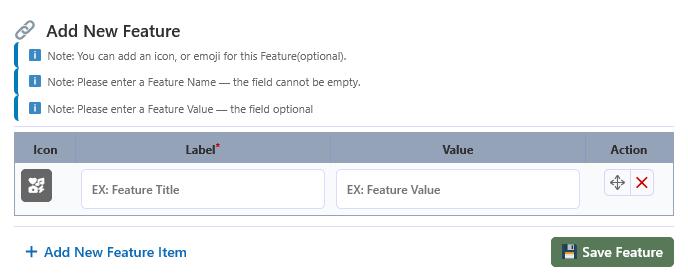
📚 Global Resources — FAQ & Terms & Conditions
The Global Resources section of the Global Configuration panel lets you create and manage a standard set of FAQs and booking Terms & Conditions that can be reused across any transport. These global resources can be applied directly or imported and customized for individual transports as needed.
❓ FAQ Configuration
Define reusable questions and answers once, then use them on any of your transports. Global FAQs keep your support content consistent while still allowing each transport to maintain its own custom FAQ set.
- Define reusable global questions and answers.
- Enable or disable the FAQ system globally.
- Use global FAQs across any transport.
- Import global FAQs into individual transports.
- Maintain a consistent FAQ structure across transports.
🚍 Transport-level FAQ
Each individual transport can use the global FAQ configuration or maintain its own custom FAQ content when different information is required.
- Use global FAQs for the transport.
- Import FAQs from the global configuration.
- Add new FAQs specific to a transport.
- Modify imported questions and answers.
- Remove or reorder FAQs according to transport requirements.
🔄 Import & reuse system
- One-click import from global FAQs.
- Reuse the same global FAQs across multiple transports.
- Fully editable after import.
- Combine global and custom FAQs when needed.
- Control FAQ order and visibility.
⚙️ Smart behavior
- Global FAQs act as a reusable FAQ resource.
- Any transport can use the global FAQ configuration.
- Imported FAQs can be customized independently.
- Changes to imported FAQs do not affect the global configuration.
🚀 Benefits
- Create FAQs once and reuse them across multiple transports.
- Saves time when managing similar transport information.
- Reduces repetitive FAQ configuration.
- Provides flexible FAQ management for different transports.
📄 Terms & Conditions Configuration
Create reusable global booking terms that can be used across any transport. Global Terms & Conditions can be applied directly to transports or imported and customized when transport-specific policies are required.
🌍 Global Terms & Conditions
From the Global Configuration panel, you can create and manage standard Terms & Conditions that can be reused across any transport.
- Define reusable global Terms & Conditions.
- Enable or disable terms acceptance globally.
- Use global terms across multiple transports.
- Maintain consistent booking policies across transports.
🚍 Transport-level terms
Each individual transport can use the global Terms & Conditions or configure its own custom terms when specific policies are required.
- Use global Terms & Conditions for the transport.
- Import Terms & Conditions from the global configuration.
- Add custom terms specific to a transport.
- Modify imported terms when required.
- Replace or customize terms according to transport requirements.
🔄 Import & reuse system
- One-click import from global Terms & Conditions.
- Reuse the same global terms across multiple transports.
- Fully editable after import.
- Combine global and custom terms when required.
- Control visibility and acceptance requirements.
⚙️ Smart behavior
- Global terms act as a reusable booking policy resource.
- Any transport can use the global Terms & Conditions.
- Imported terms can be customized independently.
- Changes to imported terms do not affect the global configuration.
🚀 Benefits
- Create booking policies once and reuse them across transports.
- Saves time with reusable global terms.
- Ensures consistent booking policies across transports.
- Allows transport-specific policies when required.
- Improves transparency and booking compliance.
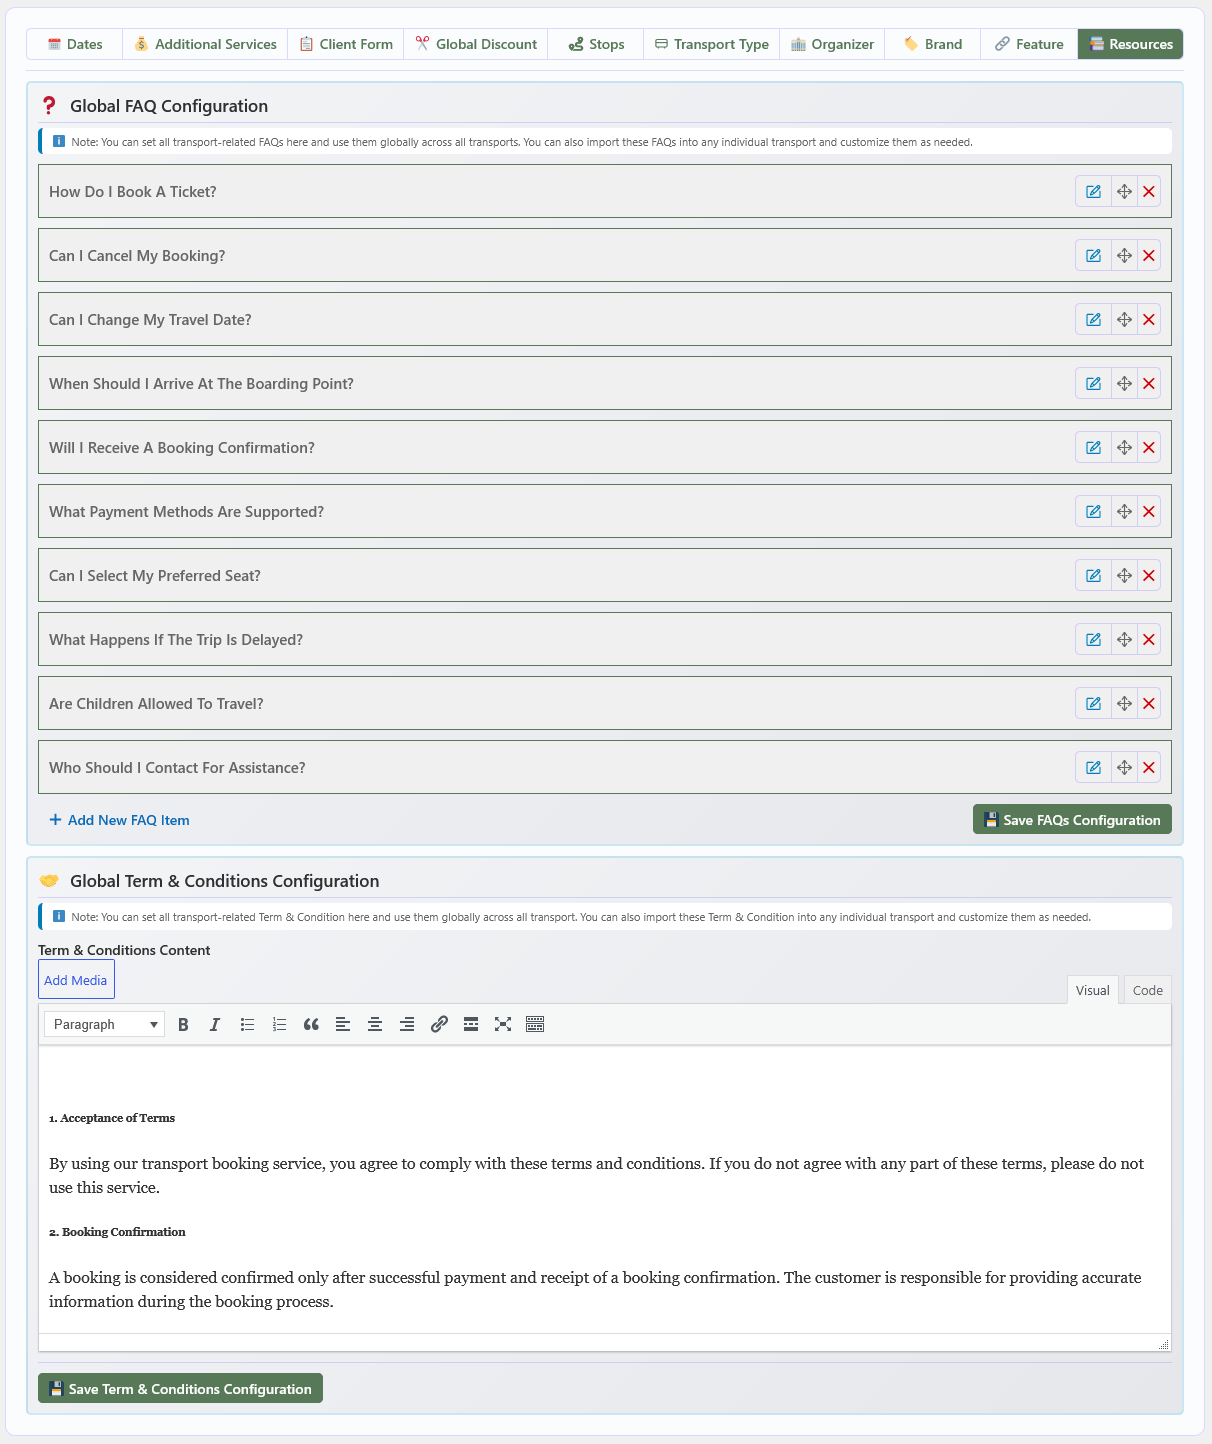
⚙️ Global Configuration
Global Configuration allows you to define the default settings for your entire Transport Booking system. These settings control common system behavior, booking options, labels, URLs, and other shared configurations used throughout the transport booking platform.
🖥️ The configuration dashboard
After activating Transport Booking and completing the initial setup, you will see the Global Configuration dashboard. From this centralized location you can configure system-wide settings, booking behavior, transport-related options, labels, URLs, and other essential settings at a glance.
📄 PDF Configuration
Manage PDF-related settings from a single place. These options allow you to customize PDF appearance, branding, colors, ticket download permissions, and Terms & Conditions content for documents generated by Transport Booking.
⚙️ Options
| Option | Description |
|---|---|
| PDF Background Image | Optionally add a custom background image or watermark layer to PDF pages to enhance their visual appearance and reinforce your brand identity. |
| PDF Logo | Upload or select a custom logo image to display in the header of generated PDF documents and provide consistent branding across your downloadable documents. |
| User Role for Ticket Download | Choose the WordPress user roles that are permitted to download transport tickets. Only users with the selected roles can access the ticket download functionality. |
| PDF Logo Height | Define the maximum height of the PDF logo in pixels (px) to ensure proper sizing and layout within generated PDF documents. |
| Background Color | Choose a custom background color for the PDF canvas to match your brand identity and maintain a consistent document appearance. |
| Text Color | Set the primary text color used for typography inside PDF documents to maintain readability and visual consistency. |
| Terms & Conditions Title | Enter a custom heading for the Terms & Conditions section that is displayed in the footer area of generated PDF documents. |
| Terms & Conditions Text | Provide the detailed terms, policies, disclaimers, or other legal information displayed in the Terms & Conditions section of generated PDF documents. |
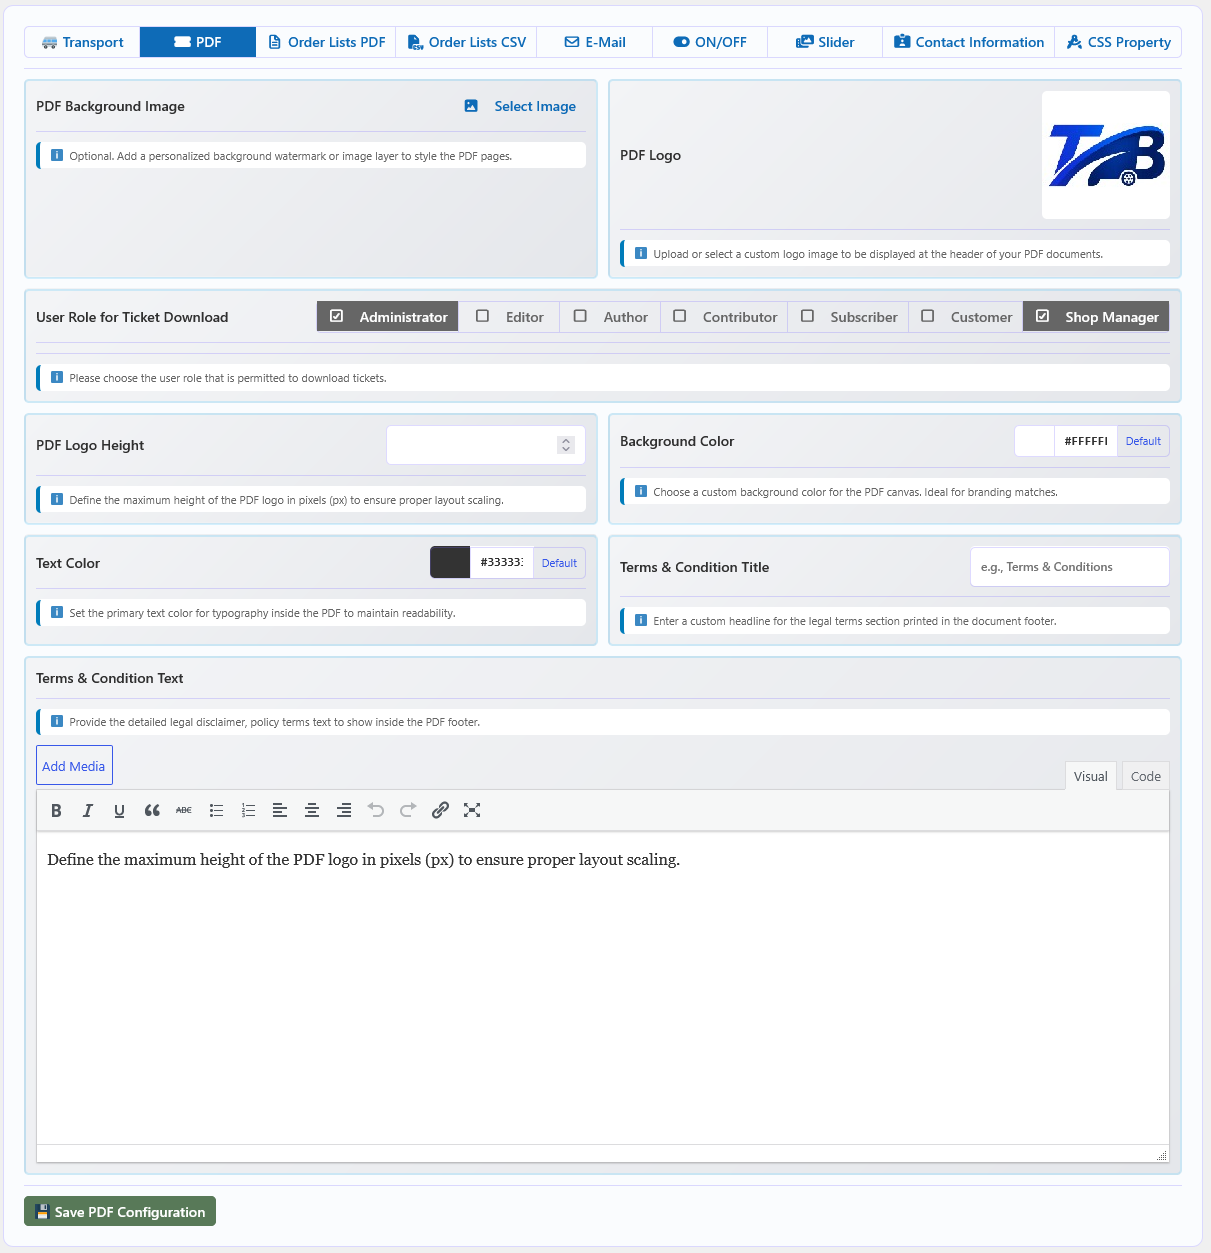
📑 Order Lists PDF Configuration (PRO)
The Order Lists PDF Configuration section lets you control which information appears in the Transport Booking Order Lists PDF. Enable or disable individual fields such as company details, booking information, passenger details, route information, pricing, payment method, order status, and Terms & Conditions for complete control over the generated documents.
🏢 Company & Branding
| Field | Description | Default |
|---|---|---|
| Company Address | Display the official company address at the top of the PDF. | ON |
| Company Logo | Display the official company logo at the top of the PDF. | ON |
| Booking Summary | Display the booking summary section at the top of the PDF. | ON |
🧾 Order & Post Information
| Field | Description | Default |
|---|---|---|
| Post ID | Show or hide the related Post ID inside the PDF. | OFF |
| Post SKU | Show or hide the Post SKU in the Booking List PDF. | OFF |
| Transport Type | Display or hide the transport item category/type in the PDF. | OFF |
| Order ID | Display the WooCommerce Order ID in the PDF. Disable this option to hide or mask the Order ID. | ON |
| Transport Name | Display the Transport Name associated with the booking. | ON |
| Order Date | Display the original order date in the Booking List PDF. | OFF |
| Order Status | Display the current order status and related status details in the PDF. | ON |
🚌 Journey & Route Information
| Field | Description | Default |
|---|---|---|
| Duration | Display the total journey duration in the PDF. | ON |
| Boarding Point | Display the selected boarding point for the booking. | ON |
| Boarding Time | Display the scheduled boarding time. | ON |
| Arrival Point | Display the arrival point of the journey. | ON |
| Arrival Time | Display the scheduled arrival time. | ON |
| Pickup Point | Display the selected pickup point when available. | ON |
| Pickup Time | Display the scheduled pickup time. | ON |
| Drop-off Point | Display the selected drop-off point. | ON |
| Drop-off Time | Display the scheduled drop-off time. | ON |
🎟️ Ticket & Booking Details
| Field | Description | Default |
|---|---|---|
| Ticket Info | Show or hide ticket information associated with the booking. | ON |
| Additional Services | Include or exclude additional services/add-ons selected for the booking. | ON |
| Client Info | Include general customer/client information in the generated Booking PDF. | ON |
💰 Pricing & Payment Information
| Field | Description | Default |
|---|---|---|
| Price Info | Control the visibility of total pricing information in the PDF. Disable this option to generate PDFs without showing pricing details. | ON |
| Billing Information | Display or hide the customer's complete billing information. | OFF |
| Payment Method | Display the payment method used for the booking. Disable this option to generate the PDF without payment method details. | ON |
📜 Terms & Conditions
| Field | Description | Default |
|---|---|---|
| Terms & Condition | Display the configured Terms & Conditions block on the final page of the PDF. | ON |
⚙️ Configuration Behavior
- ON — The selected information will be included in the generated Order Lists PDF.
- OFF — The selected information will be excluded from the generated Order Lists PDF.
- Flexible PDF Output — Enable only the information required for your business to create cleaner, more focused PDF documents.
- Privacy Control — Sensitive information such as billing details, customer information, pricing, and order information can be controlled independently.
- Save Configuration — After changing the required options, click Save Order Lists PDF Configuration to apply the settings.
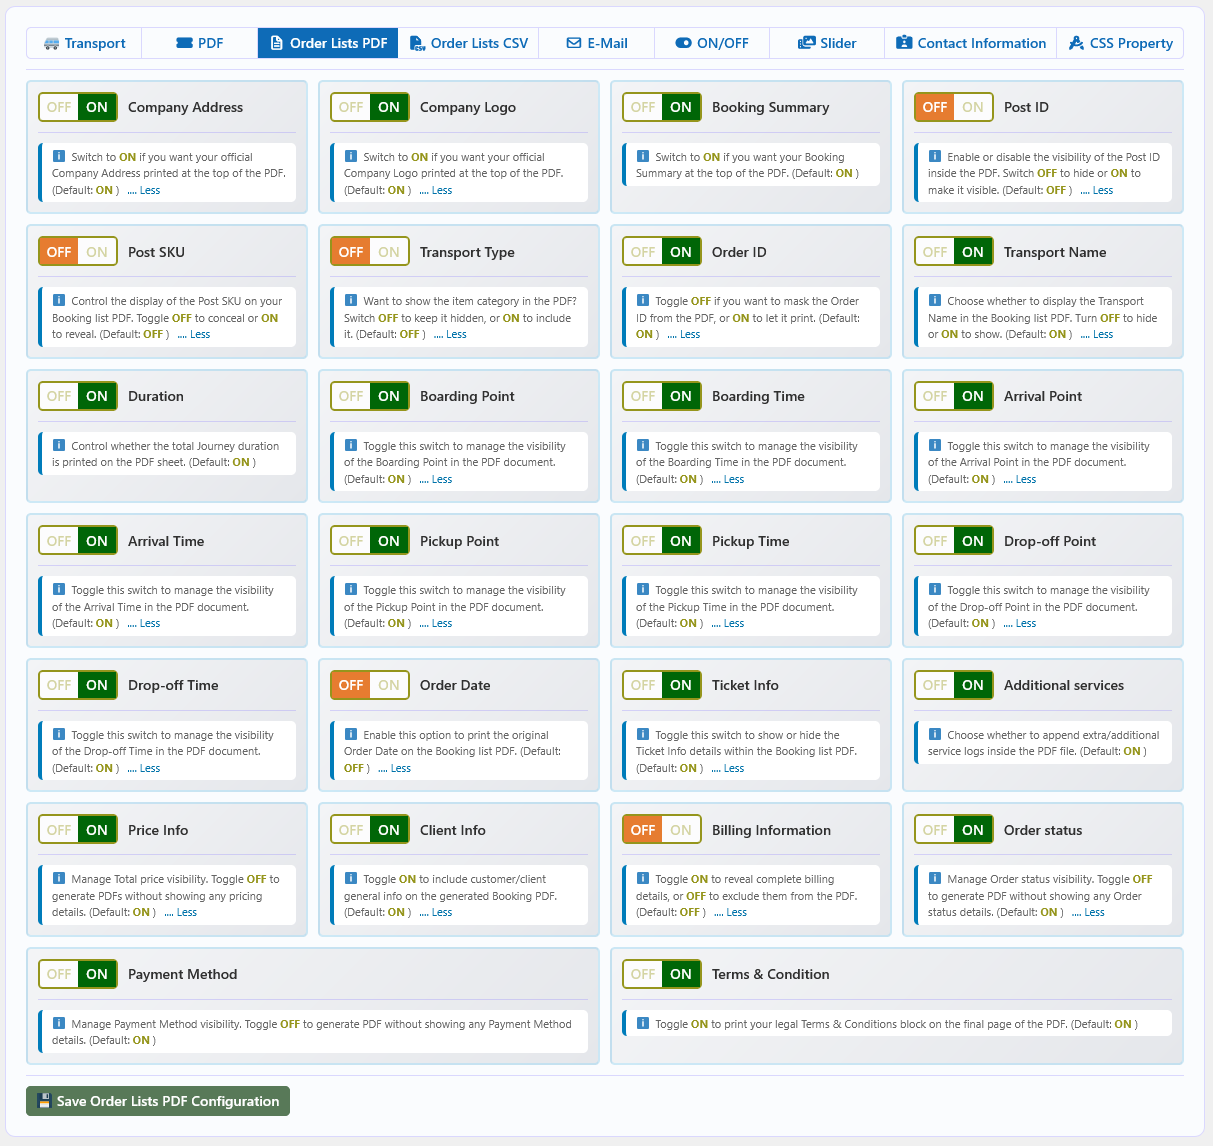
📑 Order Lists CSV Configuration (PRO)
The Order Lists CSV Configuration section lets you control which information is included in the Transport Booking Order Lists CSV file. Enable or disable individual fields such as order information, transport details, route information, ticket details, pricing, customer information, payment method, billing information, and order status for flexible control over the exported data.
🧾 Order & Transport Information
| Field | Description | Default |
|---|---|---|
| Order ID | Display the WooCommerce Order ID in the exported CSV file. | ON |
| Transport Name | Display the Transport Name associated with the booking. | ON |
| Post ID | Show or hide the related Post ID in the CSV file. | ON |
| Post SKU | Display the Post SKU associated with the booking. | ON |
| Transport Type | Include the transport item category/type in the exported CSV file. | ON |
| Order Date | Display the original order date in the Order Lists CSV file. | ON |
| Order Status | Include the current order status in the exported CSV file. | ON |
🚌 Journey & Route Information
| Field | Description | Default |
|---|---|---|
| Start Point | Display the starting point of the journey in the CSV file. | ON |
| Start Time | Display the scheduled start time of the journey. | ON |
| Boarding Point | Display the selected boarding point for the booking. | ON |
| Boarding Time | Display the scheduled boarding time. | ON |
| Arrival Point | Display the arrival point of the journey. | ON |
| Arrival Time | Display the scheduled arrival time. | ON |
| Pickup Point | Display the selected pickup point when available. | ON |
| Pickup Time | Display the scheduled pickup time. | ON |
| Drop-off Point | Display the selected drop-off point. | ON |
| Drop-off Time | Display the scheduled drop-off time. | ON |
| Duration | Display the total journey duration in the CSV file. | ON |
🎟️ Ticket & Booking Details
| Field | Description | Default |
|---|---|---|
| Ticket Info | Include ticket information associated with the booking in the CSV file. | ON |
| Additional Services | Include additional services or add-ons selected for the booking. | ON |
👤 Customer & Billing Information
| Field | Description | Default |
|---|---|---|
| Client Info | Include general customer/client information in the exported CSV file. | ON |
| Billing Information | Include the customer's complete billing details in the CSV file. | ON |
💰 Price & Payment Information
| Field | Description | Default |
|---|---|---|
| Price Info | Control the visibility of pricing information in the CSV file. Disable this option to export booking data without pricing details. | ON |
| Payment Method | Include the payment method used for the booking in the exported CSV file. | ON |
⚙️ Configuration Behavior
- ON — The selected field will be included in the generated Order Lists CSV file.
- OFF — The selected field will be excluded from the generated Order Lists CSV file.
- Flexible Export — Enable only the fields required for your operational, reporting, or administrative needs.
- Data Privacy — Disable customer, billing, pricing, or payment-related fields when those details are not required in the exported file.
- Save Configuration — After adjusting the required options, click Save Order Lists CSV Configuration to save and apply your settings.
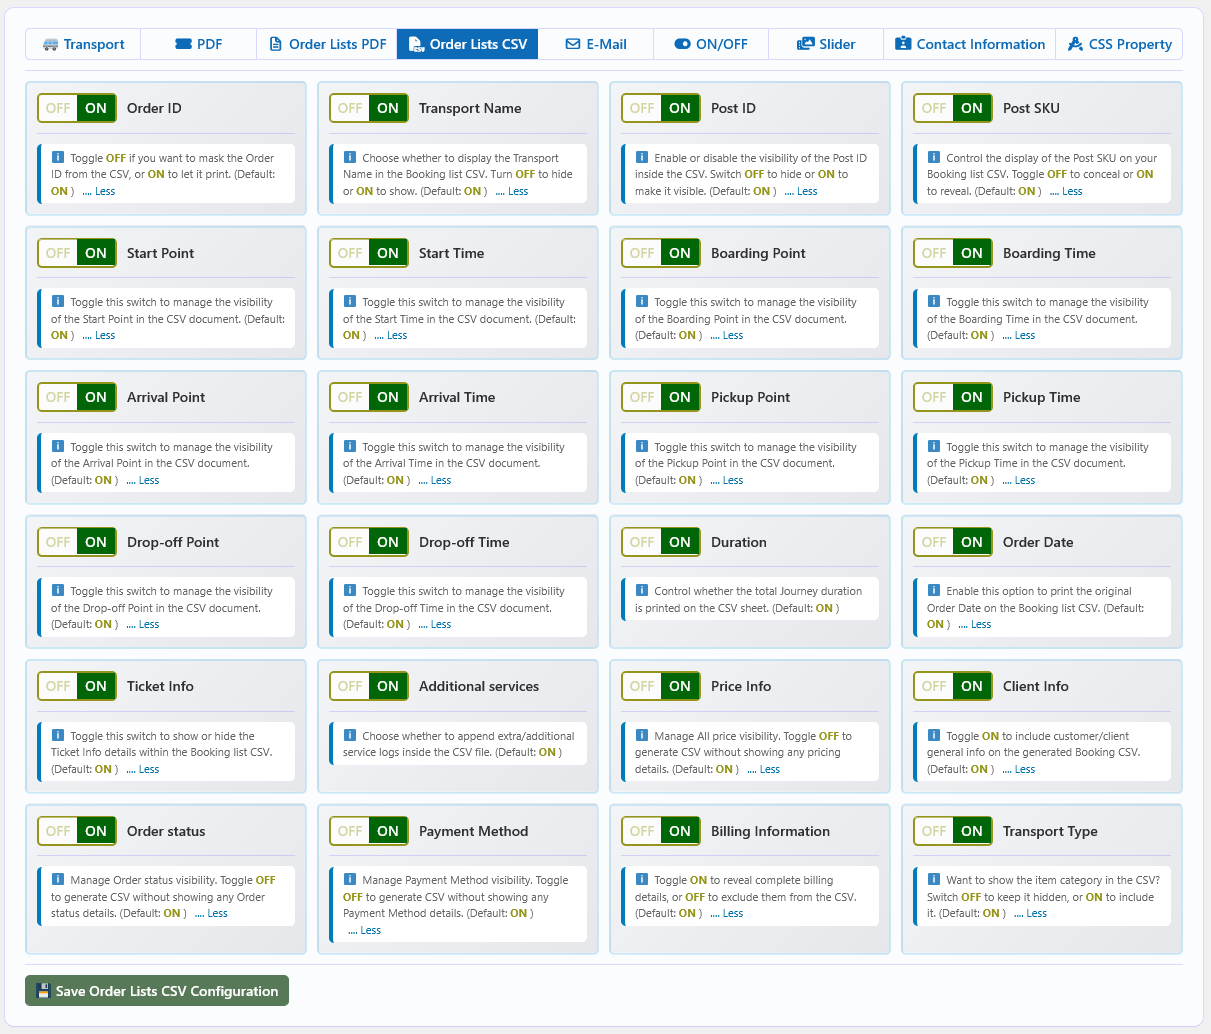
📧 E-Mail Configuration
The E-Mail tab (PRO) controls automated booking notifications, PDF ticket attachments, email templates, order-status triggers, and sender information. All settings on this page apply site-wide.
⚙️ Overview
Transport Booking Pro can send automated emails to customers whenever a booking is placed or its status changes. Each email can include a PDF ticket attachment. The email body supports template shortcodes that are replaced with real booking data at send time. Separate shortcodes are available for the initial email and for re-sent emails.
📝 Settings
| Option | Description |
|---|---|
| Send Mail | Enable or disable automated email notifications for bookings. Turn ON to send booking emails, or turn OFF to disable them. Default: ON. |
| Send PDF | Choose whether the generated PDF ticket should be attached to the booking email. Turn ON to attach the PDF ticket, or turn OFF to send the email without the PDF attachment. Default: ON. |
| Target Order Statuses | Select the order statuses that should trigger the automated booking email. Available statuses: Pending Payment, Processing, On Hold, Completed, Cancelled, Refunded, Failed, and Draft. |
| Mail Subject | Enter a custom subject line for customer booking emails. If left blank, the site title is used as the default email subject. |
| Admin Notification Email | Enter an email address where the administrator should receive a notification when a new booking or order is placed. This can also be used to receive a copy of the booking PDF ticket or notification. |
| Mail From Name | Enter the sender name displayed in outgoing booking emails. If left blank, the plugin uses the configured fallback or site information. |
| Mail From Email | Enter the email address used as the sender address for outgoing booking emails. Use a valid address for reliable delivery. |
🔤 Mail Content Shortcodes
Use the following shortcodes in the Mail Content field to display actual booking data in the customer email. The plugin replaces each shortcode with the corresponding information when the email is sent.
| Shortcode | Description |
|---|---|
#post_name | Displays the transport name. |
#client_name | Displays the customer or traveller name. |
#order_id | Displays the order ID. |
#order_date | Displays the order date. |
#status | Displays the order status. |
#payment | Displays the payment method. |
#booking_details | Displays the booking details. |
#ticket_details | Displays the ticket details. |
#bill_info | Displays the billing information. |
#price_details | Displays the total price details. |
🔁 Re-send Mail Content Shortcodes
Use the same shortcodes in the Re-send Mail Content field to display booking data when an existing booking email or ticket is re-sent. The plugin replaces these shortcodes with the corresponding booking information at re-send time.
| Shortcode | Description |
|---|---|
#post_name | Displays the transport name. |
#client_name | Displays the customer or traveller name. |
#order_id | Displays the order ID. |
#order_date | Displays the order date. |
#status | Displays the order status. |
#payment | Displays the payment method. |
#booking_details | Displays the booking details. |
#ticket_details | Displays the ticket details. |
#bill_info | Displays the billing information. |
#price_details | Displays the total price details. |
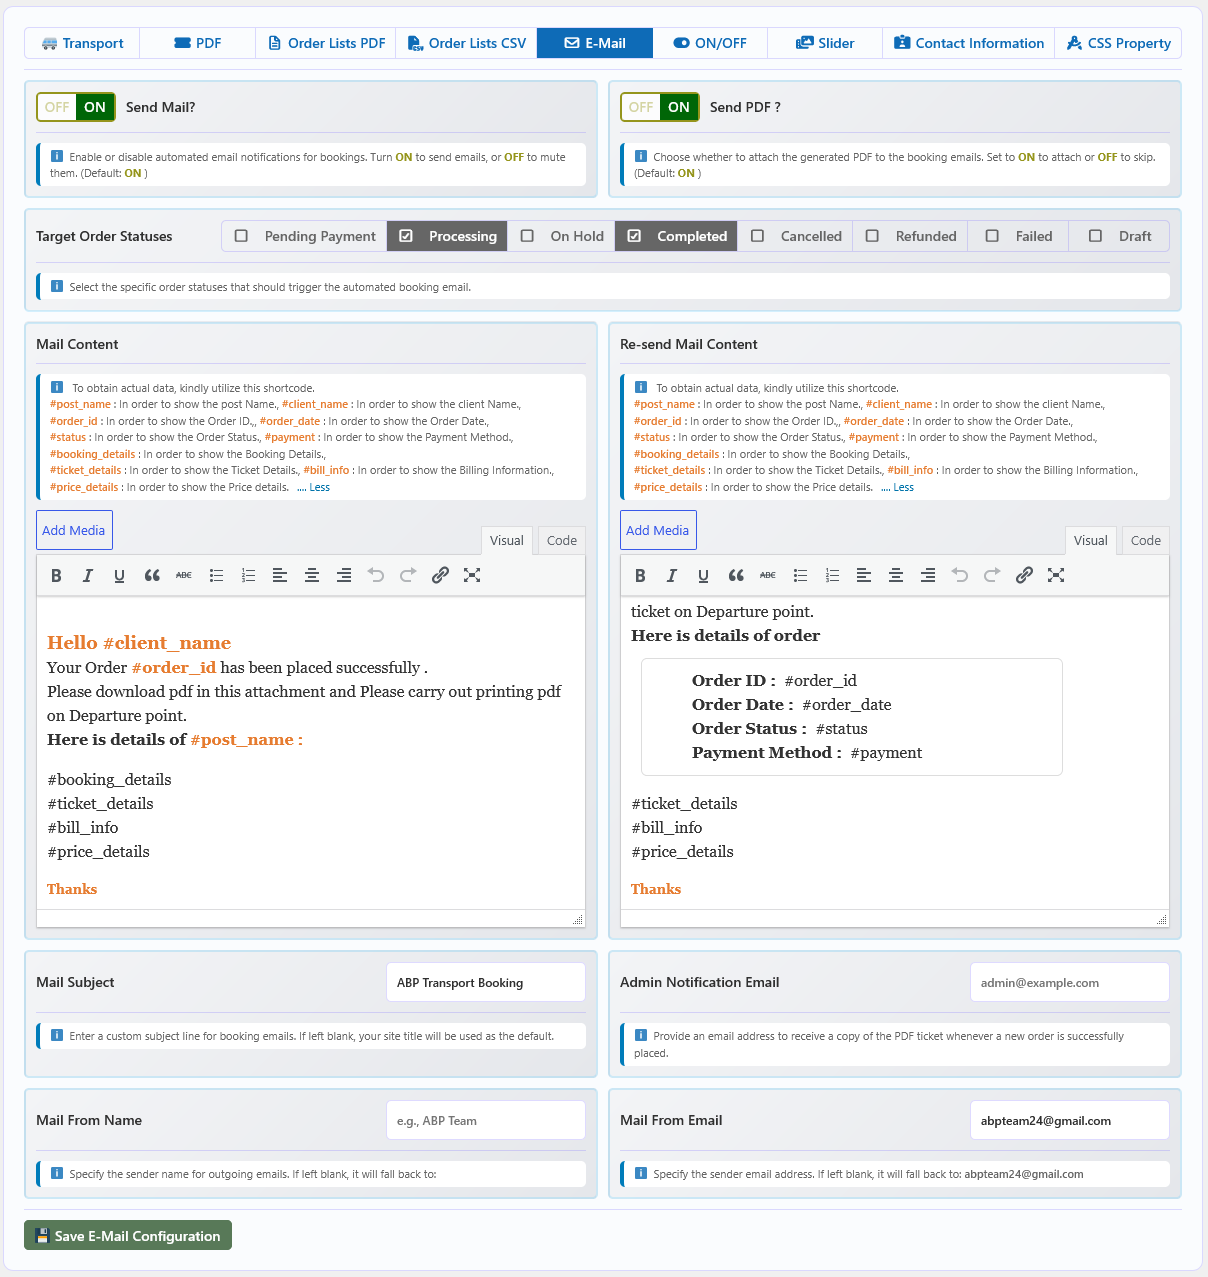
⚙️ Feature On/Off Configuration
The On/Off tab lets you control individual Transport Booking features globally. Turn a feature ON to enable it or OFF to disable it site-wide.
🔄 Overview
Transport Booking includes a wide range of features that can be independently enabled or disabled from a single control panel. Disabling a feature hides its fields, settings, and frontend output without affecting other functionality. Every toggle can be re-enabled at any time.
📝 Feature Toggles
| Option | Description |
|---|---|
| Post SKU | Controls the Post SKU feature. Turn OFF to disable the SKU field and related SKU options throughout the website. When disabled, SKU will not be required or generated for posts. |
| Transport Icon | Controls the Transport Icon feature. Turn OFF to completely disable Transport Icon options and related settings from the website. |
| Transport Sub Title | Controls the Transport Sub Title feature. Turn OFF to disable the Transport Sub Title field and its related options throughout the website. |
| Transport Description | Controls the Transport Description feature. Turn OFF to disable the Transport Description field and its related functionality across the website. |
| Organizer | Controls the Organizer feature. Turn OFF to completely disable Organizer options and related settings from the website. |
| Capacity / Available Qty | Controls the display of transport capacity and available quantity. When enabled, capacity information can be managed and displayed individually for each transport. |
| Route Direction | Controls the Route Direction feature. Turn OFF to disable route direction information across the frontend of the website. |
| Brand | Controls the Transport Brand feature. Turn OFF to disable Brand options and related Brand fields throughout the website. |
| Feature | Controls the Transport Feature option. Turn OFF to disable the Transport Feature field and its related options from the website. |
| Transport Type | Controls the Transport Type feature. Turn OFF to disable the Category, Transport Type, and related fields throughout the website. |
| Related Post | Controls the Related Posts feature. Turn OFF to disable Related Posts so they are no longer displayed on transport details pages. |
| Features | Controls the Features option. Turn OFF to disable the Features field and its related settings throughout the website. |
| Multiple Ticket Type | Controls the Multiple Ticket Type feature. Turn OFF to disable multiple ticket types and their related settings across the website. |
| Seat Plan | Controls the Seat Plan feature. Turn OFF to disable Seat Plan functionality for all transports. You can re-enable it at any time. |
| Transport Return | Controls the Transport Return feature. Turn OFF to disable return transport functionality and related options. Turn ON to enable return transport again. |
| Min & Max Qty | Controls the minimum and maximum quantity feature. Turn OFF to disable Transport Min & Max Quantity settings across the website. |
| Attendee Form | Controls the Attendee Form feature globally. Disable it to turn off the attendee form for all transports. Enable it to allow transport-specific attendee forms. |
| Same Attendee | Controls the Same Attendee feature globally. Disable it to turn off the feature for all transports. Enable it to allow the same attendee information to be reused where applicable. |
| Multiple Pickup/Drop-Off Point | Controls the Multiple Pickup/Drop-Off feature. Turn OFF to disable multiple pickup and drop-off points and their related settings across the website. |
| Additional Services | Controls the Additional Services feature. Turn OFF to disable additional services and their related settings throughout the website. |
| Term & Conditions | Controls the Terms & Conditions feature. Turn OFF to disable the Terms & Conditions field and related options from the website. |
| FAQ | Controls the FAQ feature. Turn OFF to disable the FAQ feature and remove its related options from the website. |
| Seasonal Discount | Controls Seasonal Pricing for individual transports. When enabled, seasonal pricing rules can be configured for each transport and applied according to their assigned date ranges. |
| Global Seasonal Discount | Controls the Global Seasonal Discount feature. When enabled, a global seasonal discount rule can be applied across the website according to the configured hierarchy and rule settings. Turn OFF to disable global seasonal discounts site-wide. |
| Early Bird Discount | Controls Early Bird Pricing for individual transports. When enabled, customers who book a specified number of days in advance can automatically receive discounts based on the configured Early Bird pricing rules. |
| Global Early Bird Discount | Controls the Global Early Bird Discount feature. When enabled, a global early bird discount rule can be applied across the website according to the configured pricing hierarchy and rules. |
| QR Code | Controls the QR Code feature for PDF Tickets. Turn ON to enable QR Code generation for PDF tickets, or turn OFF to disable QR Codes site-wide. |
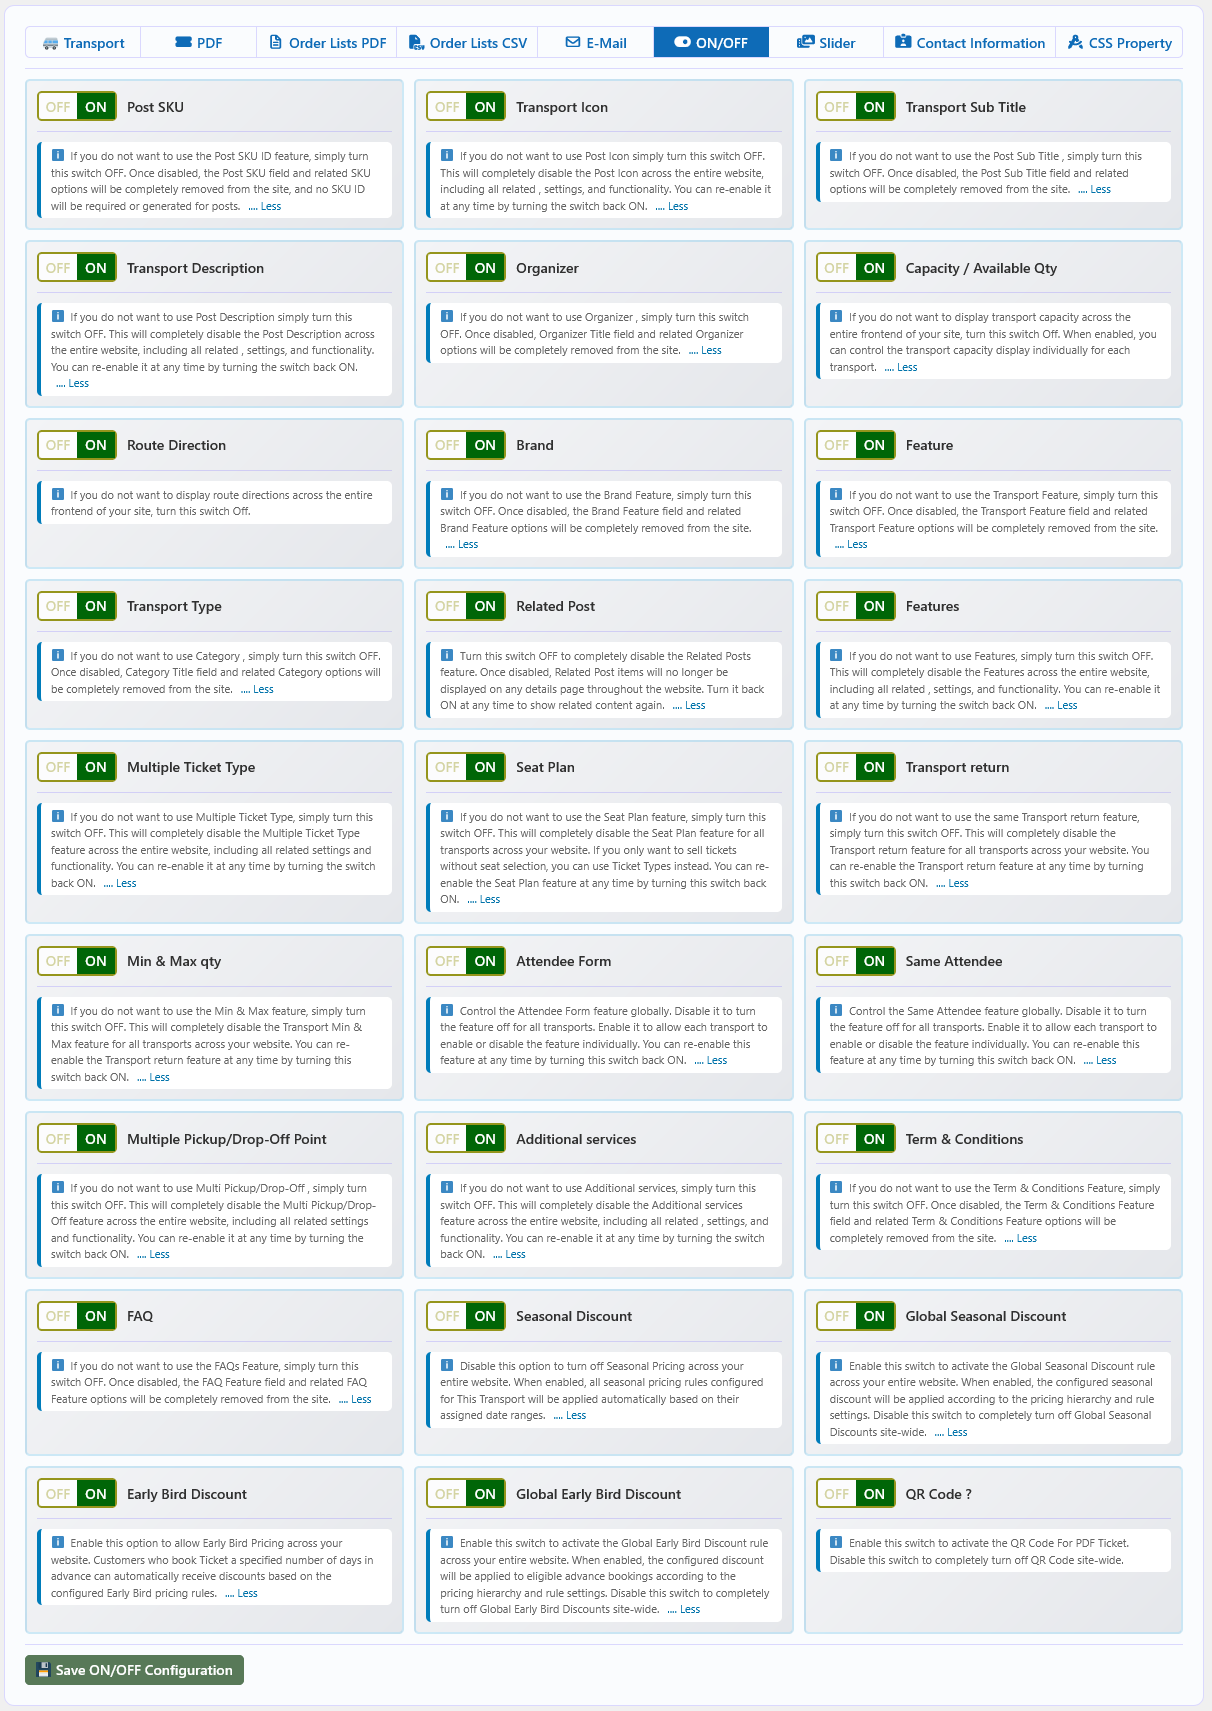
🖼️ Slider Configuration
The Slider tab controls the homepage transport slider, including theme style, indicators, showcase position, and popup behaviour. All settings apply to the transport slider on the frontend.
🔄 Overview
Transport Booking includes a configurable homepage slider that displays transport images in a carousel format. You can enable or disable the slider, choose a theme, control indicator and showcase visibility, and configure popup options for an enhanced browsing experience.
📝 Slider Settings
| Option | Description | Default |
|---|---|---|
| Slider/Thumbnail | Turn the slider switch ON to display the slider, or OFF to show only the thumbnail. | ON |
| Slider Theme | Choose the visual theme style for the slider. | — |
| Visible Indicator | Control indicator visibility. Turn OFF to hide the indicator, or ON to show it. | ON |
| Indicator Type | Select the slider indicator type. | Default Icon |
| Visible Showcase | Control showcase visibility. Turn OFF to hide the showcase, or ON to show it. | ON |
| Showcase Position | Select the position of the slider showcase. | Right |
| Visible Popup | Control popup slider visibility. Turn OFF to hide the popup slider, or ON to show it. | ON |
| Popup Image Indicator | Control the popup image indicator. Turn OFF to hide it, or ON to show it. | ON |
| Popup Icon Indicator | Control the popup icon indicator. Turn OFF to hide it, or ON to show it. | ON |
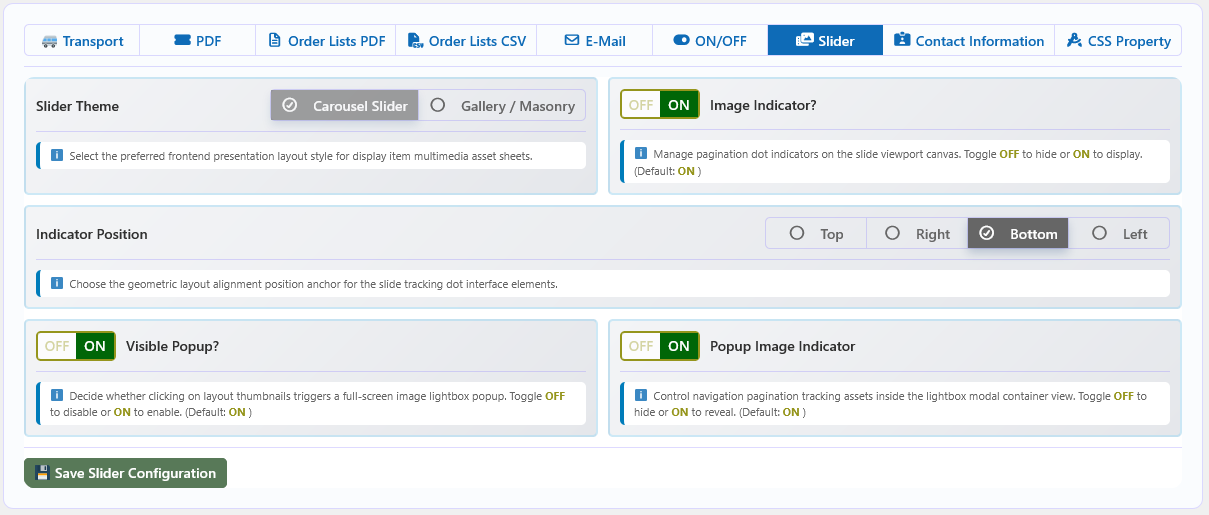
☎️ Contact Information Configuration
The Contact tab is where you enter your company's contact details — name, address, phone number, and email address. These values are displayed on the frontend wherever contact information is shown.
🔄 Overview
Transport Booking pulls contact information from this panel to display on the frontend. Fill in each field with your company's current details so customers can reach you directly.
📝 Contact Fields
| Field | Description |
|---|---|
| Company Name | Enter the name of your company. |
| Address | Enter the full address of your company. |
| Contact Number | Enter your company's phone number. |
| Enter your business email address. |
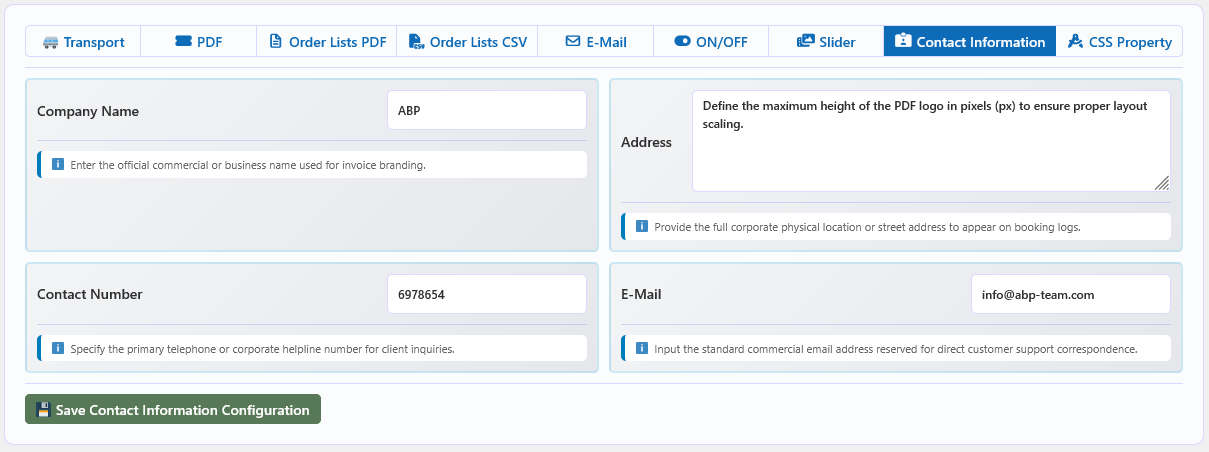
🎨 CSS Value Configuration
The CSS tab lets you customise colours, font sizes, border radius, and other visual properties for the Transport Booking frontend. These values apply to the transport section area only — not the full site.
🎨 Colour Settings
| Option | Description |
|---|---|
| Base Color | Choose the base colour for Transport Booking elements. |
| Alternate Color | The text colour used when the backdrop colour is the base colour, or alternately. |
| Default Color | Select the default text colour. |
| Button Text Color | Select the button text colour. |
| Button Background Color | Select the button background colour. |
| Warning Color | Select the warning colour used for alerts and notices. |
| Section Background Color | Set the background colour for the section area. |
🔤 Typography & Layout
| Option | Description | Default |
|---|---|---|
| Default Border Radius | Enter the default border radius in PX units. | — |
| Default Font Size | Enter the default font size in PX units. | — |
| Font Size h1 | Enter the H1 font size in PX units. | 35px |
| Font Size h2 | Enter the H2 font size in PX units. | 30px |
| Font Size h3 | Enter the H3 font size in PX units. | 25px |
| Font Size h4 | Enter the H4 font size in PX units. | 20px |
| Font Size h5 | Enter the H5 font size in PX units. | 17px |
| Font Size h6 | Enter the H6 font size in PX units. | 15px |
| Label Font Size | Enter the label font size in PX units. | 14px |
| Button Font Size | Enter the button font size in PX units. | 13px |
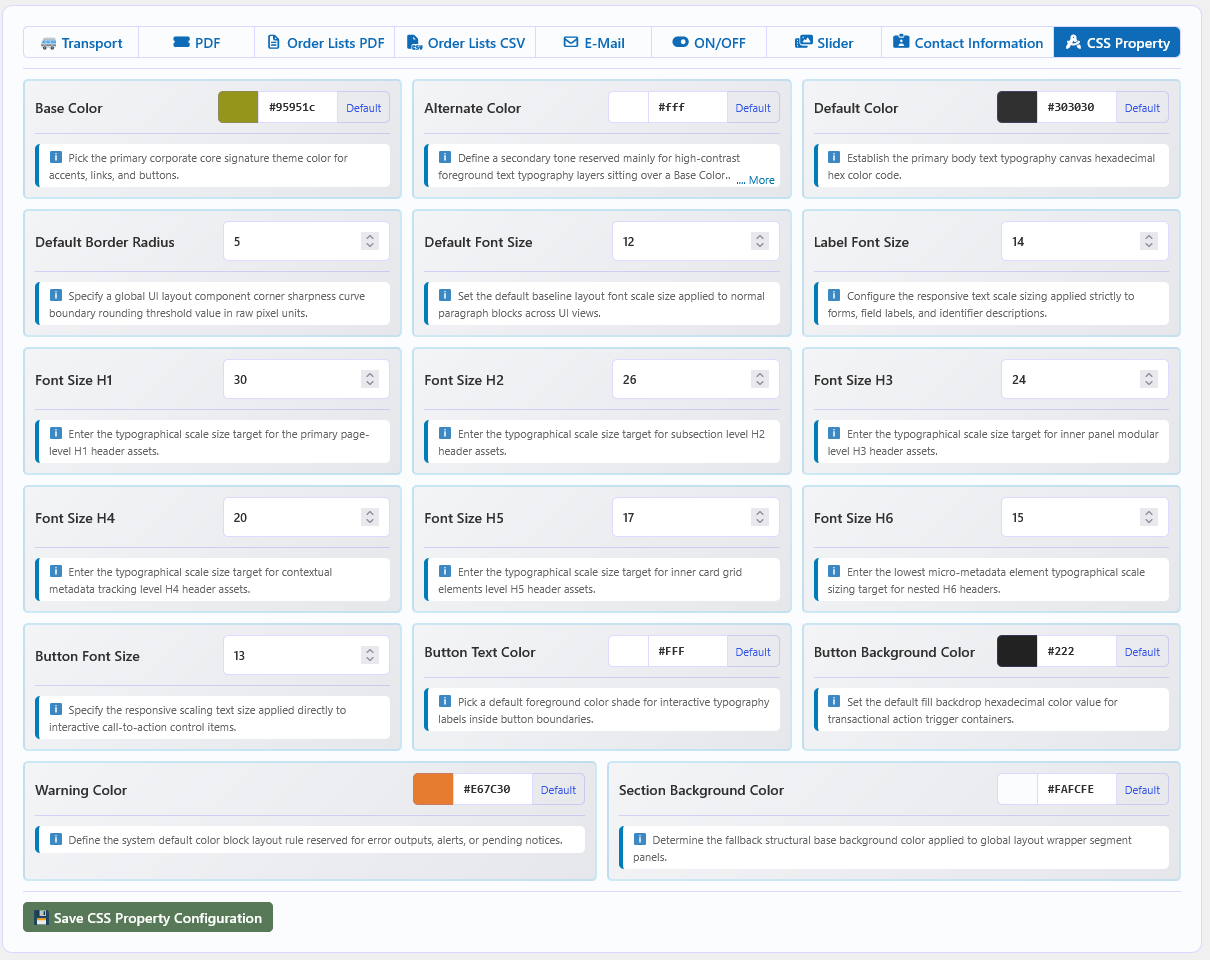
👤 Customer My Account — Transport Bookings
Customers can view every transport booking they made from the WooCommerce My Account page, and PRO adds a Download Booking PDF button and a Request Cancellation option for each booked journey.
A Transport Bookings menu item is added automatically next to the standard WooCommerce Orders section. The page lists the logged-in customer's bookings newest first, with pagination, using the same booking data the admin Order List uses.
📋 What the Customer Sees
Each booking card shows:
- Transport name and order reference number with creation date.
- Booking status chip (processing, completed, cancelled, and so on).
- Route (from — to), boarding point, dropping point, and approximate journey time.
- Ticket types with quantities and the booking total.
- Seat number and additional services when configured.
👤 Where It Appears
The list is rendered on the WooCommerce account page endpoint
/my-account/abptb-bookings/. It shows bookings tied to the customer's account — bookings
made while logged in are linked to the customer automatically.
📄 Download Booking PDF (PRO)
For bookings in a booked status (processing / completed), PRO shows a Download Booking PDF button. It downloads the order/invoice PDF for that booking. Customers can only download PDFs for their own bookings — the download is verified against the booking owner before the file is generated.
❌ Request Cancellation (PRO)
A Request Cancellation button is shown for booked journeys that still begin more than the configured time limit away, and that do not already have a pending request.
- Sending a request marks the booking as Cancel Request Pending for the customer.
- The request is stored on the booking record, and the admin is notified via a Cancel Requested badge in the Order List.
- The customer cannot send another request while one is pending, and cannot request cancellation after the configured deadline.
⚙️ Admin-Controlled Settings (PRO)
The entire cancellation flow is controlled by the administrator — there is no direct cancellation:
| Where | Setting |
|---|---|
| Configuration → On/Off Features | Customer Cancel Request switch turns the feature on or off site-wide. |
| Global Data → Cancel Request (new tab) | Set how long before the journey starts a request can still be sent, in Hours or Days (default 24 hours). The customer sees the button only while the journey starts more than this limit away. |
🛡️ Approving / Rejecting Requests (PRO)
In Transport Booking → Orders, a booking with a pending request shows a Cancel Requested badge with two actions:
| Action | Result |
|---|---|
| Approve (✔) | The booking is cancelled (status changes to Cancelled) and its seats/tickets immediately become available again for other customers to book. |
| Reject (✖) | The cancellation request is cleared and the booking keeps its current status. |
Only administrators can approve or reject requests, and both actions are logged on the booking record (by whom and when).
🔑 License Management
The License card (PRO) in the Dashboard sidebar manages your Transport Booking Pro license key and tracks the trial period. This is where you activate your purchased key, deactivate it when moving sites, and see the current license state at a glance.
🎯 Overview
Transport Booking Pro runs on a 30-day trial immediately after activation. During the trial every PRO feature, including automated E-mail and PDF tickets, is fully enabled. To keep using the PRO features beyond the trial — and to unlock automatic plugin updates and premium support — you need to activate a valid license key.
🔑 License states
The badge next to the card title shows the current state:
| State | Description |
|---|---|
| Active | A valid key is activated on this site. All PRO features, automatic updates and premium support are enabled. |
| Trial | No key has been activated yet. E-mail and PDF features stay enabled until the 30-day trial expires. |
| Expired | The trial ended or the activated license expired. E-mail and PDF features are disabled until a valid key is activated. |
| Inactive | No license data exists on this site yet. |
🔑 Activating a license key
- Buy the license — Purchase Transport Booking Pro from the official abp-team.com store and copy your key from the license section of your account.
- Open the Dashboard — Go to ABP Transport Booking → Dashboard in the WordPress admin and find the License card in the sidebar.
- Enter the key — Paste the key (format
XXXXXXXX-XXXXXXXX-XXXXXXXX) into the License Key field. - Activate — Click Activate License. The plugin contacts the license server and stores the license on your site.
- Confirm — A confirmation message appears and the card switches to Active, showing the expiry date, activation date and the site the key is locked to.
🔑 Deactivating a license key
- Open ABP Transport Booking → Dashboard and find the License card in the sidebar.
- Click Deactivate License. The stored key is removed from this site and the activation slot is freed.
- The site returns to the trial state (if trial time remains) for continued testing.
⚙️ Fields
| Field | Description |
|---|---|
| License Key | The activation key for Transport Booking Pro. Read-only once a key is active. |
| Activate License | Validates the entered key against the license server and activates it on this site. |
| Deactivate License | Removes the license from this site and frees the activation slot. Shown only while a key is active. |
| Status | Shows the current state — Active, Trial, Expired or Inactive. |
| Expires | The date the activated license expires. Keep renewing before this date to avoid interruption. |
| Activated | The date the key was activated on this site. |
| Site | The website URL the key is locked to. |
✅ Prerequisites for automatic updates
Automatic update checks for Transport Booking Pro are handled by the license subsystem and are only polled while a license is active. To receive new versions reliably:
- Keep a valid, non-expired license active on your live site.
- Make sure your server can reach the license server (HTTPS outbound connections).
- Renew before the expiry date so updates and support are never interrupted.
Shortcodes
Transport Booking provides shortcodes that let you display transport listings, booking interfaces, ticket retrieval, and image galleries anywhere on your website — pages, posts, widgets, or other supported WordPress areas.
🔄 Overview
Each shortcode supports a set of parameters for controlling layout, filtering, item count, and frontend display. Parameters can be combined to create customised transport listing and booking pages tailored to your requirements.
🚌 Booking Shortcode
The [abptb-booking] shortcode displays the Transport Booking interface. Use it to create a
dedicated booking page where customers can browse available transports and proceed with the booking process.
You can show all transports or filter by a specific transport, category, or location.
| Parameter | Description | Default |
|---|---|---|
style | Layout style of the transport listing. Options: grid, list, masonry. Example: [abptb-booking style="list"] | grid |
post_id | Display a specific transport post. When used, other filtering parameters are ignored. Example: [abptb-booking post_id="123"] | — |
cat_id | Filter transports by category ID. Example: [abptb-booking cat_id="1"] | — |
loc_id | Filter transports by location ID. Example: [abptb-booking loc_id="2"] | — |
bp & dp | Filter transports by route. Values are location IDs. Example: [abptb-booking bp="2" dp="3"] | — |
org_id | Filter transports by Organizer ID. Example: [abptb-booking org_id="2"] | — |
brand_id | Filter transports by Brand ID. Example: [abptb-booking brand_id="2"] | — |
show | Number of transports to display. Example: [abptb-booking show="12"] | 9 |
column | Number of columns (grid layout only). Example: [abptb-booking column="4"] | 3 |
When a listing shortcode is rendered, ABP Transport Booking also fires the
abptb_post_filter action just above the list. That action loads the
Frontend Taxonomy Filter Bar (see the Features guide). The bar shows
Category, Brand, Organizer and Location dropdowns; each one is shown only when its
on/off toggle is enabled in the shortcode defaults, so the visitor sees exactly the
filters they are allowed to use. Selecting a value filters the transports on the page.
🔍 Frontend Taxonomy Filter Bar
When a listing shortcode is rendered, ABP Transport Booking also shows a toolbar of filter dropdowns just above the transport list. Each dropdown (Category, Brand, Organizer, Location) can be independently turned on or off.
| Parameter | Description | Default |
|---|---|---|
category | Toggle the Category dropdown on/off. | "on" |
brand | Toggle the Brand dropdown on/off. | "off" |
organizer | Toggle the Organizer dropdown on/off. | "off" |
location | Toggle the Location/Stops dropdown on/off. | "on" |
💡 Tip: set any of these to a value other than "on" (e.g. "" or "off") to hide that filter from the frontend.
📋 Listing Shortcode
The [abptb-post] shortcode displays a transport listing anywhere on your website. It is useful for
creating dedicated transport listing pages with different layouts and filtering options. You can display all
transports or limit results by transport, category, or location.
| Parameter | Description | Default |
|---|---|---|
style | Layout style of the transport listing. Options: grid, list, masonry. Example: [abptb-post style="list"] | grid |
post_id | Display a specific transport post. When used, other filtering parameters are ignored. Example: [abptb-post post_id="123"] | — |
cat_id | Filter transports by category ID. Example: [abptb-post cat_id="1"] | — |
loc_id | Filter transports by location ID. Example: [abptb-post loc_id="2"] | — |
bp & dp | Filter transports by route. Values are location IDs. Example: [abptb-post bp="2" dp="3"] | — |
org_id | Filter transports by Organizer ID. Example: [abptb-post org_id="2"] | — |
brand_id | Filter transports by Brand ID. Example: [abptb-post brand_id="2"] | — |
show | Number of transports to display. Example: [abptb-post show="12"] | 9 |
column | Number of columns (grid layout only). Example: [abptb-post column="4"] | 3 |
🎫 Ticket Retrieval Shortcode
The [abptb-ticket] shortcode lets customers securely retrieve their booking and ticket information
using their Order ID or Ticket PIN. Customers can view booking details and download the corresponding ticket
as a PDF.
- Retrieve booking information using Order ID.
- Retrieve ticket information using Ticket PIN.
- View customer and booking details.
- Display ticket and journey information.
- Download the ticket as a PDF.
- Provides an easy way for customers to access their ticket after booking.
🖼️ Gallery Shortcode
The [abptb-gallery] shortcode displays transport images in a gallery or slider layout anywhere on your
website. You can show images for a specific transport or filter the gallery by category and location.
| Parameter | Description | Default |
|---|---|---|
style | Gallery display style. Options: gallery, slider. Example: [abptb-gallery style="slider"] | gallery |
post_id | Display images for a specific transport post. Example: [abptb-gallery post_id="123"] | — |
cat_id | Filter gallery images by category ID. Example: [abptb-gallery cat_id="1"] | — |
loc_id | Filter gallery images by location ID. Example: [abptb-gallery loc_id="2"] | — |
column | Number of images per row (gallery mode only). Example: [abptb-gallery column="4"] | 3 |
Template Override System
Transport Booking provides a flexible template override system that lets you customise the frontend structure, layout, styling, and other template elements to match your website's requirements.
🛠️ Template Override
To start customising the plugin templates, copy the tb_templates folder from the Transport
Booking plugin directory and paste it into your wp-content directory. Once the custom template
folder is detected, Transport Booking loads the customised template files instead of the corresponding
default plugin templates.
📁 Customise Only the Required Templates
You do not need to keep every template file in the copied folder. Keep only the files you actually want to customise and remove any unnecessary files. This allows the plugin to continue using its default templates for all other sections and makes future template maintenance easier.
🔄 Plugin Updates & Template Overrides
Custom template files are not automatically updated when Transport Booking is updated. If a new plugin version introduces changes to the default templates, compare your overridden files with the latest plugin templates and update your customisations when necessary.
⚠️ Development Requirements
- Basic knowledge of WordPress template structure is recommended.
- Basic PHP and HTML knowledge may be required for template customisation.
- Make changes carefully and test customised templates after plugin updates.
- Always keep a backup of your customised templates before making major changes.
🌐 Translation
Transport Booking is fully translation-ready and can be translated using any WordPress translation plugin that supports standard WordPress translation files. For the easiest workflow, we recommend using Loco Translate.
🔤 Translate Transport Booking
Follow these steps to create a translation for your preferred language using Loco Translate:
- Install Loco Translate — Go to Plugins → Add New, search for Loco Translate, then install and activate the plugin.
- Open the plugin — Navigate to Loco Translate → Plugins and select Transport Booking.
- Create a translation — Choose an existing language or click New language to create a translation for your preferred language, then select the appropriate translation location and create the translation file.
- Sync and translate — Click Sync to load the latest translatable strings from the plugin, translate the required strings, and click Save.
🔄 Updating Translation Strings
When Transport Booking is updated and new translatable strings are added, open the corresponding translation in Loco Translate and click Sync to update the translation catalog. You can then translate any newly added or modified strings and save the changes.
💡 Translation Notes
- Transport Booking uses standard WordPress translation functions and is translation-ready.
- Plugin interface text and other registered translatable strings can be translated through Loco Translate or another compatible translation plugin.
- Dynamic content entered by administrators, such as transport names, route names, ticket names, and custom descriptions, may require separate translation depending on how the content is created and displayed.
- Documentation content is not automatically translated through the plugin's translation files.
🛡️ Keep Your Translations Safe
To prevent translations from being overwritten during plugin updates, avoid storing customised translation files directly inside the plugin's own directory. Use the custom or system-protected translation location provided by Loco Translate whenever possible.
Try a different search term.